VLC Media Player Sound Not Working? Here’s What to Do
VLC is an adaptable and widely used media player that supports countless media files. However, some users encounter issues where the audio does not work. This audio error can occur from several factors, from incorrect settings within the player to file compatibility issues. In this post, we will provide potential solutions to fix the VLC media player sound not working. Understanding these issues is essential to troubleshooting and ensuring smooth media playback. If you want to learn these workable solutions, keep reading this post!

PAGE CONTENT
- Part 1. Why is Player Sound Not Working
- Part 2. Unmute VLC in Device Sound System
- Part 3. Turn On Audio in VLC
- Part 4. Restore to Default the VLC Preferences Settings
- Part 5. Disable Enhancements for VLC
- Part 6. Update VLC to the Recent Version
- Part 7. Convert Audio Files or Codecs
- Part 8. Check System Audio Settings and Hardware
- Part 9. Best Alternative to VLC Media Player
- Part 10. FAQs about VLC Media Player Sound Not Working
Part 1. Why VLC Player Sound Not Working
Before we get into the potential solutions, let us first understand why VLC sound fails. There are times you encounter issues where the sound on VLC isn’t working. In actuality, there could be several reasons why there’s no sound from VLC media player. One of the common reasons is incorrect audio settings within the VLC media player itself. This includes muted volume or misconfigured output devices. Additionally, system-level issues can also lead to sound problems. File-specific issues, such as unsupported audio codecs or corrupted files, might prevent audio playback. Lastly, hardware issues can also cause VLC to play videos without sound. Understanding these causes is essential for resolving sound issues in VLC.
Part 2. Unmute VLC in Device Sound System
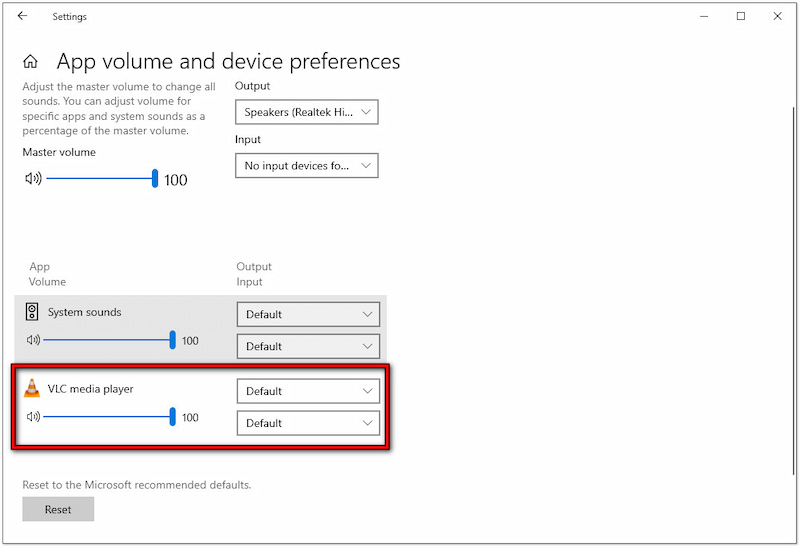
The first solution when VLC audio is missing is to check your device’s sound system settings. This step is often overlooked, but it can quickly resolve sound issues. Simply open the App volume and device preferences on your settings. Ensure the VLC’s volume slider is not set to low or mute. In case muted or set to low, increase volume to the appropriate level.
Step 1. Open the Settings app on your Windows operating system.
Step 2. Under the Sound Mixer Options, select App volume and device preferences.
Step 3. If VLC’s volume is muted or set to low, drag the slider to increase the volume.
Part 3. Turn On Audio in VLC
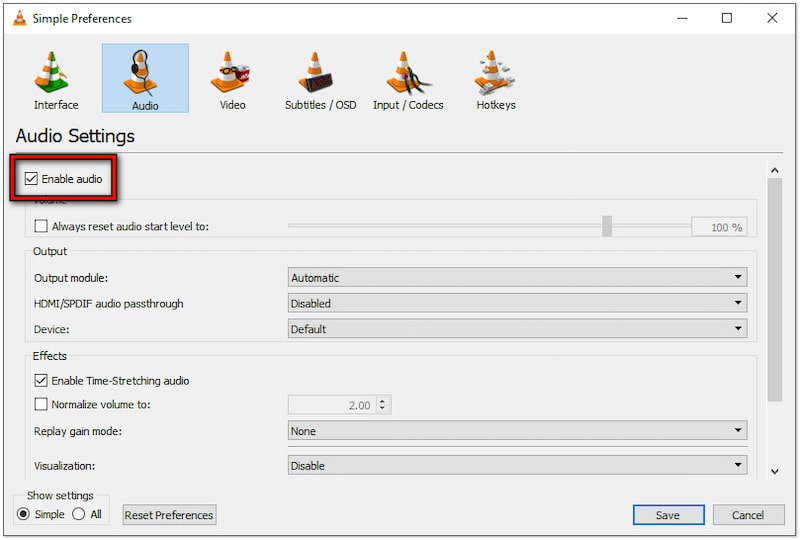
An alternative solution when VLC player sound is not working is to check the media player’s audio settings. Sometimes, the audio settings within VLC might be turned off unintentionally. Software updates can alter this internal setting, leading to audio being turned off.
Step 1. Access the Audio tab and ensure the Mute option is not turned off.
Step 2. Press Ctrl+P to access Preferences and switch to the Audio tab.
Step 3. If you find the Enable Audio option is unchecked, turn it on.
Part 4. Restore to Default the VLC Preferences Settings
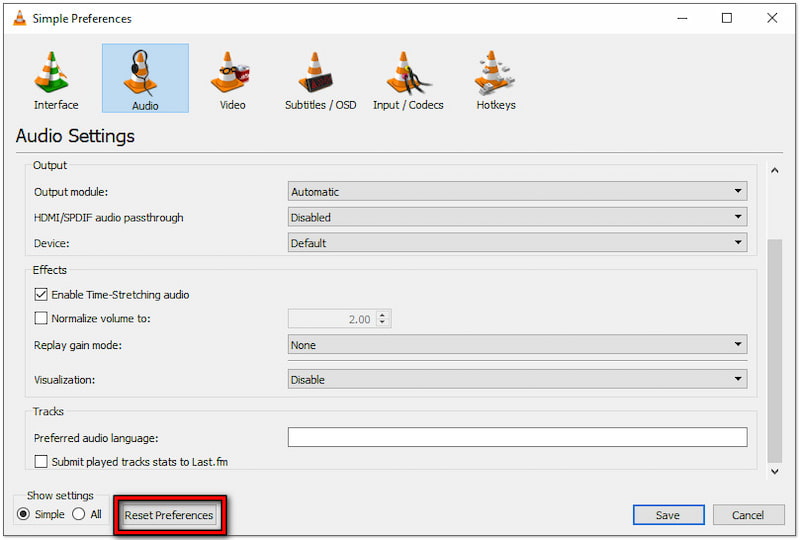
Another step is to restore VLC’s Simple Preferences settings to their default state. Restoring the preferences to the default state can fix a VLC media player sound error. This method will revert the incorrect configurations to their original defaults, including audio delay.
Step 1. In VLC’s Simple Preferences settings, switch to the Audio tab.
Step 2. Click the Reset Preferences button to revert all configured settings.
Part 5. Disable Enhancements for VLC
A further method when VLC is not playing sound is to turn off audio enhancements. Some audio enhancements applied at the system level can interrupt audio playback. Disabling this option can ensure that audio is not being modified in ways that prevent proper playback.
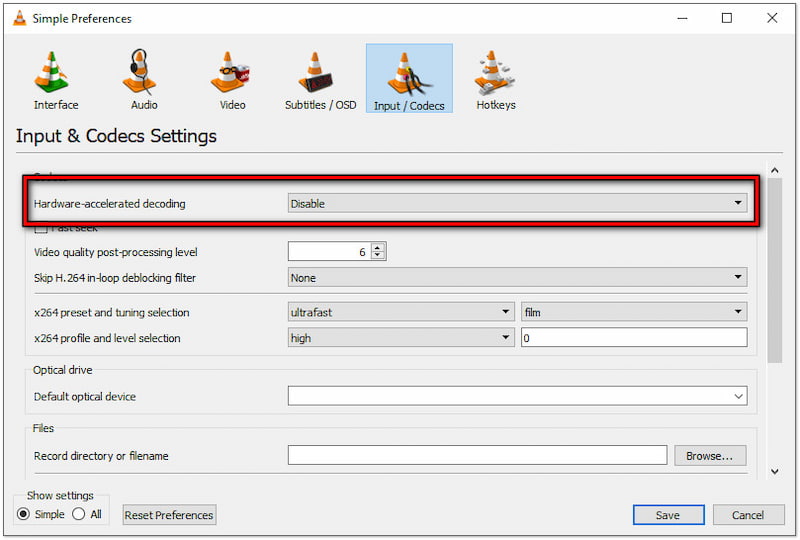
Step 1. Navigate to the Input / Codecs tab in VLC’s Simple Preferences settings.
Step 2. In the Hardware-accelerated decoding option, select Disable from the menu.
Part 6. Convert Audio Files or Codecs
As a next measure, consider checking the audio file or codecs you’re trying to play. This is essential if the VLC audio problem is specific to certain media files. Although VLC can handle countless formats, some codecs/containers can cause audio errors. For instance, you can convert CAF to AAC to resolve the issue, as VLC doesn’t support this format.
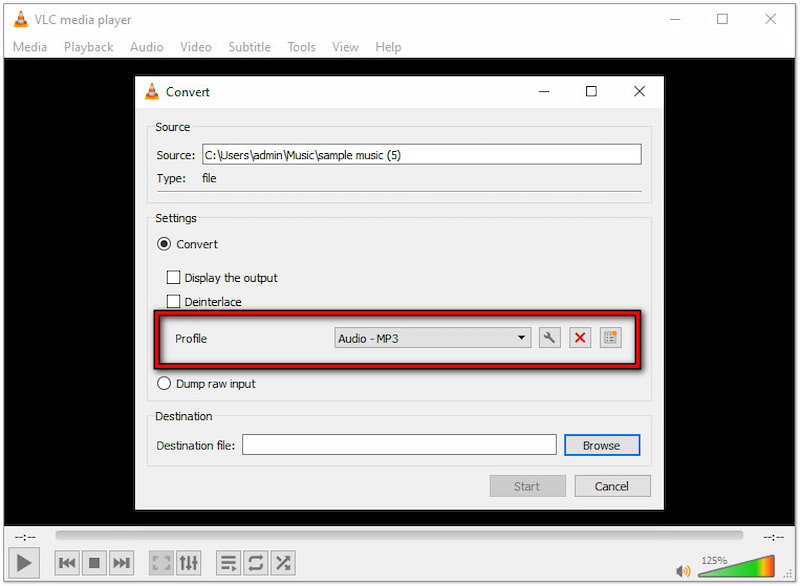
Step 1. Select the Convert/Save option in VLC’s Media tab.
Step 2. Add the unsupported file or codec in the next window.
Step 3. In the Profile field, choose a format from the selection.
Part 7. Update VLC to the Recent Version
If you have completed the previous solutions and still have no sound from VLC media player, try updating it to the newest version. The developers release updates frequently to improve the media player’s performance, enhance compatibility with various media files, and fix bugs. These issues can be resolved in a newer version.
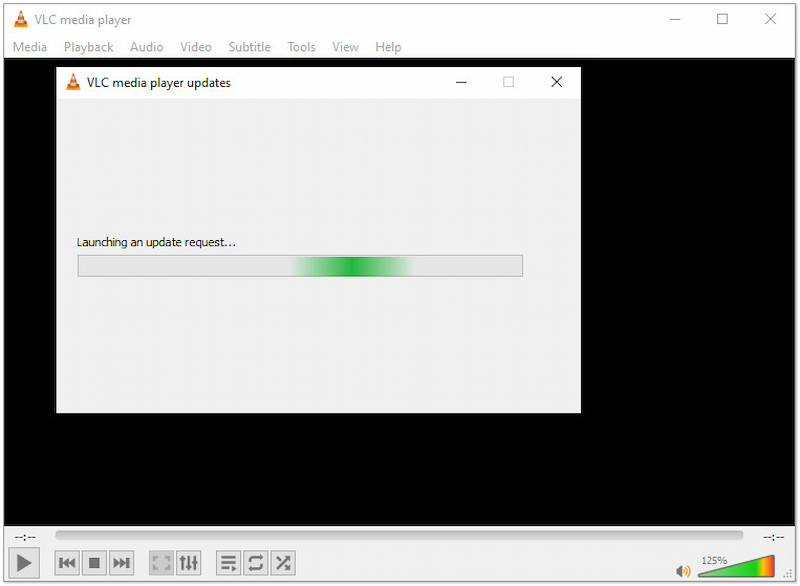
Step 1. Head to the Help menu and click the Check for Updates option.
Step 2. VLC will launch an update request. If there’s any, download it.
Part 8. Check System Audio Settings and Hardware
Finally, make sure that audio settings are correctly configured and the hardware is functioning properly. Sometimes, the problem lies not within VLC but in the system setup or hardware. So, it is important to rule out these possibilities. Additionally, consider updating or reinstalling your audio drivers, as outdated and corrupted drivers can lead to sound issues.
Part 9. Best Alternative to VLC Media Player
Undoubtedly, VLC is an exceptional media player due to its extensive format support. However, it is not the only option available. If you still encounter VLC player sound is not working, Vidmore Player is worth considering. This powerful media player can perform better with specific file types or formats. It is an all-inclusive media player that can handle nearly all digital media files. Some of which are MP3, AAC, FLAC, WAV, M4A, AC3, and many more. Beyond digital media files, Blu-rays/DVDs, Folders, and ISO files are also supported. This makes it a versatile tool for playing various media files and ensuring it suits your specific preferences.
Step 1. Start by obtaining the free download of Vidmore Player. Install the media player software and allow the installation process to finish.
Step 2. Once the installation is complete, launch the Vidmore Player on your computer. Click the Open File button to add the audio file you want to play.

Step 3. After loading the file, the audio will then automatically play. Use the navigation control to Play, Pause, Stop, backward, and forward the media.

Part 10. FAQs about VLC Media Player Sound Not Working
Why is VLC on mute?
VLC may be on mute if the volume is turned down to zero. This happens when you accidentally click Mute or adjust the volume slider. Also, it can be muted through your system’s volume mixer, where it can be controlled from your desktop’s Master Volume.
Why does VLC convert with no audio?
This happens when there are issues with the audio codec during the conversion. If the selected output format does not support the audio codec, VLC will convert video without audio.
Why is VLC recording screen but no audio?
Recording screen with VLC without audio occurs due to incorrect audio input settings. Essentially, VLC must be configured to capture audio from the correct source. By default, VLC does not select an audio source, leading to screen recording but no audio.
Conclusion
Solving VLC media player sound not working issues requires a meticulous examination of internal and system settings. Identifying and dealing with these issues can restore VLC’s full functionality. If the issue is specific to certain media files, consider using an alternative media player. Fortunately, Vidmore Player can be your lifesaver in such instances. This versatile media player can handle audio files and codecs that VLC can’t.On top of that, it ensures a high-quality playback from various media files.

