Fix the Video Exposure Easily [with Detailed Information]
In the video, exposure is essential. The ideal exposure is one in which neither the shadows nor the highlights lose any information. In other words, the exposure makes the most of the camera's sensor's ability to record as much detail from the video as possible, including shadow and highlight detail. This article will define video exposure, long exposure video, double exposure video, and low exposure video. So you will have an idea about this topic. Additionally, you will discover how to fix your video exposure using an offline application. Read this article to learn how to fix your video's exposure immediately!

PAGE CONTENT
Part 1: What is Video Exposure
Double Exposure
The process of double exposure involves layering two different exposures or photographs on top of one another. A portion of both photos can be seen since the image overlay is not entirely opaque, creating an image that resembles a ghost. You may use double exposure to communicate your narrative in original and engaging ways. And it may be done with either a digital camera or an older film camera. In-camera or using editing software, double exposures can be produced in digital photography. The identical area of the film would need to be exposed twice if you were using actual film, with the second image superimposed on the first. Making a double-exposure video makes it more unique and aesthetic.
Long Exposure Video
Filming the movement typically involves long exposures. For instance, the image's background is sharp, while a moving object is blurred. When the camera follows the subject, the inverse can also be accomplished. Since long exposure photography aims to employ long exposure durations, like 30 seconds or even 2 minutes, low light circumstances (twilight or nighttime) are typically required. However, by using the correct set of filters, you may take long exposures in bright, sunny situations. For instance, taking long-exposure photographs of landscapes is beneficial while the sun is out. This way, the sky will become great, deep blue, and the photo will have more contrast.
Low Exposure Video
Low exposure on the video means decreasing the amount of light from your video. If your video is too bright, the best thing you need to do is lessen the light by adjusting the video’s brightness. Making a low video exposure is also good, especially if you prefer a semi-dark mode video to a brighter video.
Part 2: Best Application to Fix Video Exposure
1. Vidmore Video Converter
Do you have a video that has a problem with exposure? Worry no more. With the help of Vidmore Video Converter, you can fix your video exposure instantly. If you have a low-exposure video, you can adjust the brightness to make it brighter than the original. Also, you can make your bright video darker. This downloadable application lets you fix your video exposure by adjusting your video’s brightness, contrast, hue, and saturation using the Color Correction tool. Even changing the video exposure is hard; this application offers a hassle-free procedure with an easy-to-understand interface, which is perfect for all users, especially beginners.
Step 1: Install Vidmore Video Converter on your computer. You can click the download button below to access the application easily.
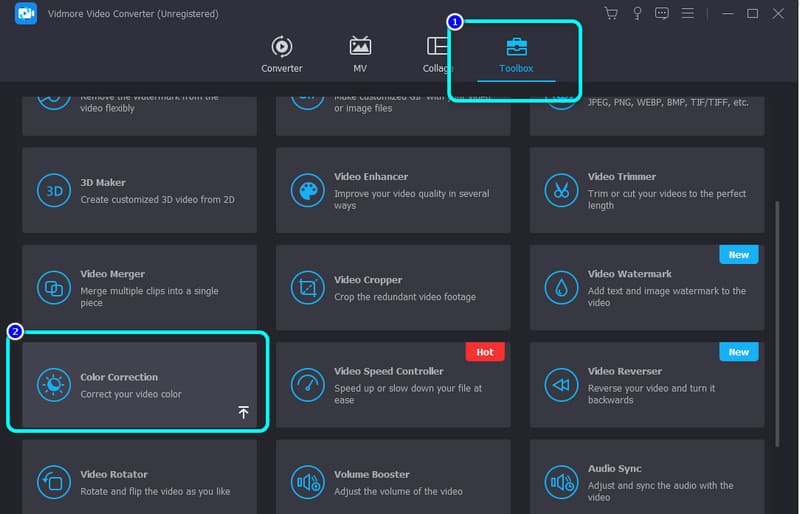
Step 2: Select the Toolbox panel on the upper interface and click the Color Correction tool.
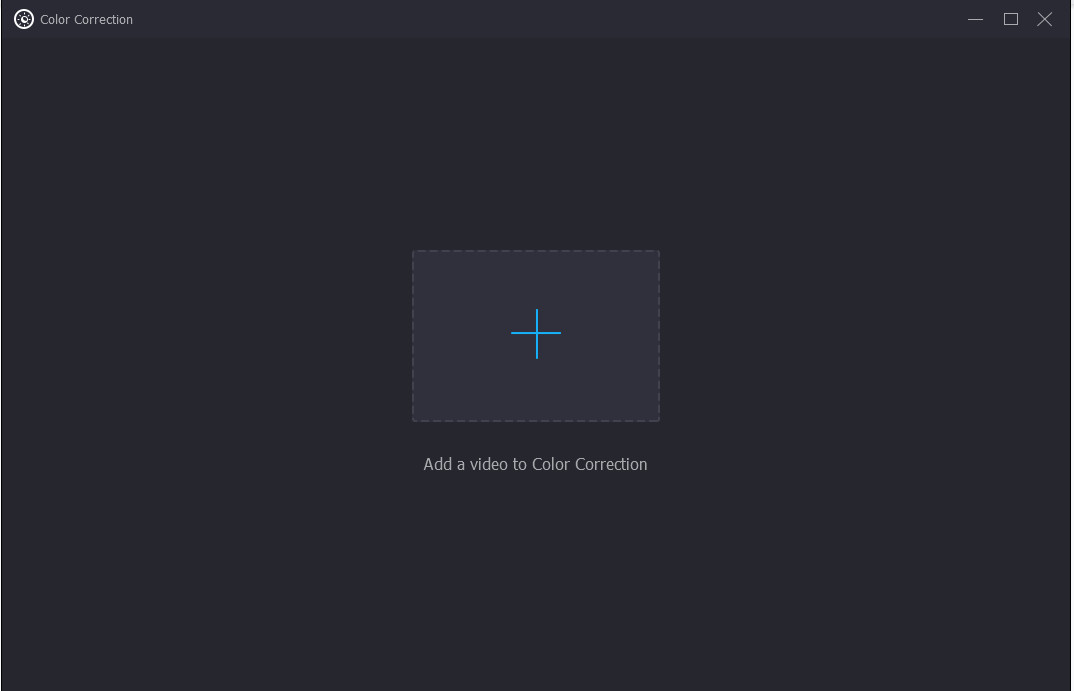
Step 3: When the new interface shows up on the screen, click the Plus icon to insert the video you desire to edit.
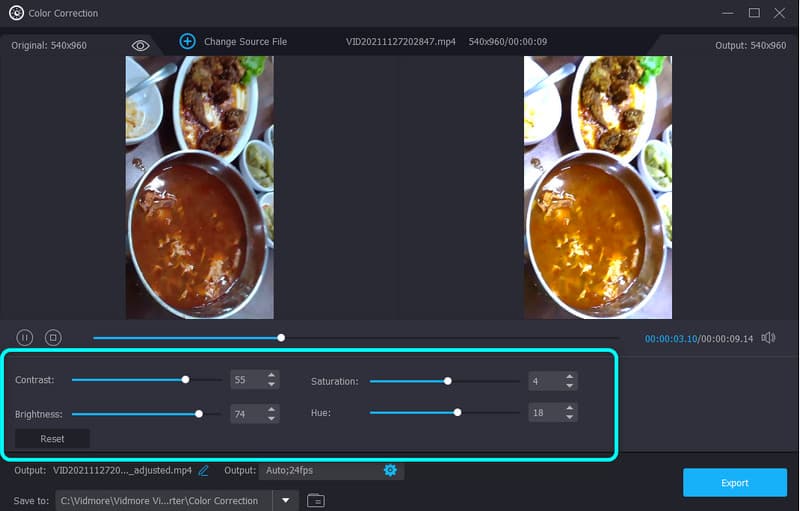
Step 4: In this part, you are allowed to fix the exposure of your video by adjusting the sliding bar of your video’s brightness, hue, saturation, and contrast.
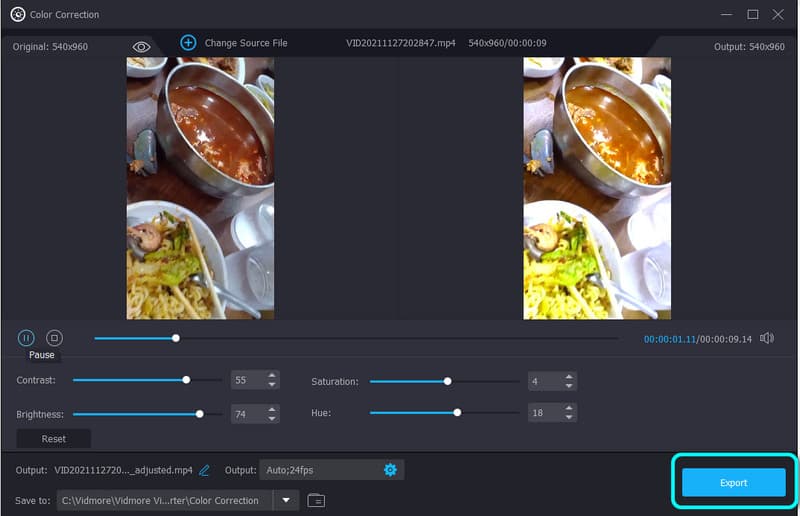
Step 5: Lastly, select the Export button to save your video with a fixed exposure.
2. Adobe Premiere Pro
In this part, you will learn about fixing video exposure problems in Premiere Pro. Many of these typical factors can be fixed with the use of various tools in Adobe Premiere. Little did we know exposure has a big role in a video. It gives extra impact, especially in getting the viewer’s attention. It gives emotions like happiness, sadness, madness, and more. Adobe Premiere is an application you can also use to fix video exposure. However, the free trial version of this application is only good for 7 days. After that, you need to buy the application, which is costly. It is also unsuitable for non-professional users because it has advanced editing tools that might confuse them.
Step 1: Import your video into Premiere Pro after shooting them. Your timeline should include the clip you want to enhance on top of the footage of your subject at the bottom.
Step 2: When you have all of your clips in their proper locations, go to the Effects Controls panel, click Opacity Settings, and then choose Blending Option > Screen.
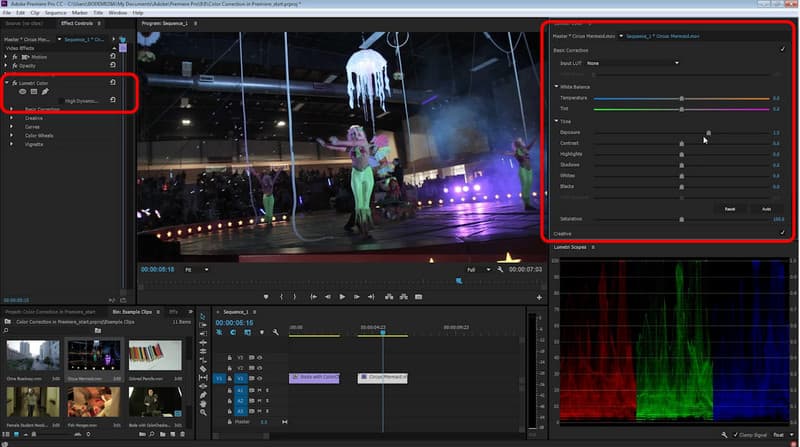
Step 3: Go to Lumetri Color Options and select the lowest clip of your subject. Exposure, contrast, curves, and saturation are just a few of the controls you can experiment with here. And there you go, the exposure of your video is fixed.
Part 3: FAQs about Video Exposure
1. What is the right exposure?
Finding the ideal exposure requires striking a balance. Overexposure results in overexposed highlights and photos that appear faded. Images that are underexposed are gloomy and difficult to see.
2. Why should I fix video exposure?
Fixing video exposure is essential. It helps you to create satisfying videos, especially for the viewers. If your video has annoying exposure, it has a possibility that viewers won't watch your videos.
3. How can I fix the exposure of my video?
Use Vidmore Video Converter. This application is capable of balancing the exposure of your video by adjusting the brightness, contrast, saturation, and hue.
Conclusion
As shown above, you have learned the definition of video exposure. At the same time, you discovered the methods on how to fix video exposure using your computer. So, if you want to balance your video exposure, use Vidmore Video Converter.
