Where Are Your Steam Game Screenshot Saved on Windows Mac and Linux
Steam is one of the most popular video game distribution platforms developed by Valve. There are oceans of games on the platform for players around the world. If you are a Steam user, you may know that you can take a screenshot on Steam while playing games by hitting the F12 key on your keyboard.
However, a lot of players asked where are Steam screenshots saved on forums.
That is why this article wish to tell you the basic knowledge related to Steam screenshot folder.

Part 1: Where is Steam Screenshot Folder
Method 1: Find Screenshots in Steam Client
The Steam client has a built-in Screenshot manager. It can open the folder that stores Steam screenshots directly. Moreover, it is available to both Windows and Mac.
Step 1: Open your Steam client and sign in your account.
Step 2: Go to the View menu on the top menu bar and choose Screenshots from list.
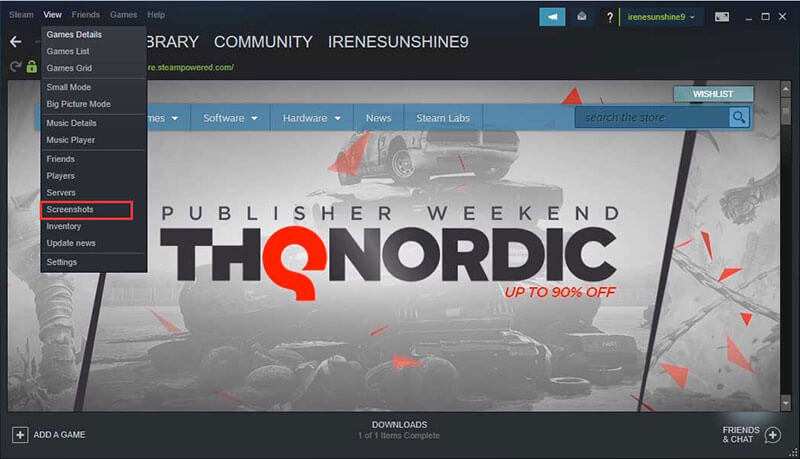
Step 3: Now, you can see all Steam screenshots as thumbnails. If you want to enter the Steam screenshot folder, click SHOW ON DISK button to open it immediately.
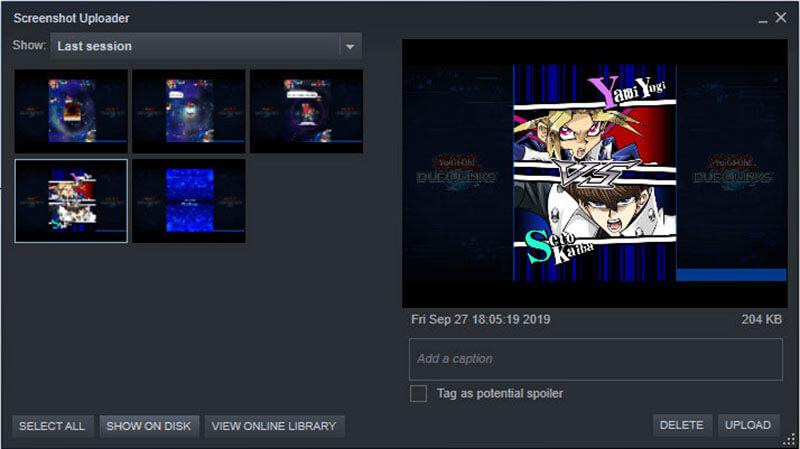
Note: You can manage Steam screenshots in the manager window directly, such as delete unwanted files.
For more details to take screenshots on Windows and Mac, you can visit it here.
Method 2: Find Screenshots by Directory
The more direct way to access Steam screenshot is to locate the folder on your hard disk directly. By default, your game screenshots will be saved to the directory where your Steam installed.
On PC: C:/ Program files (x86) /Steam/userdata/yourSteamID/760/remote/app–ID/screenshots.
On Mac: Users/Mac username/Library/Application Support/Steam.
On Linux: ~/.local/share/Steam.
Note: If you do not know your SteamID, open the Steam client, go to View menu, select Settings and then Interface. Check Display Steam URL address when available and hit OK. Then view your profile and the number at the end of the URL is your SteamID.
Tip: How to Change Steam Screenshot Folder
In fact, the best location to save Steam screenshot is not the default folder. Steam client is usually installed on your system disk. If you store too many large files on it, the performance of your device will slow down. Fortunately, it is not difficult to change Steam screenshot folder.
Step 1: Run the Steam client, go to the View menu and select Settings.
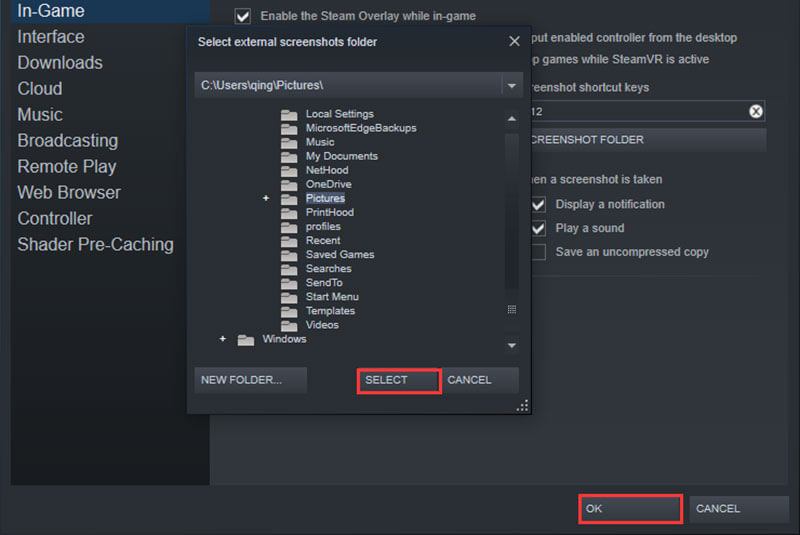
Step 2: Then head to the In-Game tab on the popup dialog, and click SCREENSHOT FOLDER button. Next, select an existing folder or create a new folder.
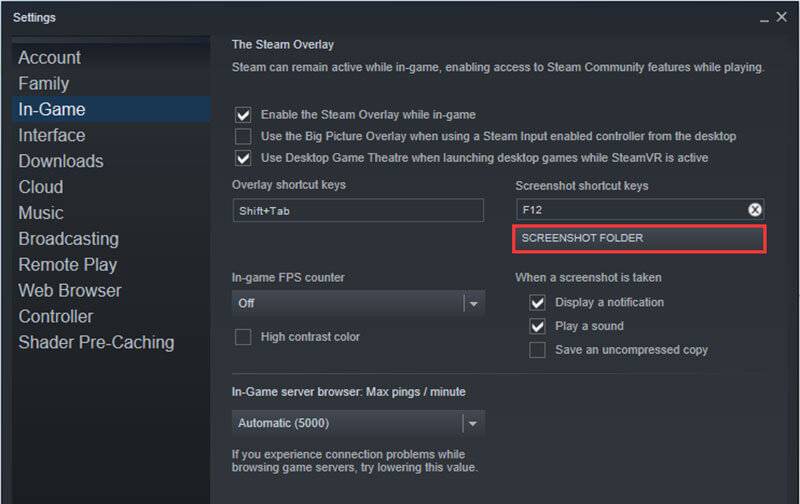
Step 3: Click SELECT button and then hit OK to confirm it. Now, your game screenshot will be saved to the new directory.
Note: In addition to Steam screenshot folder, you can also change the screenshot hotkey. Moreover, you can decide the notification of screenshot on the popup dialog.
Part 2: Best Alternative Way to Screenshot Steam
For gameplay screenshot, the built-in function is not a good option. It just takes a screenshot for your game, but not provides other function, like image editing. If you are looking for the best way to screenshot Steam game, try Vidmore Screen Recorder directly. It is an all-in-one solution to save important moment. More importantly, it is pretty easy to use and not requiring any technical skill.
Basic Features of the Best Steam Screenshot Tool
- Take a screenshot of Steam gameplay in one click.
- Free of charge and available to Windows and Mac.
- Edit screenshot in real time.
Briefly speaking, it is the best choice if you want to screenshot Steam gameplay in high quality pictures.
How to Take a Steam Screenshot Easily
Step 1: Set up Screenshot tool
Launch the best screenshot tool for Steam after you installed it on your PC. There is another version for Mac. If you want to set Steam screenshot folder, click the Menu icon and choose Preferences. Then go to the Output tab, click the folder icon next to Location of screenshot files and set a proper directory. You can also set the screenshot format and hotkey on the popup dialog. Click OK and back to the main interface.

Step 2: Take a screenshot
When you reach the moment of Steam gameplay you wish to capture, switch to the utility and click Screen Capture option. Then your cursor will change to a cross. Click on the Steam window to take a screenshot.
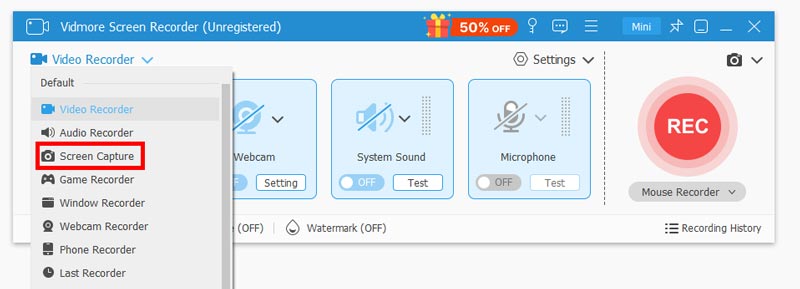
Step 3: Edit and save Steam screenshot
Once you release your left mouse, the toolbar will pop up. Here you can edit the screenshot:
Add a shape: Select a shape, like circle, rectangle or line, choose your favorite color, and place it to the right place.
Add text: Select the T icon, set font, size and other options, click the screenshot and enter some texts.
Add painting: Select the Pen icon and choose a color, then draw on the screenshot.
When editing is done, click the Save button to export the Steam screenshot to your hard drive. Alternative, choose Clipboard icon to send it to clipboard.

Part 3: FAQs of Steam Screenshot Folder
How do I take screenshots on Steam?
By default, press F12 button and your Steam screenshot will be saved to Screenshot Manager. Besides, you can customize the screenshot button in Settings dialog.
Why are my Steam screenshots not being saved?
If you press the F12 button but not capture screenshots, make sure that you do not change the screenshot button in Steam. Moreover, you must enable the Steam Overlay; otherwise, the screenshot function won’t work.
Can Steam takes screenshot for VR games?
To take a screenshot in VR, look in the direction of where you want to take the screenshot, and press down both trigger and power buttons on Vive controller at the same time for 2 seconds. Then you should hear the screenshot sound. If not, the screenshot may be not taken successfully.
Conclusion
This guide has told you where you can find Steam screenshot folder. Now, you should master the default folder on Windows, Mac and Linux, as well as how to change it to another directory. If you do not like the built-in screenshot function in Steam, use Vidmore Screen Recorder as an alternative. It is not only easy to use, but also able to produce high quality screenshot quickly. More questions? Please leave a message below this guide.
