How to Screenshot on Chromebook: 3 Ways for 2025
Taking a screenshot is one of the most perfect methods for capturing various scenes in your videos. It is also perfect if you want to capture some information on various browsers and content on your screen. You can even take a screenshot for collecting and storing information. With that, we can tell that taking a screenshot is a helpful activity. In this section, we are going to teach you how to screenshot on a Chromebook. You will learn how to utilize the shortcut keys, quick settings, and where to find the Chromebook screenshots. After reading all the information, we ensure that you can get the information you need. Without anything else, come here and obtain all the details about the discussion.

PAGE CONTENT
- Part 1. Can Chromebook Copy A Screenshot
- Part 2. Take A Screenshot on Chromebook using the Shortcut Keys
- Part 3. Take A Screenshot on Chromebook using the Quick Settings
- Part 4. Best Software to Screenshot on Chromebook
- Part 5. Where to Find Chromebook Screenshots
- Part 6. FAQs about How to Screenshot on Chromebook
Part 1. Can Chromebook Copy A Screenshot
If you want to know if Chromebook can copy screenshots, then the answer is yes. Copying the captured screen is an easy task when using a Chromebook. With that, you can use it if you plan to use the capture screen for various purposes. After taking a screenshot, you will see a Thumbnail button on the bottom-right corner of your screen. You can use this button to copy and paste the screenshot on various platforms. You can paste it on Google Sheets, Docs, Slides, and more. You can even attach the image on Email. Plus, it is also possible to use the screenshot on various image editing software, like Adobe Photoshop and Paint.
Thus, we can tell that this feature makes it more convenient to instantly use screenshots or share them on your Chromebook for various purposes. If you want to learn the effective process of taking screenshots using a Chromebook, we suggest moving to the next section.
Part 2. Take A Screenshot on Chromebook using the Shortcut Keys
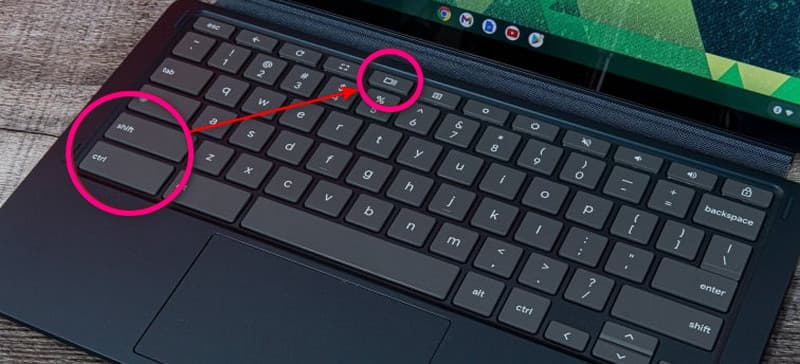
One of the most effective ways to screen grab on Chromebook is to use its shortcut keys. The Chrome operating system has a screenshot keyboard shortcut to achieve the task. There are also assigned keys or buttons that can be operated for capturing a screen. But if the laptop has no buttons like that, you can use the simple steps below.
1. On your keyboard, hit the Shift + Ctrl + Show keys. The latter will look like a rectangle next to the two vertical lines.
2. If you are operating an external keyboard that has no Show button, press the Shift + Ctrl + F5 keys.
3. Launch the Settings option at the lower part of the screen and select the Screenshot. After that, you can already take a screenshot on your Chromebook.
The best part here is that you can choose how you want to take a screenshot. From the Screenshot option, you can take a partial screenshot, or full-screen screenshot, or a Windows screenshot. All you need is to use the Space bar keys, then press the Tab keys to adjust the screenshot window.
Part 3. Take A Screenshot on Chromebook using the Quick Settings
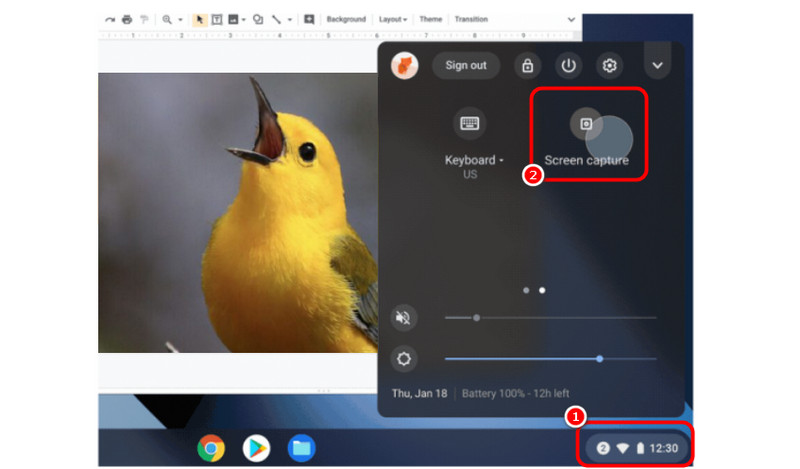
If you are still looking for another method to capture your screen using a Chromebook, then you can use Quick Settings. For additional insight, after the launch of Chrome OS 89 in the year 2021, Google inserted the screen-capture tool into the Quick Settings on Chromebooks. It is perfect if you don't have any idea about the shortcut keys to achieve the goal. Plus, the menu can offer a clear visual representation of various screenshot options, especially full screen, selected screen, and window. What's more, you can also use this menu if you want to record the screen, making it an excellent screen recorder for Chromebooks. If you want to learn how to take a screenshot on a Chromebook using the Quick Settings menu, see the instructions below.
1. Go to the bottom-right corner of your Chromebook screen and select Quick Settings.
2. After that, hit the Screen Capture option. Once done, you can proceed to the next procedure.
3. Now, you can pick how you want to take a screenshot. You can select the full screen, partial screen, and window. Click the Capture button to begin capturing the screen.
Part 4. Best Software to Screenshot on Chromebook
Wondering what is the best downloadable software you can access to capture your screen on Chromebook? In that case, we recommend using Vidmore Screen Recorder. This screen-capturing and recording software can help you achieve the outcome you need. This is because taking a screenshot is a simple task when using this program. After selecting the Screen Capture feature, you can begin capturing the screen easily. The best part here is that you can capture the full/entire screen or a selected area on the screen. Plus, you can also expect to get an excellent image quality after the process for a better viewing experience.
Furthermore, you can also use some basic image editing functions after capturing the screen. You can add text, insert various shapes, adjust the color, and more. With that, you can tell that enhancing the screenshot is possible with this software. Thus, we can conclude the Vidmore Screen Recorder is among the best screenshot tools you can access on your Chromebook.
Main Features
• The software can capture the screen (full screen, window, and selected area).
• It can give an excellent image quality.
• It can offer various editing functions to enhance screenshots.
• It can record video, gameplay, webcam, meetings, etc.
• The program can record audio content.
If you want to learn how to take a screenshot on a Chromebook using this software, see the detailed instructions below.
Step 1. For the first step, access Vidmore Screen Recorder on your Chromebook. You can use the provided buttons below to get the software's installer. After that, launch it to begin with the screen-capturing process.
Step 2. After you launch the main interface, go to the left interface and select the Screen Capture button. Then, you can go to the next procedure.
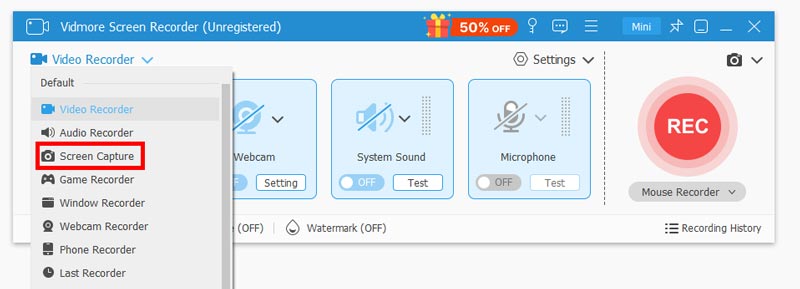
Step 3. Now, you can start capturing the screen. Click and hold the left mouse and select the screen you want to capture. You can capture the whole screen or a selected area on the screen. After you select the area, you can remove your finger from the left mouse.

Step 4. After taking a screenshot, you can also improve the output using the editing functions. You can use the T option to customize and add text to the screenshot, customize color, draw elements, and more. Once done, you can tick the Save button to save the screenshot on your Chromebook.

Part 5. Where to Find Chromebook Screenshots
After taking a screenshot on Chromebook, maybe you are wondering where to find them. In that case, you can find the screenshots on your Clipboard. You can open the Tote from the Shelf to get the recent downloads, pinned files, and especially the captured screens. You can also just visit the Download folder. The good thing here is that you can also assign a designated folder for the screenshots. All you need to do is press Shift + Ctrl + Show, proceed to Settings > Select Folder, and choose your preference. With that, every time you take a screenshot, you can just find them in your assigned folder.
Part 6. FAQs about How to Screenshot on Chromebook
How to screenshot on an HP Chromebook ?
You can just use the Screenshot from the keyboard for a screenshot on an HP Chromebook. After pressing the key, the device will start capturing the content from your screen.
How to screenshot on Dell Chromebook ?
On your keyboard, you can use the Ctrl + Show Windows keys to take a screenshot using your Dell Chromebook. This way, you can capture the entire screen. To capture the selected areas on your screen, press the Shift + Ctrl + Show Windows button.
How to screenshot on Acer Chromebook ?
On Acer Chromebook, you can also press the Shift + Ctrl + Show Windows keys. Plus, if you are using an external keyboard without a Show Window key, you can use Ctrl + Shift + F5 keys.
Conclusion
Learning how to screenshot on Chromebook is helpful, especially if you want to capture any content on your screen. Thankfully, this article has all the instructions you need to get your preferred result. Aside from that, if you are searching for third-party software that can help you capture a screen with excellent image quality, use Vidmore Screen Capture. With its screen-capturing capability, you can get the result you need. You can even use basic editing tools to improve the captured screen, which makes it more worthy to operate.
