How to Convert DVD to ISO Image File on PC, Mac or Linux
Creating an ISO image file from DVD is straight forward when you have chosen the right tool. First of all, it is a good way to back up your optical discs. When a DVD cannot be read due to scratch and other damage, you can use the ISO image file to make unlimited copy.
In addition, some software has the capacity to mount ISO image files directly. It means that you can watch your favorite DVD movies without the physical disc. In this article, you can learn everything you need to know about ISO image files including how to make an ISO image file from your DVD.

PAGE CONTENT
Part 1: What Is ISO?
Before learning how to make an ISO image file, let’s talk about what ISO is. An ISO file, also called ISO image, is a single copy of an entire DVD including DVD structures. All contents on your discs can be duplicated in an ISO file accurately, from video data files to DVD structures, from program installation files to encryption or region code.
It is a quick way to back up and copy optical discs. Today, ISO image files are primarily used for distributing large programs and HD movies through the internet. If you want to share your favorite DVD movies with your friends, for example, ISO image file allows you to do it through the internet. Moreover, when your DVD is damaged, you can use the ISO image file as a virtual disc directly or make another DVD with it. Considering image files are so important, you’d better pick up the best ways to copy your DVD collection to ISO image files.
Part 2: Ultimate Way to Create ISO from DVD
Creating ISO image from a commercial DVD is a big challenge since the encryption prevents you from making a copy of the disc. Therefore, you need a powerful tool to remove the encryption and then make an ISO image. From this point, we recommend Vidmore DVD Monster.
- Convert an entire DVD to an ISO image file in one click.
- Preview DVD videos and select certain ones to make an image file.
- Provide extensive video editing tools, such as crop, clip, rotate and more.
- Keep the original video and audio quality while copying DVD to ISO.
- Offer a wide range of custom options for advanced users.
In a word, it is the easiest way to make ISO from your DVD collection on computer.
How to Create ISO from DVD
Step 1: Get the best ISO maker
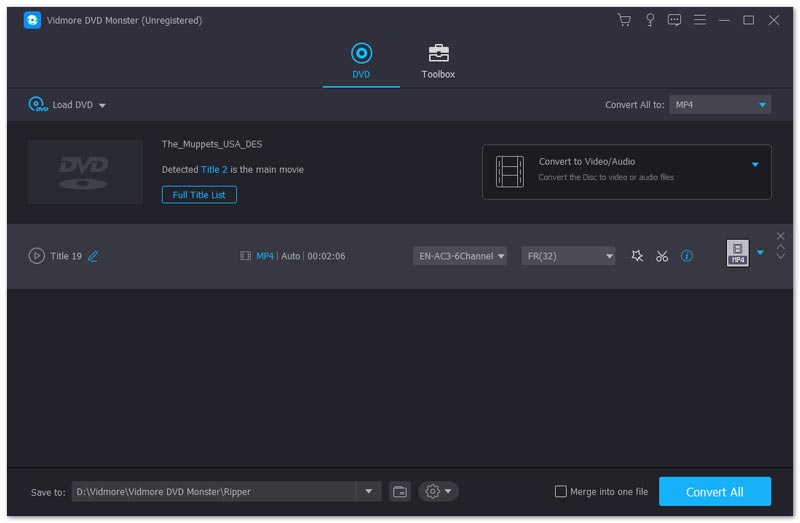
If you have a large DVD collection, download and install the best ISO maker to your computer. Make sure to insert a DVD into the built-in ROM drive or an external DVD drive. Launch the DVD maker and click the Load Disc button to scan your disc.
Step 2: Preview and edit DVD videos
After DVD scanning, the DVD movies will appear in the media library, then you can preview them and decide to copy entire DVD or specific movies by checking and unchecking the boxes.
If you want to shorten a DVD video file, click the Trim icon under the thumbnail to open the video trim window. Then reset the Start and End points to split or trim the video file. Click the Save button to confirm it and back to the main interface.
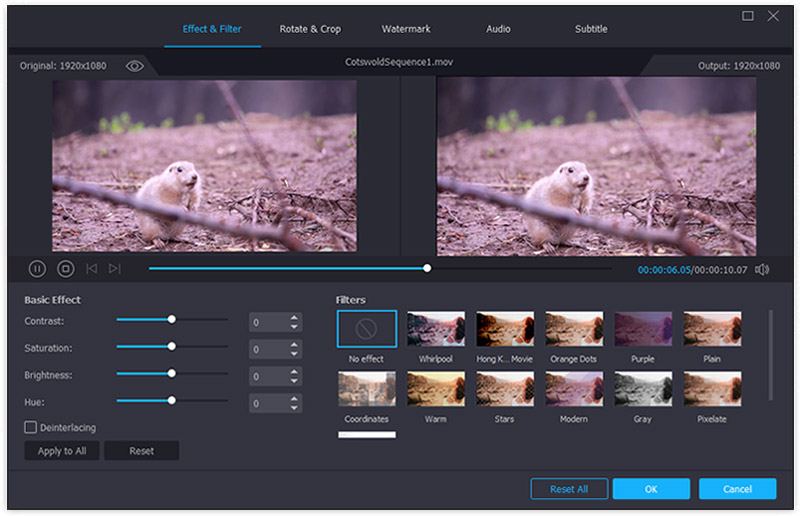
To get other video editing tools, press the Edit icon under the video in the media library. When the video editor window pops up, you will be presented Effect & Filter, Rotate & Crop, Watermark, Audio and Subtitle tools.
Step 3: Rip DVD to ISO
When DVD video previewing and editing is done, expand the Rip All to drop at the top right corner of the main interface, and select the proper format. Here we choose an image file format. Then click the Settings button at the bottom with a gear icon to open the Preference dialog. Go to the Ripper tab and set the destination folder in the Output Folder field. Click OK to confirm it and back to the main interface. Finally, click the Rip All button to start converting DVD to ISO image file.
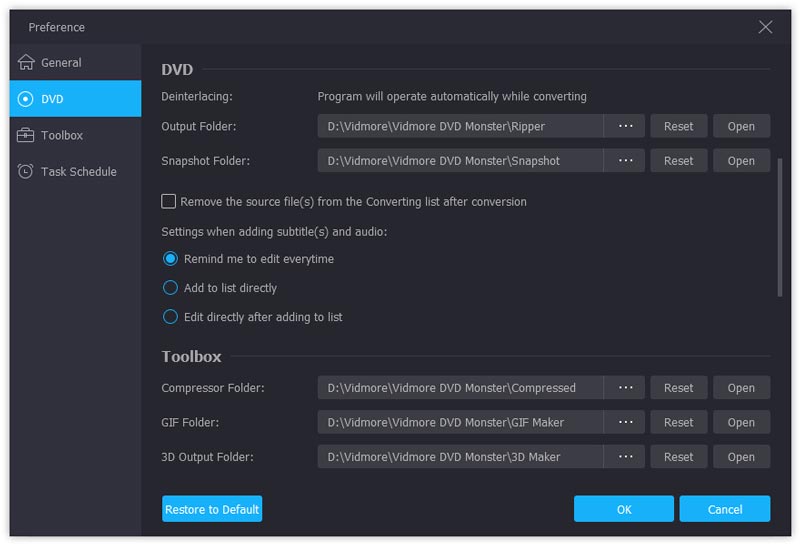
Note: According to our research, it only takes a few minutes to complete the DVD to ISO conversion process since the ISO maker
Part 3: Make ISO from DVD on Windows for Free
By natively, you can mount an ISO image or burn an image file to a DVD on Windows using the built-in functionalities. However, it cannot make an ISO image file from your DVD without third-party software. Fortunately, there are several free tools can meet your need.
Method 1: How to Create ISO from DVD with BurnAware
BurnAware is an easy-to-use ISO maker. It allows you to convert DVD to ISO image file on Windows 10/8/7 for free. According to our research, it is free of antivirus if you download it from official website(http://www.burnaware.com/download.html).
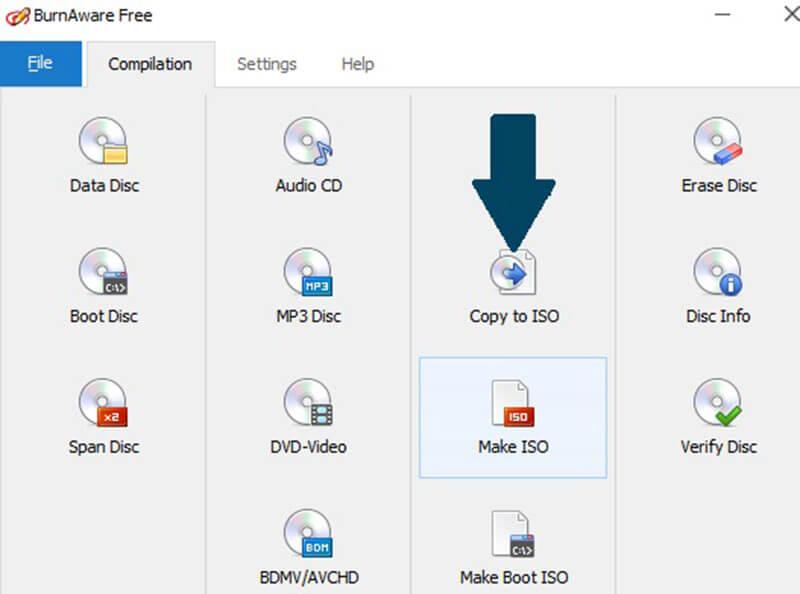
Step 1: Run the DVD to ISO converter either from shortcut on your desktop or from the Start menu. Go to the Compilation tab and select the Copy to ISO option.
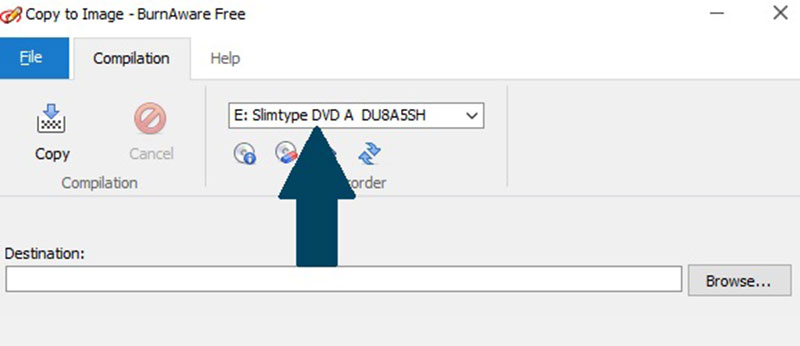
Step 2: Click and expand the dropdown list, and select your optical disc drive. If you have inserted a DVD into your DVD drive, the freeware will import it immediately.
Step 3: Click the Browse button next to Destination field and select a specific directory to store the ISO image file. Next, click the Copy button to begin ripping DVD to ISO image file. It usually spends 10 to 15 minutes to finish making an ISO image.
Note: The freeware cannot remove region code or encryption from your DVD when ripping it to ISO file.
Method 2: How to Convert DVD to ISO with InfraRecorder
InfraRecorder is an open-source DVD burning software. It also has the ability to create ISO image from DVD. However, it is only available to Windows 7/XP/Vista and older systems.
Step 1: Put the DVD you want to back up into your computer. Open the Start menu and click All Program -> InfraRecorder -> InfraExpress.
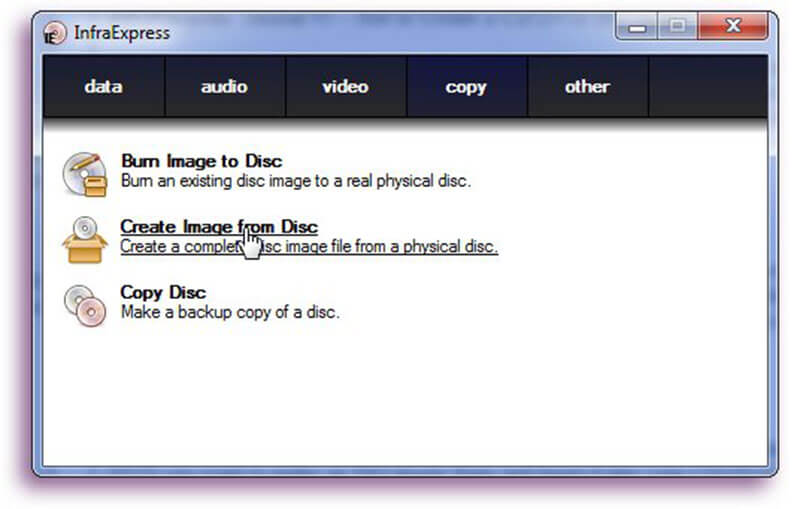
Step 2: Select the Create Image from Disc option to open the Copy to Disc Image dialog. Head to the General tab and you can see two boxes. Select your optical disc from the Source drop. Then click the button with a three-dot icon to find a specific folder for saving your ISO file, and name the image file.
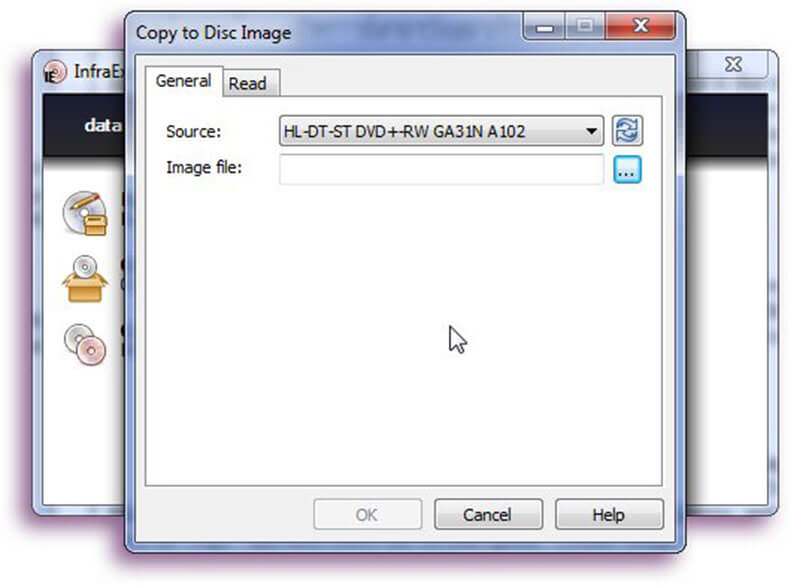
Step 3: Next, go to the Read tab, then decide whether to Ignore read errors or not, and the Read speed. If you want to modify these from the default values, make sure you really know what you are doing.
Step 4: Click OK button when you are done and the ISO creation process itself will start. You can monitor it by the progress bar and cancel it at any time. When it is finished, the OK button will pass from gray to normal.
Part 4: Rip DVD to ISO on Mac without Paying a Penny
If you are using a MacBook Pro or other Mac computer, you are lucky since Apple has introduced the ISO creation feature into macOS. However, the feature is so hidden that many users even do not know it. Therefore, we share a detailed guide below.
Step 1: Open Disk Utility from the Applications folder. Insert your disc into your DVD drive.
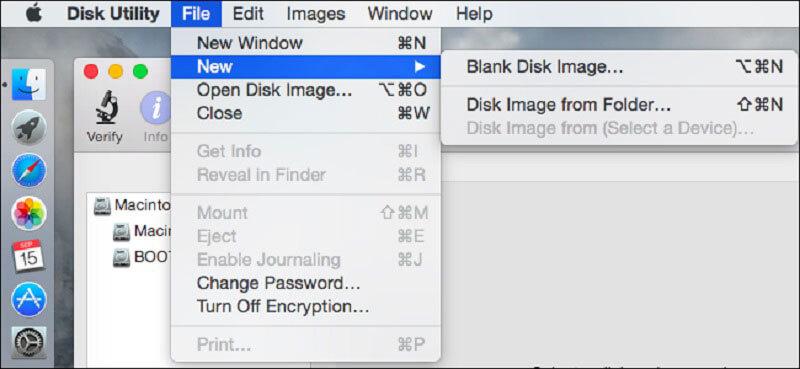
Step 2: Expand the File menu on the top men bar, point to New -> Disc Image from Drive.
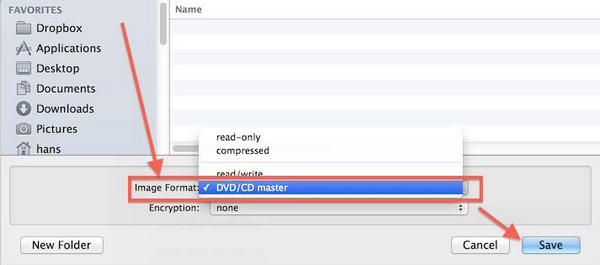
Step 3: Select DVD/CD master from the Image Format drop, and pick up none from the Encryption field. Once click the Save button, Disk Utility will create an image file from your DVD.
Tips You Should Know about Ripping DVD to ISO on Mac
First of all, the default image file format on Mac is CDR. So, Disk Utility will create a .cdr file from your disc. If you want to rip DVD to ISO image file you have to convert the CDR image to ISO format by renaming the file extension simply. Or you can execute the command hdiutil convert /path/imagefile.cdr -format UDTO -o /path/convertedimage.iso in Terminal to convert CDR image to ISO file. Replace /path/imagefile.cdr with the patch of your CDR file and name, and replace /path/convertedimage.iso with a path and name to the ISO file you intend to create.
In addition to make ISO image from optical disc, Disk Utility is also able to mount DVD image files by hitting File -> Open Disk Image.
Bear in mind that Disk Utility is only able to handle unencrypted DVDs. If you want to convert an encrypted or commercial DVD to ISO image on Mac, you have to use a third-party app, such as HandBrake.
Part 5: Convert DVD to ISO on Linux
On Linux, you can create an ISO image from a DVD with the program language or any disc-burning utilities. Ubuntu, for example, uses the Brasero disc-making utility, which has the capacity to rip DVD to ISO no matter it is encrypted or not.
How to Convert DVD to ISO with Brasero
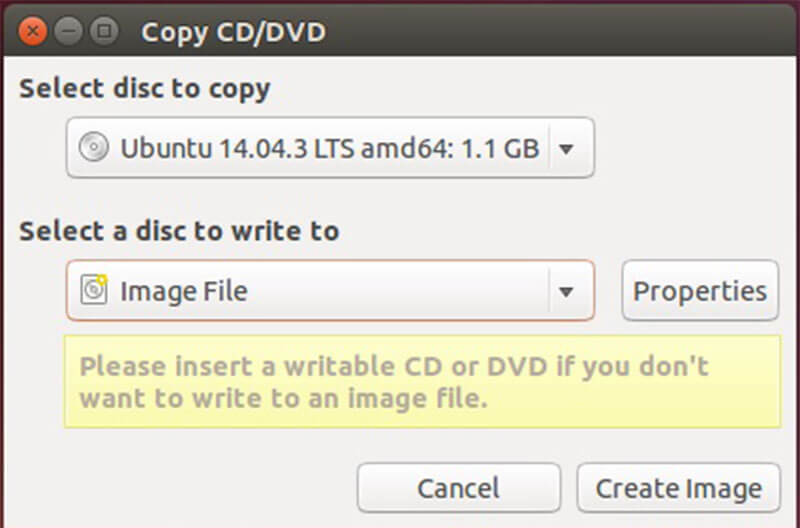
Step 1: Open the Brasero Disc Burner on your computer and choose Disc Copy. Then put your DVD into your optical drive.
Step 2: Make sure to select your DVD drive from the drop-down under Select disc to copy. Then choose Image File from the drop-down of Select a disc to write to.
Step 3: Finally, click the Create Image button to start copying DVD to ISO.
Note: Since Brasero has been removed from Ubuntu 16.04, you need to install it from the Ubuntu Software Center manually. When it comes to other Linux distributions, you can find similar tools and they are working the same.
How to Create ISO from DVD with Terminal

Alternatively, you can use Terminal and program language to create an ISO image from your disc on Linux. The command is sudo dd if=/dev/cdrom of=/home/username/image.iso. Replace /dev/cdrom with the path of your DVD drive, and /home/username/image.iso with the path and name of the ISO image you wish to make.
Once you get the ISO image file, you can move it to your hard drive, USB flash drive, or cloud server. The computers without DVD drive can mount them and use them as the virtual disc.
Conclusion
This article has discussed how to create ISO from DVD on Windows 10/8/7, macOS and Linux. Though we are comfortable to access videos and music on popular platforms, DVDs are not dead. Many people still have a collection of optical discs storing favorite movies, music, digital games, programs and even operating systems. If you want to copy your DVD movie collection to ISO image files, Vidmore DVD Monster can help you simplify and accelerate the process. Please leave a message if you encounter troubles when copying your DVDs.
