How to Record Screen on Chromebook
The Google Chromebook is the popular laptop to perform a variety of tasks via the Google Chrome browser, which is featured by its fast speed and easy-to-use operation. If you are going to capture Chromebook screen, you can use a screen recorder to help you make it. For helping users to choose a suitable recording application, the following part will show you two excellent and helpful screen recorders for Chromebook that you can use, and also tell you how to use them.


Before writing, how we test software for posts:
Disclaimer: All the content on our website is written by humans in our editorial team. Before writing, we do deep research about the topic. Then, it takes us 1-2 days to select and test tools. We test software from device and system requirements, functions, use experience, etc. To make our test more comprehensive, we also view review websites, like G2, Trustpilot, etc., to gather real users' experiences for reference.
Best Screen Recorder for Chromebook Screencasting
It is quite simple to use Vidmore Screen Recorder to have a screencasting on your Chromebook. It is the best and most versatile screen capture to record any screen activity on your desktop with a customized recording area or a full screen. With the help of this tool, you are also able to capture videos and make video tutorials to upload it. Apart from capturing the screen on Chromebook as a video, you can also use Vidmore Screen Recorder to grab audio from system or microphone with ease, like Skype calls. All in all, you can record any video or audio on the Chromebook with original quality. Follow the detailed steps below to capture the screen or audio on the Chromebook.
Vidmore Screen Recorder – Best Screen Recorder for Chromebook
- Capture full/partial screen on Windows/Mac.
- Select system audio only, microphone voice only or both for PC/Mac.
- Record with high aspect ratio, like 1024x768, 1920x1080, 4K and so on.
- Add lines, arrows, circles, highlights and so on while recording gaming tutorials.
- Set record length or task schedule.
- Support Windows OS and Mac OS.
Step 1. Free download the Screen Recorder
Free download and install this program on your computer. Then, launch this software on your computer. On the interface, select “Video Recorder”.

Step 2. Set the recording area and audio settings
When you enter the Video Recorder interface, you should decide the recording area and audio recording.

You can record the full screen by clicking “Full”.
Or click “Custom” to select either “Fixed region” or “Select region/window” for recording the customized area on your Chromebook screen.
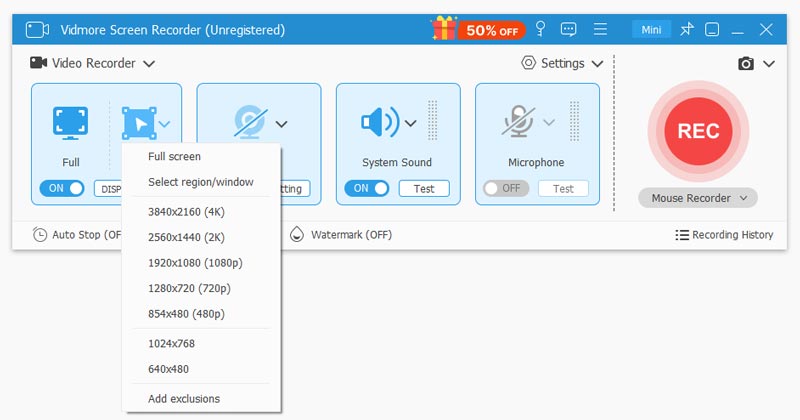
Note: For customizing the recording area, you should open the window that you want to capture. Then you can get the exact recording area.
As for audio settings, just toggle on the audio options from “System Sound” and “Microphone”.

Step 3. Record and save the video recording
When you are ready, just click the “REC” button to start recording. During the recording process, you can use the edit button to edit the screen while recording.

Then, click the “Save” button to export and save the video recording file on your computer.

How to Record Chromebook Screen with Chrome Extension
For recording Chromebook scree, you can also add a Chrome extension for screencasting to your Chrome browser. Here we’d like to share Screencastify, a go-to Chrome extension, which allows users to record all screen activities on tab and desktop along with audio. You can also capture your webcam while you record the desktop screen. The recorded video will be saved as WEBM or VP8 file in Google Drive. Plus, this tool allows you to upload the video to social platform when you finish recording. Here's how it works.
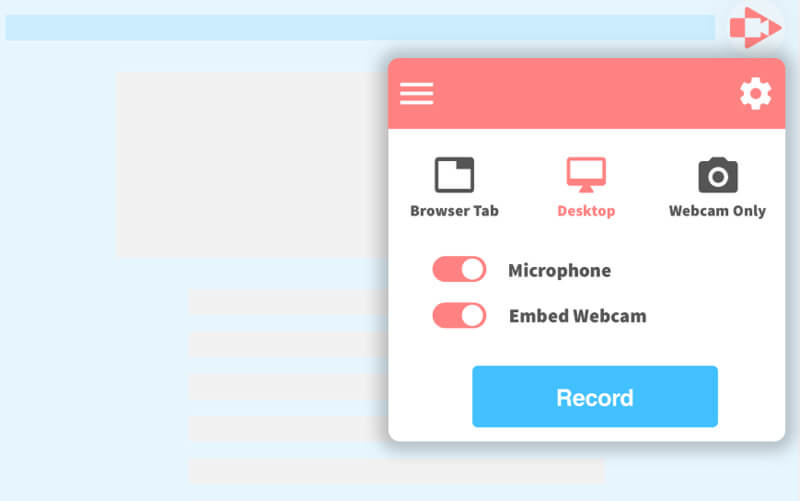
Step 1. Search Screencastify on the site of Chrome web store and then add it on Chrome browser by clicking the button of “Add to Chrome”. Then you will find its icon on the tool bar.
Step 2. Configure the recording settings, such as recording area, resolution, audio, etc.
Step 3. Click on the “Start Recording” to start to screencast. During recording, you can pause at any time by clicking the button on control panel.
Step 4. Once your recording task is done, hit on “Stop Recording” button on screen.
Step 5. The finished screencast will appear in a new tab from which you can choose to download it to your Chromebook, or upload it to Google Drive.
Here you may like: How to Record Cisco WebEx Meetings with Audio and Video with Ease
FAQs of Screen Recorder for Chromebook
1. Can I record audio on my Chromebook?
The answer is yes. For recording audio on Chromebook, you need to turn to the professional Chromebook recorders for help. You can use the above two screen capture to pick up the audio on your Chromebook.
2. What is the best screen recorder for Chromebook?
As we mentioned above, the best Chromebook screen recorder is Vidmore Screen Recorder. You can use this all-in-one application to capture any part of your Chromebook screen, record HD video and audio, and take screenshots anywhere as you like.
3. Can I record a webcam video on my Chromebook?
To record a webcam video, you use Vidmore Screen Recorder, the best webcam capture software to capture webcam along with your screen simultaneously with different audio sources in high quality. You can capture webcam video on your Chromebook and save it as MP4, AVI, WMV, MOV, and more. Moreover, you can also make real-time editing and take snapshots while recording your webcam videos on Chromebook.
