How to Record Video on Windows Media Player
Windows Media Player (WMP) is a native video/audio playing software for Windows users. It is a full-featured player that can play back audio CDs, audio files, DVDs and videos. It can also play some audio and video streams directly from the Internet. Some people even try ripping DVD to Windows Media Player.

So, can you record a video using Windows Media Player? Unfortunately, Windows Media Player has no such function to help you make a video recording. However, you can seek for other available video recording software to help you record video or audio on Windows Media Player or other media players.
Vidmore Screen Recorder is the best and the most professional video recorder to capture your desktop. It was designed for those people who want to record everything happened on their computer screen. You can capture online movies or other video shows. You are able to customize the recording area as you like or set a full screen in one click. What’s more, you can also use Screen Recorder to make video tutorials to share with others.
Vidmore Screen Recorder also enables you to record audio from system or microphone optionally. You can keep recording your video or audio calls with friends or family. In short, you can record any video or audio on the computer with the high quality. So it is definitely worth a shot.
Vidmore Screen Recorder
- Capture full/partial screen on Windows/Mac.
- Select system audio only, microphone voice only or both for PC/Mac.
- Record with high aspect ratio, like 1024x768, 1920x1080, 4K and so on.
- Work as a facecam recorder to record picture-in-picture video.
- Add lines, arrows, circles, highlights and so on while recording gaming tutorials.
- Set record length or task schedule.
- Support Windows OS and Mac OS.
How to Record Videos or Audio on Windows Media Player with Vidmore Screen Recorder
This software can capture any video and screen activity on your computer. Here, let’s check how to use it to make a video on Windows Media Player.
Step 1. Free download the Screen Recorder
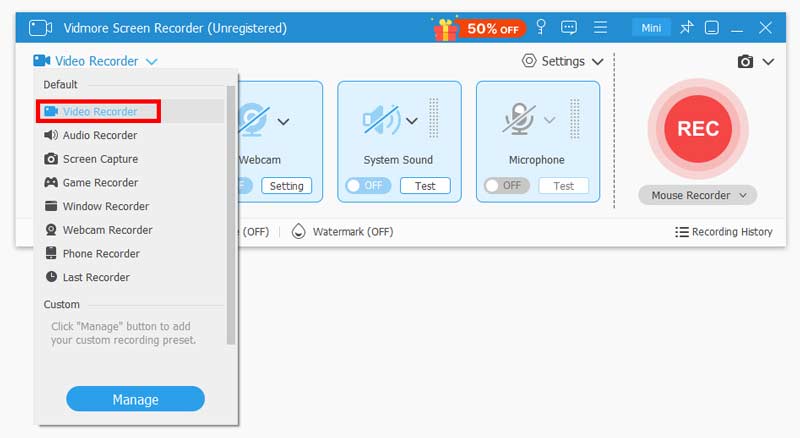
Free download and install this video recording software on your computer. Then, run this software on your computer. In the home interface, select 'Video Recorder'.

Step 2. Recording area and audio settings
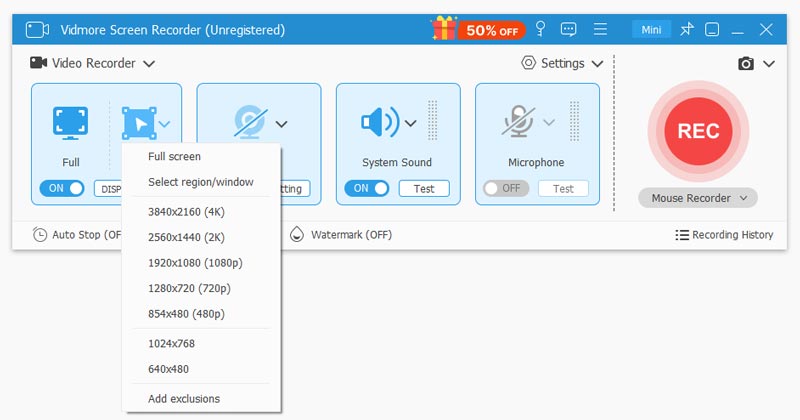
When you enter the Video Recorder interface, you should decide the recording area and audio recording.

You can record the full screen by clicking “Full”.
For recording the customized area, you just need to click “Custom” to select either “Fixed region” or “Select region/window”.
“Fixed region” will display the common recording area with the specific value, while “Select region/window” will give you more controls to select the specific window or rectangular area.

Note: For customizing the recording area, you should open the window that you want to capture. Then you can get the exact recording area.
As for audio settings, just toggle on the audio options from “System Sound” and “Microphone”.
For saving online movies, you should turn on “System Sound” and turn off “Microphone”.
For creating a video tutorial with your narration, you should turn on “Microphone”. As for “System Sound, it depends.

Step 3. Record and save the video recording
After all the settings are made well, just click the “REC” button to start recording. During the recording process, you can use the edit button to edit the screen while recording.

Then, click the “Save” button to export and save the video recording file on your computer.

Conclusion
Although Windows Media Player is not able to make a video recording, you can still capture your desktop with other Windows media screen recorders, like Vidmore Screen Recorder. This versatile and powerful video recorder software can help you capture any activity on your screen, as well as audio. After recording, you can save it to any popular video format as you want.


