How to Use Zoom Watermark Feature and Add to Zoom Meeting Recordings
The use of a Zoom watermark can have positive and negative effects. It's a blessing if you are trying to establish legal ownership over your work; it's a curse if you can't get rid of it in meetings. The watermark tool in Zoom can be used however you desire, and thankfully it's easy to figure out. Meanwhile, many users want to use this feature and add a watermark logo to their Zoom content.
That said, you will find out how you can watermark your Zoom videos by enabling this feature and adding a watermark to your zoom meeting recordings. Without further ado, look in the paragraphs below to learn how to add a Zoom watermark to your videos.

PAGE CONTENT
Part 1. How to Use the Watermark Feature in Zoom
The watermarking capabilities of Zoom are available in two forms. The first type of watermark is an image watermark, which is what it sounds like: a graphic overlay that appears on your video and includes your company's name or emblem. Zoom not only allows you to add a visual watermark to your video but also an auditory one. An auditory watermark, in contrast to a visible watermark, is difficult to detect unless one goes looking for it. Here, you will learn how to enable this feature and how to add a watermark to Zoom meeting recordings.
1. How to Enable a Watermark on Zoom
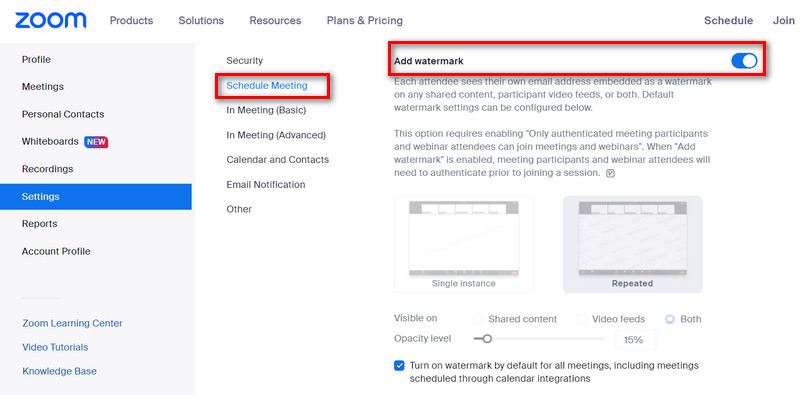
Step 1. Open any browser on your computer and go to the Zoom web portal. Soon after, log in as an admin to access the edit account settings.
Step 2. From the main page, select the Settings option on the left sidebar.
Step 3. Under the Meeting tab, you will see a list of sections. Scroll down the page until you reach the Schedule Meeting section.
Step 4. Next, toggle on the Add Watermark menu, and the settings will be changed. That is how you enable the Zoom watermark feature.
2. How to Add Watermark to a Zoom Meeting
Step 1. You should initially activate visual watermarking using the aforementioned procedure.
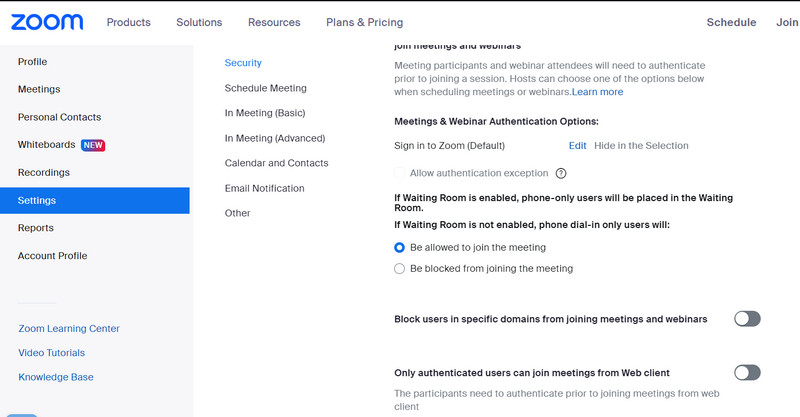
Step 2. The next step is to navigate to the Meetings and Webinars area under branding and scroll to the upload a live streaming watermark option.
Step 3. You can click Change and upload a PNG or JPG picture to be shown in the stream's bottom right corner. It will be captured in any recordings that may be made, in addition to being viewable during the live stream of your meeting. This procedure will also let you add a logo to the zoom background.
Part 2. How to Add a Watermark to Zoom Meeting Recordings
If you wish to add watermarks to your post-recorded videos, you can use Vidmore Video Converter. It is fantastic for adding a watermark to your videos. It is possible to add more than one watermark to a movie because both text and image watermarks are supported. Also, you can customize the watermark's appearance in a number of ways, such as placement, size, transparency, etc.
Other customization tasks are possible, such as trimming the video's unwanted portions and cropping the video to precisely fit a particular screen. Also, rotating the video to the right orientation, adjusting visual effects to make the video more captivating, adding necessary captions to make the video understandable, etc., can be done with it as needed. Learn how Zoom adds a logo or uses other watermarks on a video using this program.
Step 1. Install and launch the Vidmore Video Converter
Please select the Free Download button to access the program. Choose the installation file that is compatible with your computer's operating system. From then on, you'll have full access to the program's features to learn more about it.
Step 2. Load a Zoom Meeting Recording
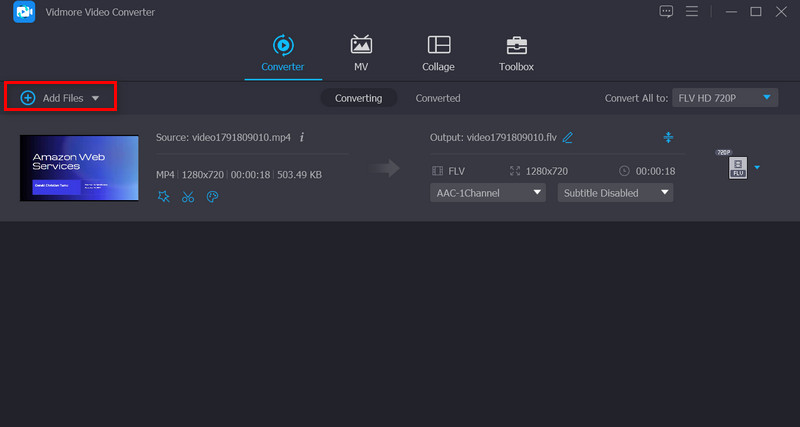
Click the Add Files option on the app's main interface, then locate the video to which you wish to apply a zoom watermark. Then, insert your preferred video. The primary interface also features a prominent + button that you may use to post videos.
Step 3. Apply a watermark to the video
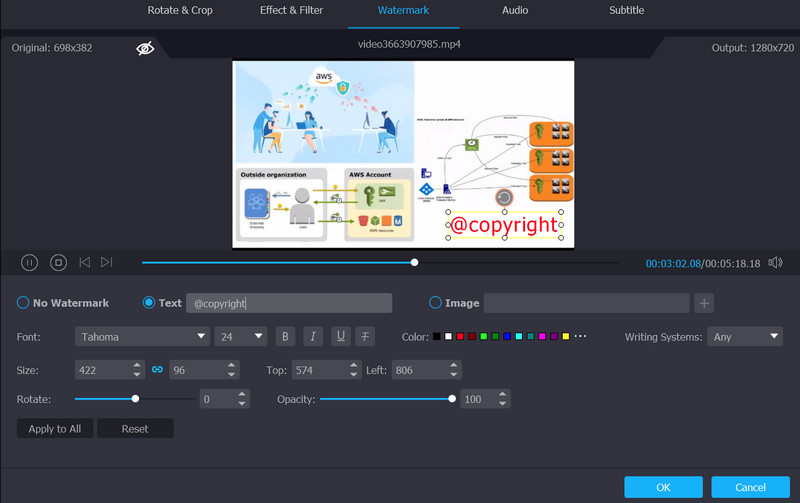
To apply a watermark to a clip, go to the main interface's Edit button, and from there, select the Watermark sub-menu. Text, as well as images, have the option of having a watermark superimposed on top of the videos. In addition to this, you are in complete control of the watermark's setup at all times.
Step 4. Finish the process and export the video
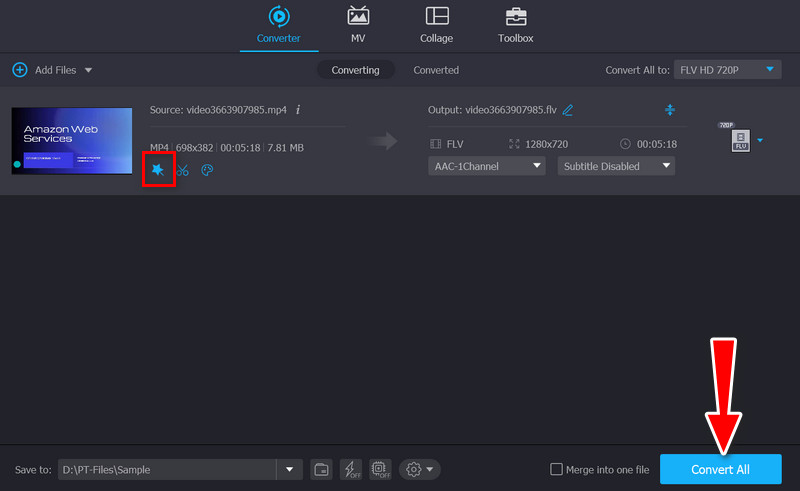
After you have done adding a watermark to a video, you can close the window by clicking the OK button. When the Edit button becomes grayed out, it indicates that the change has been successfully implemented. Choose the format you want your videos to be converted into before clicking the Convert All option.
Part 3. FAQs about Using the Zoom Watermark Feature
Why is the watermark feature not available?
There are times when the watermark feature on Zoom is not working. The requirements may not be met. First, a Windows or Mac computer and a Zoom desktop client version 3.5 or higher are needed. Also, you need to be an administrator to access the watermark feature
How can I disable the watermark feature?
For you to disable the watermark feature of Zoom, you need to go to the Zoom web portal. Then, look for the Add watermark toggle switch and turn it off. Then, the watermark will not show up in your zoom meetings
How can I remove the watermark from my photos?
If you are looking for a reliable program that will help you effectively remove a watermark from a photo, count on Vidmore Free Watermark Remover Online. It offers various tracing tools, and it can remove watermarks from photos in batches
Conclusion
By reading this tutorial, you may realize that adding a Zoom watermark and enabling it on your Zoom is a piece of cake. You can achieve a watermarked video or Zoom meeting in no time. Suppose you cannot enable this feature. You can use the Vidmore Video Converter to add watermarks or your choice. Also, it is a great video editor for modifying your videos.

