FFmpeg Crop Video Introduction and Tutorial: Detailed Walkthrough
FFmpeg is underrated when it comes to modifying video or audio files. Little did we know that it is packed with powerful and useful tools, allowing you to convert, crop, cut, or edit videos. Although it does not have that GUI like most programs we are using these days, it does not fall behind in terms of functionalities and modifying prowess. In other words, it lacks in one aspect, but it does not mean it is incapable of accomplishing video-editing tasks.
That is the reason why many users are stan of this tool. Apart from practicing their skills in writing commands, it can accomplish many functionalities, even exceeding other tools. In this article, we will show you an FFmpeg video resize tutorial using this tool's cropping method. Read through the post to learn more.

PAGE CONTENT
Part 1. Introduction about What is FFmpeg
Cropping or resizing videos to your desired dimension will help you remove black borders without a watermark for no cost at all. FFmpeg is a cross-platform solution for recording, converting, and streaming audio and video. It can decode, encode, transcode, mux, demux, stream, filter, and play almost every type of media file. It is also very portable since it builds and operates in a broad range of build environments, machine architectures, and configurations. That includes operating systems like Mac, Microsoft Windows, and Linux.
Part 2. Using FFmpeg to Crop Videos
FFmpeg includes a variety of tools for end users to convert, play, and analyze media files, as well as libraries for developers to utilize in various applications. On the other hand, we will guide you on how FFmpeg resizes videos using the cropping technique. Check out the following steps.
Step 1. First, download the program from its official website. This action is a prerequisite for using the tool. But, if it is already installed on your computer, then proceed to the next step.
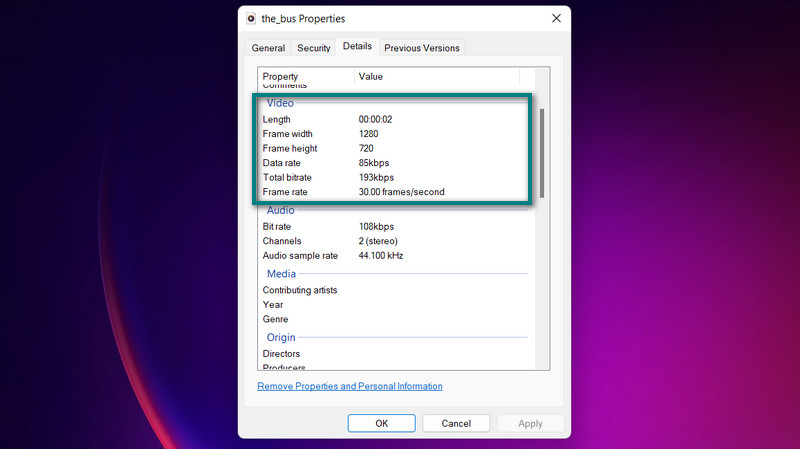
Step 2. Check the dimension of the video you are trying to modify first. You can check the dimension of your video using this FFmpeg command: ffprobe -v error -select_streams v:0 -show_entries stream=width, height -of csv=s=x:p=0 sample.mp4. For an easier alternative, you check the Properties of your video file.
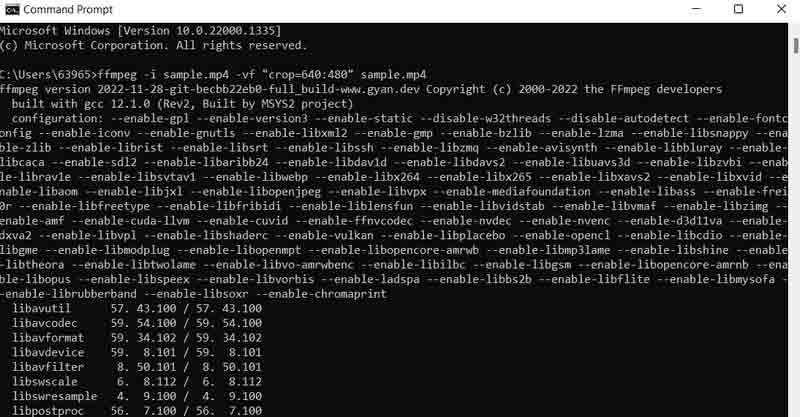
Step 3. Now, enter this command in FFmpeg if you want to crop the input video from the center: ffmpeg -i sample.mp4 -vf “crop=640:480” sample.mp4. Here, vf calls for the usage of a video filter. That filter is the crop filter. Hence it is also identified in the command. W:h stands for the width and height of the output video, while x:y represents the coordinate for which part of the video will be cropped. The tool works with almost any file format. Thus, you can use FFmpeg to resize MP4, FLV, WMV, MOV, etc.
Part 3. Easy Alternative to FFmpeg to Crop Videos
Admit it or not, FFmpeg is not for everybody. You will delight in using it when you are skilled at writing commands. But not everybody can learn commands overnight. In other words, it takes patience and diligence to be able to maximize the potential of FFmpeg. Nevertheless, we have an alternative tool for FFmpeg to resize the video with the same quality. This program is called Vidmore Video Converter.
This helps you resize and crop videos without having to tweak many settings. All the functionalities and navigation are populated in an easy-to-navigate user interface. The best part is you can select an aspect ratio or crop the videos in just a few simple clicks. There is no need for you to take time to read and understand commands. Moreover, it is an easier and more convenient way to crop videos. Here are the steps to learn FFmpeg crop video the Vidmore way.
Step 1. Get the program and install it
To get started, you must acquire the tool using the Free Download buttons below. Afterward, install and launch the app on your computer. You can then start circumnavigating to become familiar with the tool.
Step 2. Load in a video file to crop
Notice that there is a + sign icon on the main interface. Click it and select the video file you want to crop from your file explorer. Then, it will be loaded into the program with its properties shown, including the current dimension of the video.

Step 3. Access the video editor
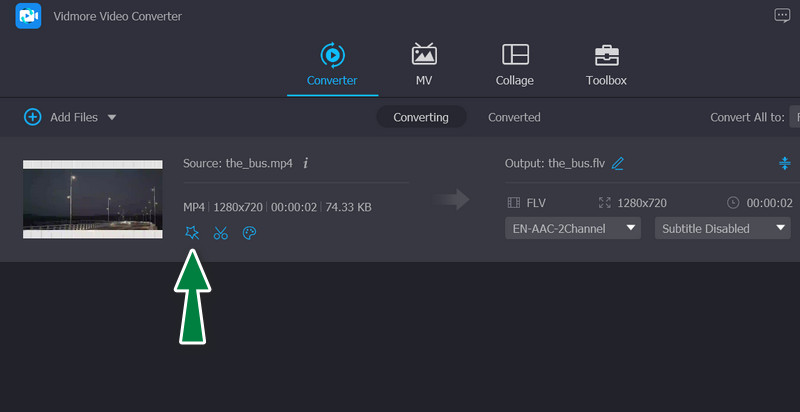
On the video's thumbnail, tick the wand icon, which represents the video editing studio of the program. Upon clicking this button, it will take you to the video editing panel.
Step 4. Crop the video
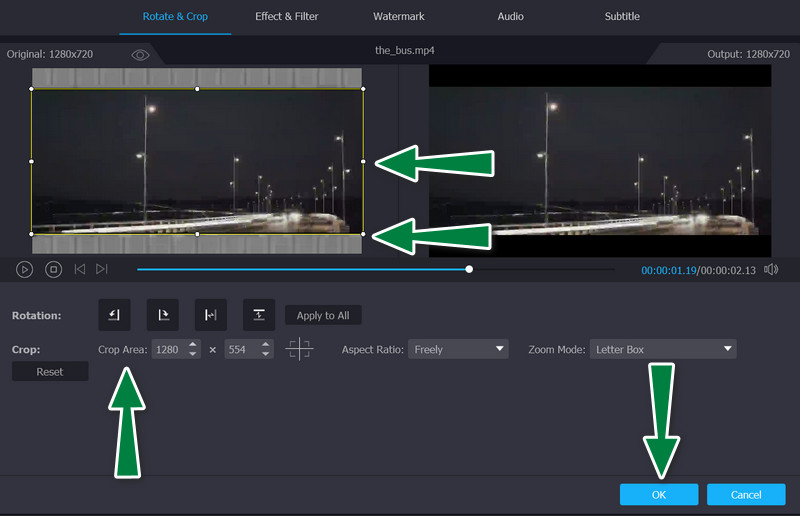
On to the main process, you should see the Crop Area menu at the bottom of the interface. You can modify the dimension by inputting your desired value for the width and height. Alternatively, you can manually adjust the cropping sliders in the editing panel, which is the yellow frame. Also, you can rotate, pinch and zoom the video. Once satisfied, tick the OK button to save the changes you made.
Part 4. FAQs about Cropping Video with FFmpeg
How to use PHP-FFmpeg to resize videos?
To use FFmpeg with PHP to resize videos, you need to be familiar with some commands or code. Once you get used to the codes and commands, you can easily navigate FFmpeg alongside PHP.
How can I perform FFmpeg resize to 720P?
You may use this command to scale the video to 720P: ffmpeg -i sample.mp4 -vf scale=1280:720 -preset slow -crf 18 sample.mp4Ask: How does FFmpeg crop video time?
How does FFmpeg crop video time?
There is also a command to cut or crop video time using FFmpeg. Usually, you will need to determine where to start and stop the cropping video time. The command looks like this: ffmpeg -ss 00:05:20 -i input.mp4 -to 00:10:00 -c:v copy -c:a copy output4.mp4
Conclusion
Using FFmpeg to crop videos is undeniably a solid technique you cannot miss. However, usability-wise, you may wonder if it is for you or not. Therefore, if learning to code is not your cup of tea, you can consider the latter solution, Vidmore, to help in cropping, editing, zooming, and other essential video modifying tasks.

