Use Davinci Resolve to Sync Audio and Video Like a Pro
Synchronizing audio and video is essential in the post-production process. This ensures that all audio elements are aligned perfectly with the corresponding video clips. Fortunately, DaVinci Resolve offers a powerful feature to achieve this synchronization. In this post, you will learn how to use DaVinci Resolve to sync audio and video. We will show you the steps to sync audio and video using the manual technique effectively. This way, you can produce polished and professional video content for your viewers.

PAGE CONTENT
Part 1. How to Use DaVinci Resolve to Sync Audio and Video
DaVinci Resolve is an all-inclusive video editing and audio post-production software developed by Blackmagic Design. One of its standout features is handling audio and video out of sync. This ensures audio elements are perfectly aligned with the video clip. In this section, we will guide you through manually syncing audio and video.
Here’s how to sync audio in DaVinci Resolve:
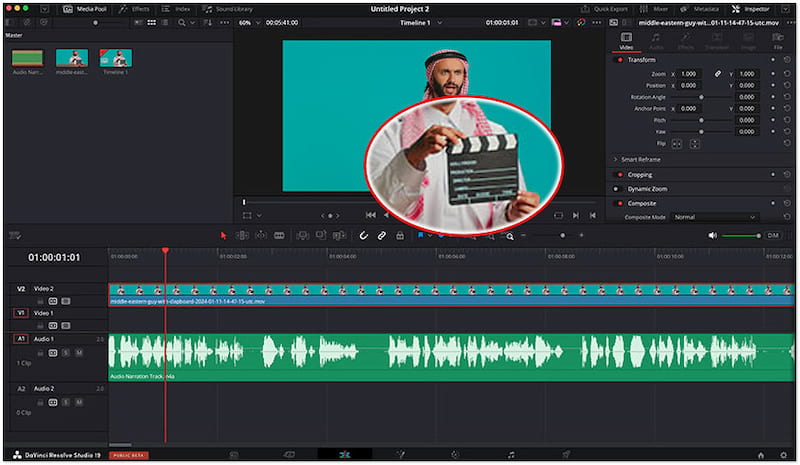
Step 1. Get started by loading your audio and video clips into the Timeline. On the Edit mode, use the Zoom slider to bring closer the Timeline to view audio and video clips in detail. This action will let you see the audio waveforms clearly and move frame by frame through the video.
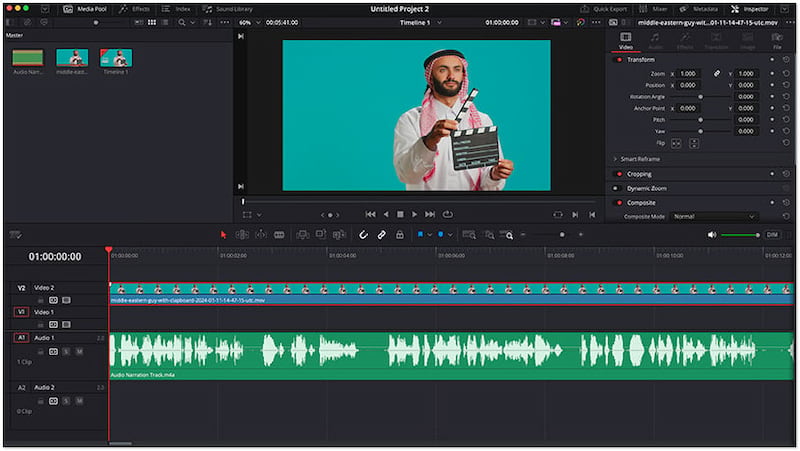
Note: The video clip will appear in blue, and the audio track will be green.
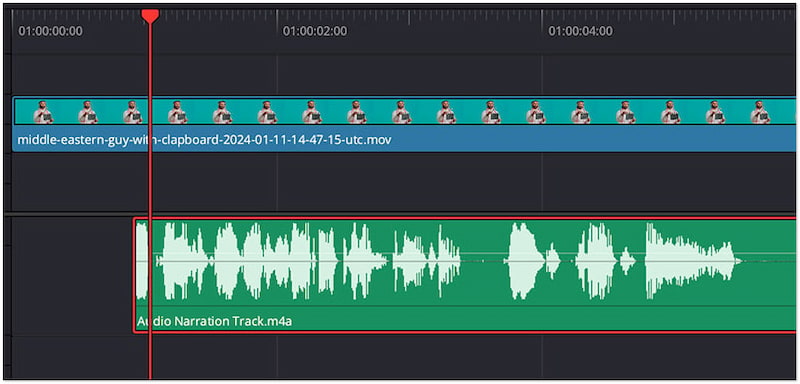
Step 2. Next, proceed with identifying the first contact point. This will serve as your synchronization marker. Direct the Playhead before the clapping begins and use the left/right arrow keys to move forward frame by frame.
Step 3. Look for a sharp sound wave on your audio track that corresponds to the marker. Click and drag the audio track to align the waveform with the marker on the video track. Match the sound of the clap with the visual cue of the clapboard coming together.
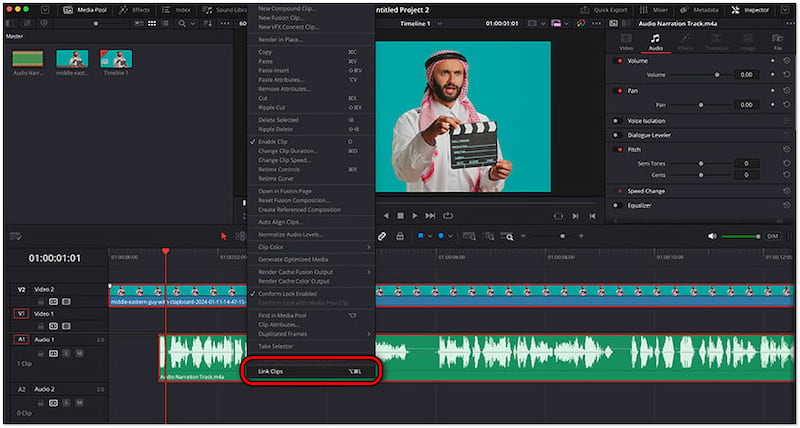
Step 4. Once the audio track and video clip are aligned, select both in the Timeline. Simply click the video clip, hold down Shift, and click the audio track. Afterward, right-click the selected tracks and choose Link Clips from the menu.
Manually aligning audio and video out of sync in DaVinci Resolve is easy by following our detailed guide. But here’s a thing. It can be time-consuming, mainly for long projects and multiple clips. It requires careful attention to detail, which can slow down your editing workflow.
Part 2. What if DaVinci Resolve Auto Sync Audio Not Working
If the auto-sync audio is not working as expected, there are several workarounds you can try. In this section, we will cover potential solutions to resolve the issue.
Mismatched Frame Rate
A common problem with auto-sync results from mismatched Timeline and Playback frame rates. If the frame rates differ, DaVinci Resolve might not align the media files correctly. Setting up your project’s frame rate can easily resolve this issue.
Step 1. Access the Project Manager option and start a new project.

Step 2. Before adding any media, click Cogwheel and select the Master Settings tab.
Step 3. Afterward, set the Timeline frame rate according to your preference.
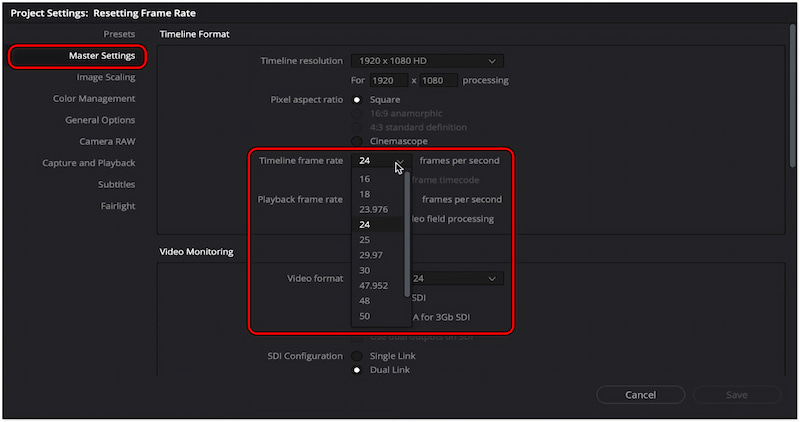
Step 4. Ensure the Playback frame rate matches the Timeline frame rate and click Save.
This process is similar to when you sync audio and video in Premiere. You have to align the tracks with the markers, remove the scratch track, and combine the clips. However, once you import a media file in DaVinci Resolve, you won’t be able to change the frame rate anymore.
Timecode Discrepancies
Another reason the auto-sync feature is not working is Timecode discrepancies. These occur when the audio and video have different starting timecode formats. This confuses DaVinci Resolve’s auto-sync feature, as it relies on matching timecodes to synchronize the clips.
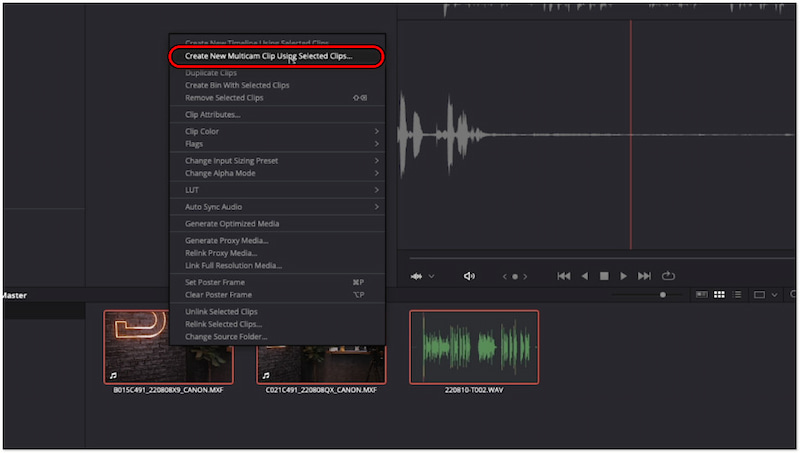
Step 1. Select all the clips you want to sync and right-click them. Then, select the Create New Multicam Clip Using Selected Clips option.
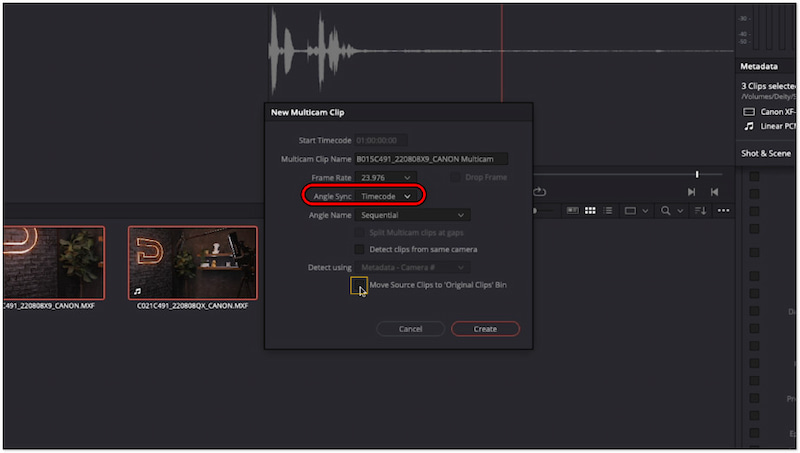
Step 2. In the New Multicam Clip, select Timecode as your Angle Sync. Uncheck the Move source clips to Original Clips Bin option to prevent placing them into a new bin after syncing.
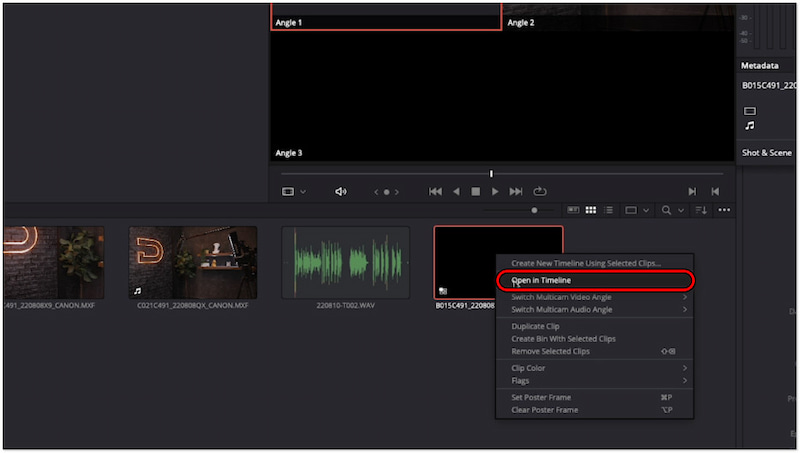
Step 3. Go back into the media browser, right-click the new multicam clip, and select the Open in Timeline option. Your clips are now synced and ready for editing.
Tip:
Use Alternative Tool
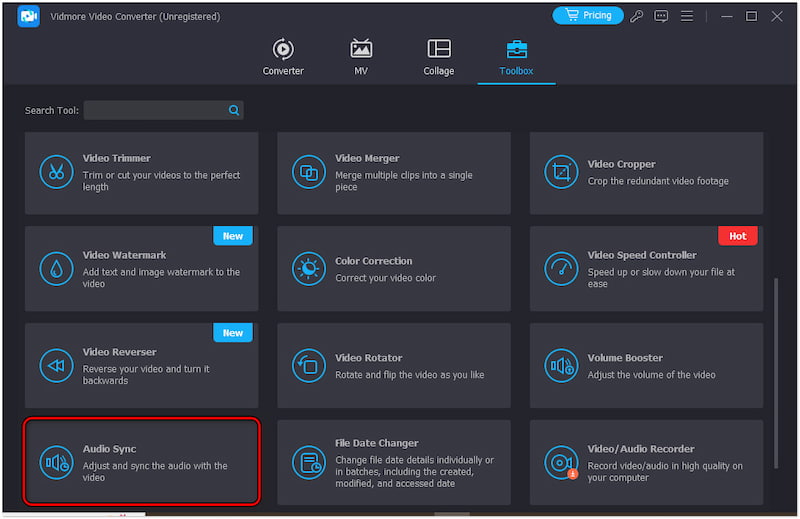
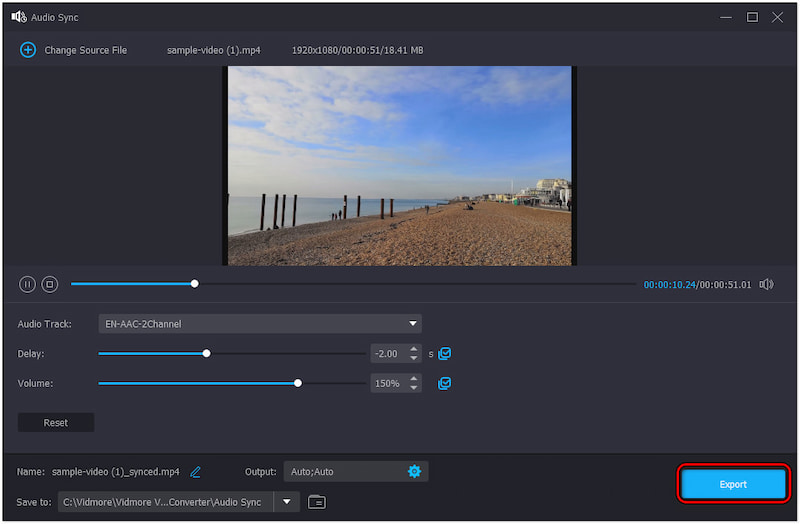
If the DaVinci Resolve sync audio and video feature still isn’t working, consider using an alternative. Vidmore Video Converter can be your lifesaver for this purpose. Beyond the media conversion functionality, this adaptable multimedia software comes with additional tools. It offers a Toolbox kit that boasts over 20+ editing tools, including the Audio Sync feature. It is designed to address and correct synchronization issues between audio tracks and video clips.
Not to mention, you can use the Delay slider to adjust the audio track forward/backward. This action lets you identify the exact time the audio should align with visual cues. What’s more, the Volume slider allows you to adjust the audio level to match the video’s overall sound. This functionality is beneficial mainly when the original audio level is too low or high.
Here’s how to use Vidmore Video Converter if DaVinci Resolve auto sync audio not working:
Step 1. Beforehand, get the free download of Vidmore Video Converter. Install the multimedia software and allow the installation process to complete.
Step 2. After completing the installation, launch the Vidmore Video Converter on your computer. Shift to the Toolbox tab and look for the Audio Sync tool.
Step 3. In the Audio Sync window, click + to add the video you want to sync audio. A new window dedicated to synchronization adjustments will appear.

Step 4. Use the Delay slider to shift the audio forward or backward in time. If needed, adjust the Volume slider to ensure the audio levels are balanced for the video content.

Step 5. Once satisfied with the synchronization, you can now save it. Click Export to save the synchronized video to your local drive.
Vidmore Video Converter provides a convenient solution to correct synchronization issues effectively. Aside from synchronizing audio and video, you can use other editing tools to enhance your video. This includes the video merger, video rotator, video cropper, and more.
Part 3. FAQs about Syncing Audio and Video Using DaVinci Resolve
How do I sync audio and video while filming?
A simple hand clap at the beginning of each take is recommended to ensure audio and video are in sync while filming. It provides a clear synchronization point, allowing you to align the audio and video accurately during post-production.
What is the synchronization between audio and video?
Basically, synchronization refers to the alignment of the audio with the corresponding video. Thai ensures that audio elements match the visual movements perfectly.
How do I merge audio and video in DaVinci Resolve?
Merging audio and video in DaVinci can be a bit tricky. For a brief demonstration, you can use the Auto Sync Audio feature and choose either Based on Timecode or Based on Waveform.
Conclusion
Knowing how to use DaVinci Resolve to sync audio and video allows you to enhance the coherence of your projects. The software ensures that the audio aligns precisely with the visual cues. Meanwhile, we also present you with the Vidmore Video Converter as an alternative if the auto-sync feature of DaVinci Resolve isn’t working. This alternative tool lets you correct synchronization issues hassle-free.