Trim Video in Microsoft Photos: Easy Guide to Shorten Videos
Myriads of Windows 10 or Windows PC users are looking for ways to shorten videos that are rather too long, like removing video's unwanted parts and extracting the most crucial scene from the footage. Believe it or not, Windows 10 comes with a tool developed to edit videos and photos. The application is called Microsoft Photos.
This facilitates organizing photos and videos. Interestingly, it has a Memories feature that generates slides out of your photos. Not to mention, you get to choose which photo to insert by making an album of the selected photos. Equally important, cutting videos is possible using this program. Essentially, you don't need to install another program to trim videos on your computer. Without so much explanation, we will teach you how to trim/splice videos in the Microsoft Photos app. Continue reading below.

- Part 1. How to Trim Videos in Microsoft Photos
- Part 2. Best Alternatives to Microsoft Photos
- Part 3. Comparison Chart
- Part 4. FAQS on Trimming Videos in MS Photos
Part 1. How to Trim Videos in Microsoft Photos
The Microsoft Photos app is the default photo viewer in Windows 10 PC. This also serves as an editor that enriches photos or videos with helpful editing tools. With it, you can make drawings and markups, add 3D effects to videos, insert background music, and so much more. What is more, the Photos interface is not that complicated to maneuver.
In other words, the interface is amicable for beginners and professional users. You will also be pleased to cut videos into multiple parts allowing you to remove parts of a video. Also, you may trim the starting and ending portions as you please. With that being said, here is how to trim video in the Microsoft Photos app.
Step 1. On your computer, open the Photos app. To do this, click the Windows button on your computer keyboard to open the menu and type in Photos to search for the app.

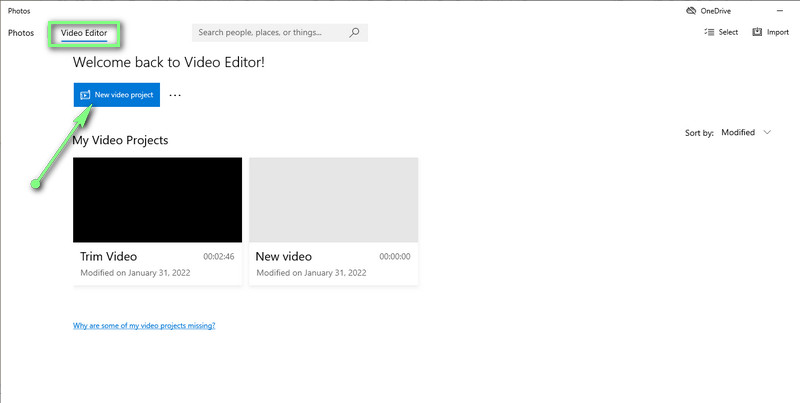
Step 2. On the menu located at the top left portion of the interface, click on the Video Editor tab and then hit the New Video Project button to begin cutting a video. Next, type in the name of the project you will create.
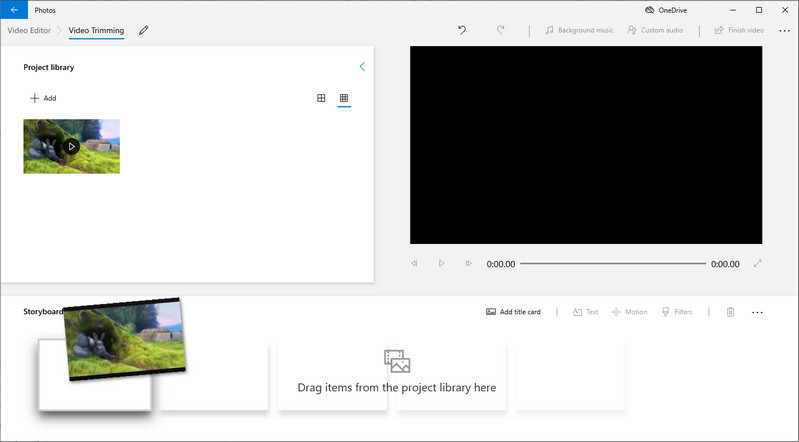
Step 3. Import the video you wish to trim by clicking the Add button. Browse and select your target video. After that, drag the video file from the media library to the storyboard to start the editing process.
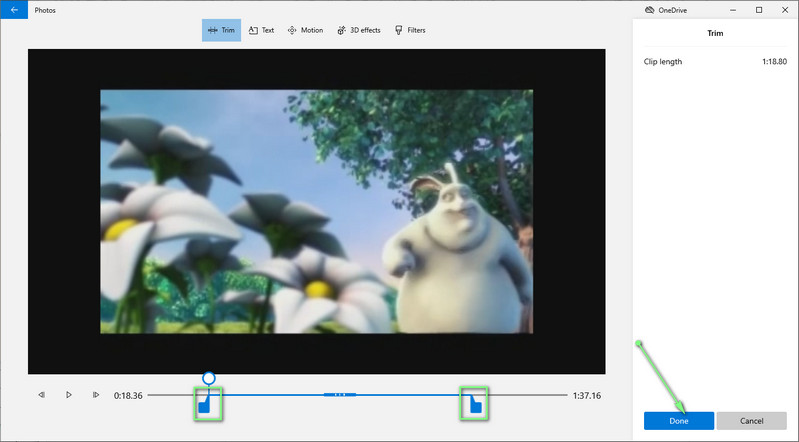
Step 4. Click on the Trim button from the Storyboard menu, and a dialog will pop up. Now, drag the left and right handles to select a range, then hit the Done button at the bottom right-hand side of the interface.
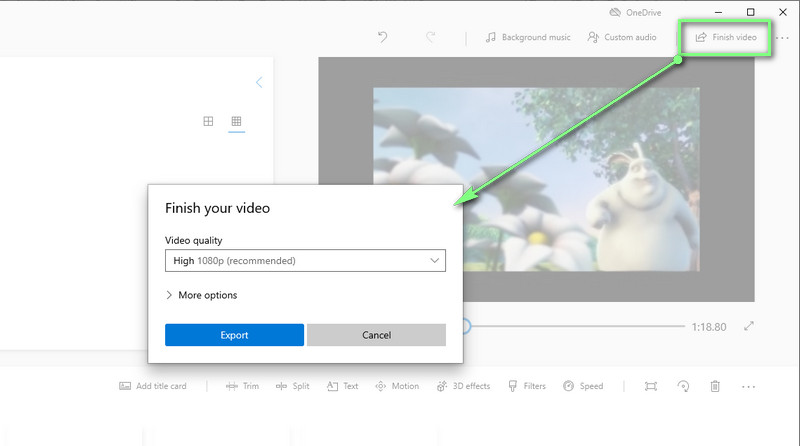
Step 5. To save the trimmed version of the video, click on the Finished video button at the upper right corner of the window. Now, select the video quality and hit Export. Completing the above steps will quickly help you trim video in the Microsoft Photos app.
Part 2. Best Alternatives to Microsoft Photos
1. Vidmore Video Converter
If the video result is not satisfactory when using Microsoft Photos, you should consider using Vidmore Video Converter. This program is designed to edit videos with its competent video editing tools. It can help you trim the starting and end of the video, cut in the middle of the video, and split the video. Plus, you can access many competent editing tools to enhance your videos. On top of that, there are other media features to help you make slideshows offering various templates, GIF makers, collage makers, and many more. Learn further and acquire knowledge on how to trim/splice videos in Microsoft Photos alternative.
![]() Great Photos App Alternative: Video Video Converter
Great Photos App Alternative: Video Video Converter
- Available on Windows and Mac computers.
- Cut, split, trim, and merge video files.
- Apply video filters and edit video effects.
- Supports nearly all video/audio formats.
- Sleek and easy-to-use graphical user interface.

Step 1. Install and launch the program
At first, you need to get the program. Simply click on the Free Download button suitable for your computer's OS. Install and run it on your computer afterward.
Step 2. Import a video file
The interface is segmented into four tabs. Choose the last tab, Toolbox, to see the functions it offers. From here, select the Video Trimmer option. Then choose and import the video that you like to trim. Simply click the Plus symbol and add your chosen video.

Step 3. Trim the video
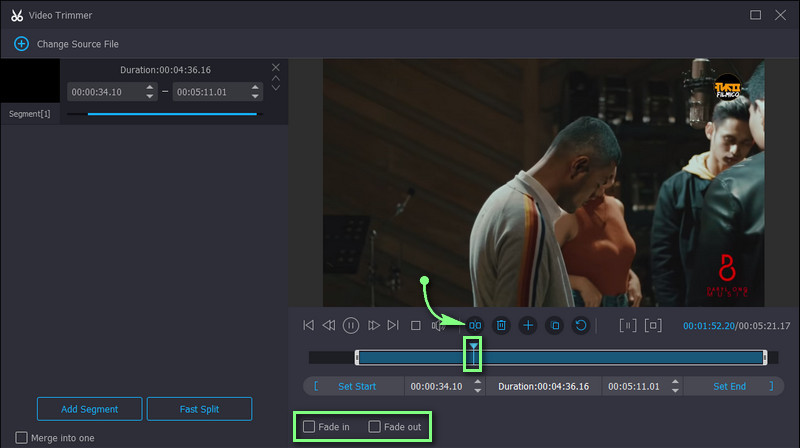
Now, to trim the video, select the section which includes the first part of the video you want to get rid of by moving the Playhead. Then click on the Split button from the menu below the viewer. You may also use the slider to trim the beginning and starting sections. You can apply fade-in and fade-out effects to the video for further enhancement.
Step 4. Save the video's trimmed version
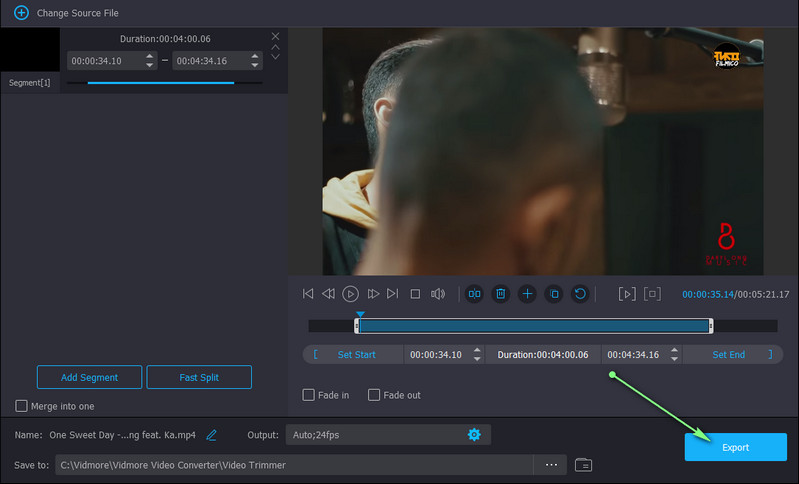
If you are happy with the video you trimmed, click the Export button at the bottom right corner. The output will show up instantly once the process is done. Then you can preview the video right away.
2. VLC Media Player
Another good substitute for MS Photos to cut videos in Windows 10 is the VLC Media Player. This program supports almost all computer and mobile platforms. In parallel with that, it accepts a wide array of video formats allowing you to cut and view nearly any video format. Trim videos in this Microsoft Photos alternative by following the steps below.
Step 1. Launch the VLC Media Player and upload the video you want to trim with the tool.
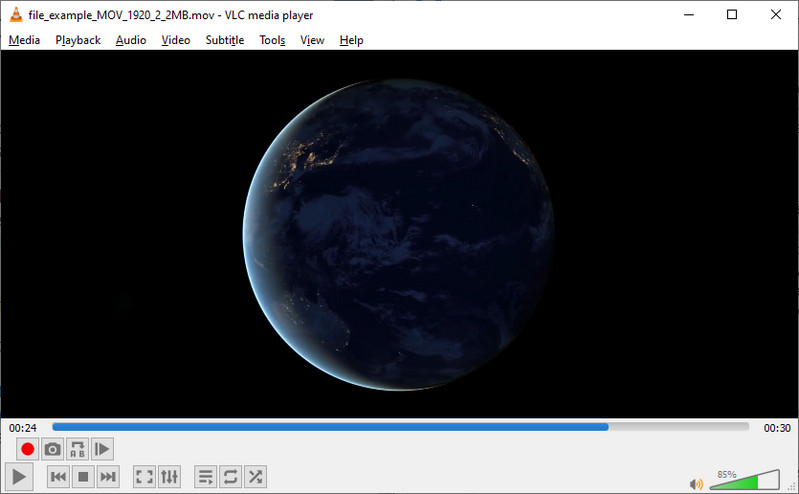
Step 2. Access the Advanced Controls from the View tab. You should see options added at the bottom of the interface.
Step 3. Now, choose the section where you want to start cutting the video, then hit the red Record button. Once it reaches the section where you want to end the video cutting, hit the Pause button to stop the video from playing.
3. Avidemux
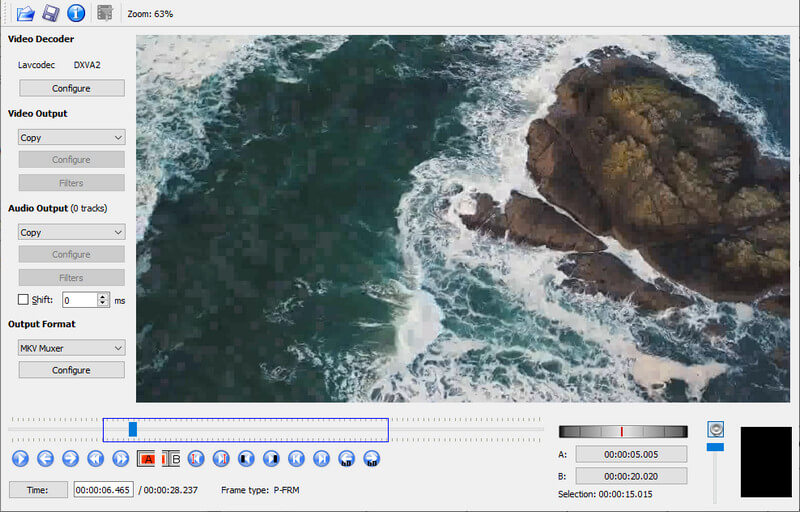
Like the previous tool, Avidemux is a multi-platform program available across different OS. It can carry out cutting, trimming, and joining tasks. Indeed it has a simple interface yet tends to be complicated for first-time users. Nonetheless, take the guidelines below to learn how to use this alternative.
Step 1. Run the program on your computer and open the video you want to cut.
Step 2. After that, select the point where you want to start the video cutting or press [ key. To mark the ending point, press the ] key.
Step 3. Lastly, save the video’s trimmed version.
Further Reading:
3 Simple Ways to Trim a Video in Windows 10/8/7/XP/Vista
Google Photos Movie Maker – Create Movie with Pictures and Videos
Part 3. Comparison of the Video Trimmers
We prepared a comparison chart of the tools mentioned in this post to inspect the programs further. Check it out below.
- Tools
- MS Photos
- Vidmore Video Converter
- VLC
- Avidemux
| Supported OS | Video Effects | Supported Format | Easy to Use |
| Windows | Supported | AVI, WMV, MP4, etc. | |
| Windows and Mac | Supported | MKV, MOV, AVI, MP4, and more. | |
| Windows, Mac, iOS, and Android | Not Supported | WMV, FLV, MOV, AVI, etc. | A bit complicated |
| Windows, Mac, and Linux | Not Supported | AVI, ASF, DVD, MP4, etc. | A bit complicated |
Part 4. FAQS on Trimming Videos in MS Photos
Can I trim large videos in Windows 10?
Yes. With the help of Microsoft Photos, you can trim videos without length constraint. Therefore, whether the video is short or long, you will have no problem cutting or trimming videos.
Is it possible to edit videos in Microsoft Photos?
Yes. The tool offers different editing options, including splitting videos, trimming, adding motion, 3D effects, filters, changing speed, etc.
Can I crop videos in Microsoft Photos?
Unfortunately, the cropping tool is only available for photos. If you wish to crop videos, you may use Vidmore Video Converter to crop without compromising the quality.
Conclusion
If you are a newbie and need to discover how to trim videos in Microsoft Photos, the guideline provided is a great help. However, if you find it a little insufficient for editing videos, there are more options for you to use. Vidmore can be of big help in terms of significant video enhancement. To perform video cutting in free and open source apps, you can choose between VLC and Avidemux.

