Find Ways to Trim a Video Clip in Google Slides: 3 Easy Steps
Suppose you are using Google Slides to show a presentation, and there is a slide there that is a video, and you want to cut it. You won't have to repeat the process of creating a presentation over and over again. Because now, you can trim a video clip on Google Slides. If you wonder how to cut a video on Google Slides, worry no more because this post will answer all your inquiries. Have a look at the guide below and follow the steps provided.

- Part 1. How to Cut a Video in Google Slides
- Part 2. Best Ways to Cut a Video
- Part 3. Comparison Chart
- Part 4. FAQs About Cutting a Video on Google Slides
Part 1. How to Cut a Video in Google Slides
If you are a complete beginner and want to learn how to cut a video clip on Google Slides, following the detailed step-by-step guide below will be better.
Step 1: First, on your Mac or Windows devices, go to Google and look for the Google Apps. Once the options appear, look for the Slides and click them.

Step 2: Next, tap the Blank page on the upper part of the video and tap the Insert option above. Then, press the Video from the choices and add your video clip, whether a URL or Google Drive.
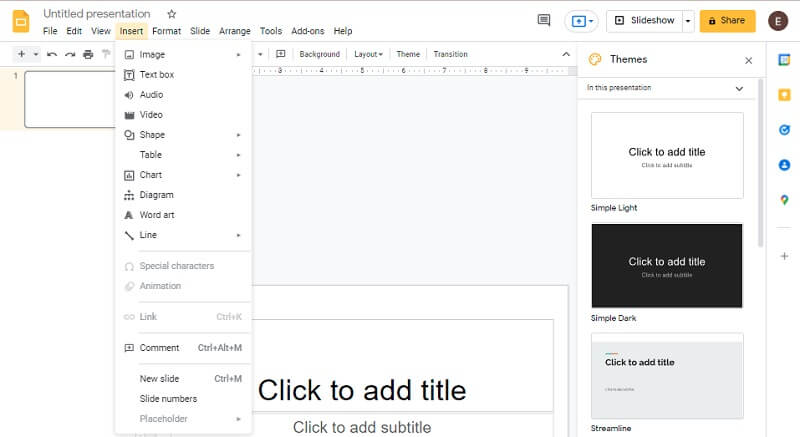
Step 3: Since Google Slides is not a video editor, it has limited features. You can't cut it with that, but you can set your video's beginning and end time. In that way, when you play the video, it will start at the said time. Just input the Start and End period located on the right side of the video. And that’s it! You can proceed with the presentation properly.

Part 2. Best Ways to Cut a Video
1. Vidmore Video Converter
Suppose you want a video editor rich in editing tools such as cutting and trimming. In that case, Vidmore Video Converter is the right fit. This program features a highly user-friendly interface that enables users, whether beginners or pros, to edit and change their recorded videos effortlessly. Also, you will be able to change any file format, including video, photos, and audio recordings. What draws users to this application is its flexibility to adapt to any multimedia file they operate. Vidmore Video Converter is accessible with Mac and Windows-based devices.
Additionally, it converts your files nicely, as it converts pretty quickly. That is why, if you want your video presentation to be more attractive to the audience, you better give this software a shot. Here is a basic demonstration of how to do it.
Step 1: Download the Best Video Cutter
Choose the appropriate Download option from the drop-down menu below to get a copy. Following that, you'll need to install a launcher for the program and wait for it to begin operating correctly on your computer.
Step 2: Add the Footage You Want to Include on Your Slide
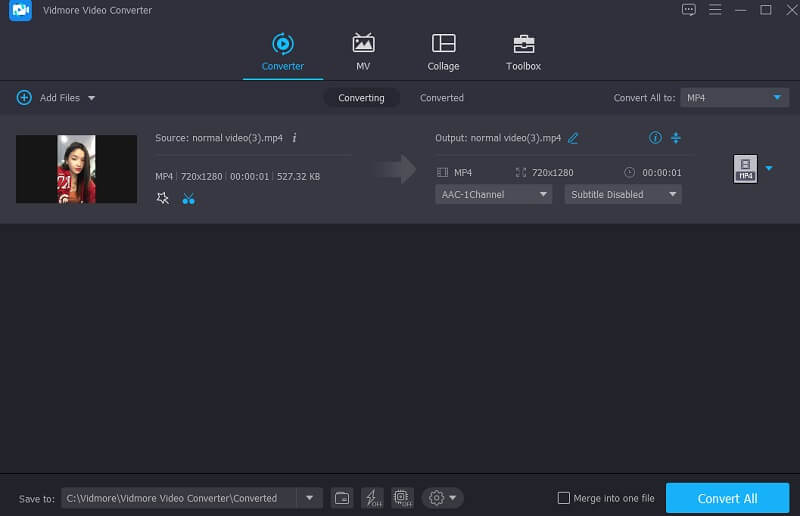
When you click on the Add Files button in the left top corner of the screen, the process of uploading the recorded video that you desire to change will begin. In addition, you may make use of the Plus sign, which will appear in the middle of the screen.

Step 3: Start Cutting the Parts
To go to the cutting portion of the video, click on the Scissors button situated underneath the video. A new screen will show when you click on the symbol to see the material. Following that, you'll want to direct the play head and define your video clip's start and stop timings, respectively. Once you're happy, click on the Save button to close the window.
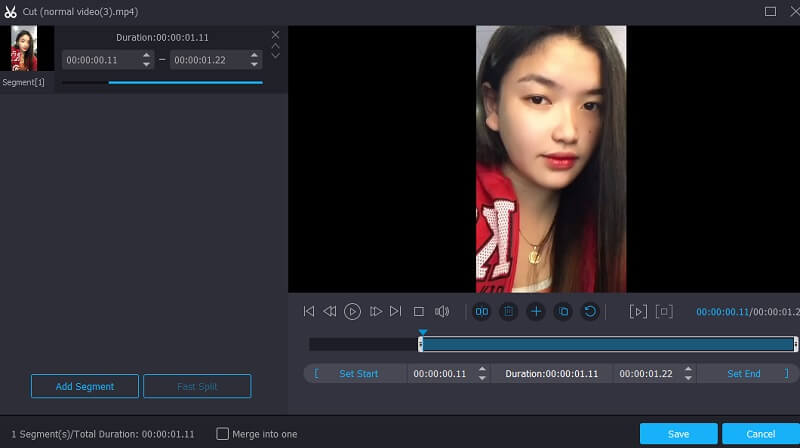
Step 4: Convert the Video
You may save the video you have created by clicking the Convert All button. You will find it on the Timeline's bottom portion as soon as you are pleased with the final output.
2. iMovie
In terms of video editing software for Mac, iMovie is the most well-known name in the industry. Using this program, in addition to video editing, can do a variety of other tasks. If you have a high-end device and wish to cut a video on your Mac device, you may do so by using one of the ways listed below.
Step 1: The Project tab will display when you run iMovie on your Mac. To continue, choose New and then Movie from the drop-down options. Select File, then Load Media to import the video to iMovie for cutting.
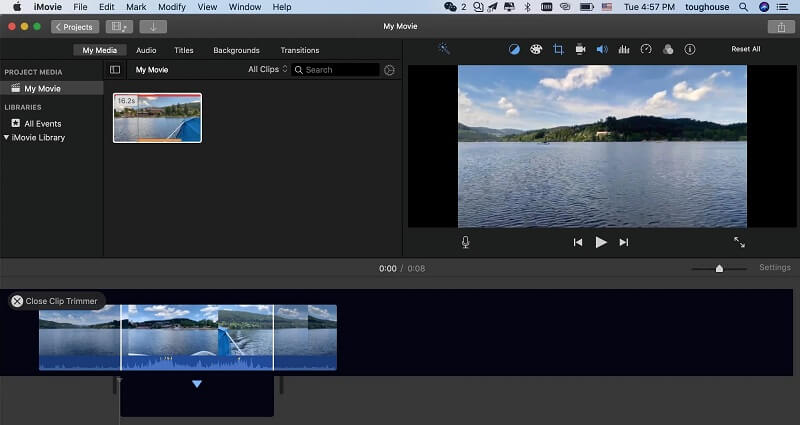
Step 2: Once complete, drag the video into the Timeline and use the arrow to shift the play cursor to the moment the film should be shortened. Then click the icon to bring the activity to a close.
Step 3: Finally, choose Separate Clip from the Modify drop-down menu to divide the clips. Additionally, you may use the Command + B keyboard combination to go to the next scene quickly. To restore the video's cut sections, choose Delete from the list.
3. ClipChamp
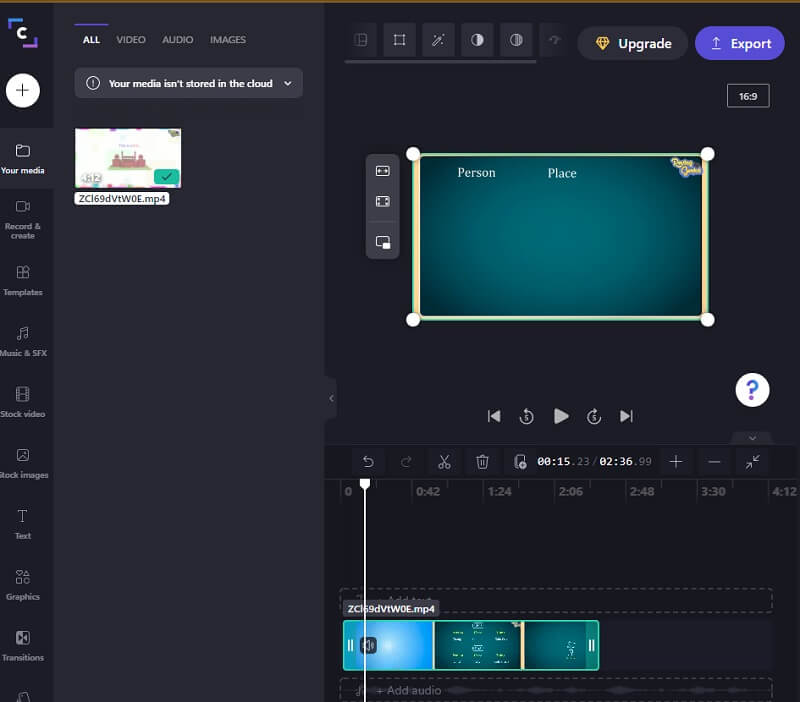
Clipchamp's online video cutting tool is a fantastic alternative if you're looking for a simple way to cut your videos. ClipChamp may be pretty beneficial for people who desire to enhance their videos, especially those who have no prior experience with video editing. With this web-based program, you can merge audio, image, and video elements into a single production. Additionally, it permits the inclusion of filters and language to make it more aesthetically appealing to a large audience. If you're curious about how this online program works, here's a brief tutorial.
Step 1: The first step is to search ClipChamp on your preferred search engine. Once on the main page, select the Create Video button to upload your video. You may use your phone to scan the code and upload your movie to ClipChamp.
Step 2: Drag the video into the Timeline after uploading it to the online tool. Then, position the play head on the portion of your recorded video that you want to cut. Tap the Scissor symbol to cut that part.
Step 3: If you are satisfied with your changes, click the Export option in the upper right-hand corner of the main screen.
Further Reading:
4 Easy Ways to Trim a Video on Mac
How to Trim MP4 Files with Leading Desktop and Online Trimmers
Part 3. Comparison Chart
Take, for instance, the situation when you are having difficulty deciding which video trimmer will assist you in making your video more presentable. Here is a table that can guide you through the process.
- Features
- Applicable on Mac and Windows
- Rich in editing tools
- Supports different video formats
| Google Slides | Vidmore Video Converter | iMovie | ClipChamp |
Part 4. FAQs About Cutting a Video on Google Slides
How long can a Google Slides video be?
The maximum length of a video that you may upload to Google Slides is 60 seconds.” /]What video formats are Google Slides compatible with?
The only format that Google Slides is compatible with is MP4.
What is the maximum file size that Google Slides support?
The longest or the largest file size that you may upload to Google Slides is 100MB in length.
Conclusion
Now you know how to cut a video clip on Google Slides, you will not have difficulty discovering it yourself. All you need to do is come after the guide above. But since Google Slides have limitations in editing tools, it is much better if you use the Vidmore Video Converter.


