Learn How to Improve Image Quality Online, Offline, and on iPhone
The quality of a photograph plays a very vital function, particularly in modern times when it is required to submit images to social media accounts. If we want to have a good buy-in of our products, then it is also crucial that we do this. But if the image's quality isn't excellent, how can we possibly do that? You can improve a high-quality photo in various ways, which is a fortunate development. Because of this, we will offer you some time right now to look at several tools that will accommodate you in improving the quality of your image.


Part 1. How to Improve Image Quality Online
There is a simple method available for enhancing the quality of your image. You can accomplish it by using the Vidmore Online Free Image Upscaler. It is an online tool that aims to improve the quality of a photograph for free, even if it is of low quality. This application can enhance the quality of a photograph by using its built-in artificial intelligence. It is accessible online.
Vidmore Free Image Upscaler Online is a fantastic tool, particularly for amateur photographers who are just starting and wish to improve the resolution of their photographs. Because of the intuitive design of the user interface, even first-time users should have no trouble navigating the site. Customers don't have to pay to use this also helps make it more approachable. Imagine that you could get a better image without paying any extra money.
In addition to that, this online picture enhancer is very risk-free. It does not keep a copy of every image you submit on its user interface. It takes only one day to clear these photographs. Using Vidmore Free Image Upscaler Online to enlarge an image without lowering its overall quality is also possible. And finally, it supports a variety of picture formats, which contributes to its very adaptable nature.
Here is a simplified process for improving the quality of an image in Vidmore Free Image Upscaler Online.
Step 1: Navigate to the Vidmore Free Image Upscaler page and locate the Upload Image button in the middle of the display window. Click on this button. Select the picture you wish to edit after the folders containing your documents have been brought up.
Try Image Upscaler Now!
- Improve photo quality.
- Enlarge picture to 2X, 4X, 6X, 8X.
- Restore old image, unblur photo, etc.

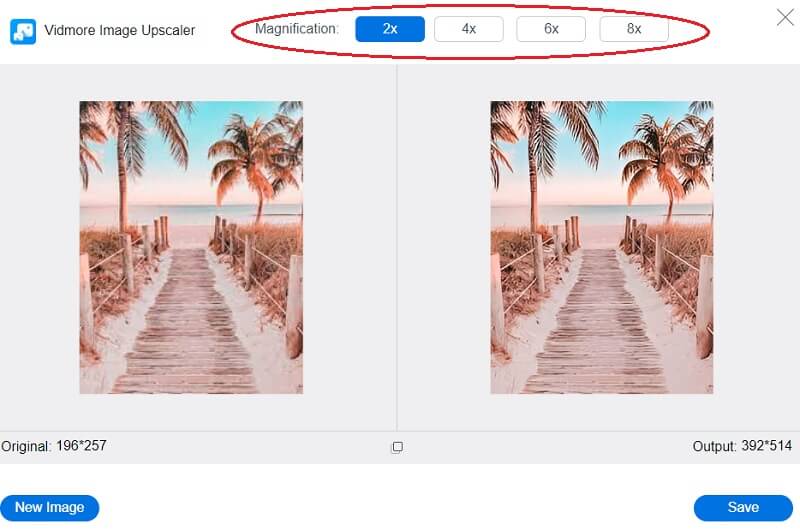
Step 2: If the image has been mirrored on your end, it will display both the original and modified version of the image. You also can select the preference you would want from the Magnification menu.
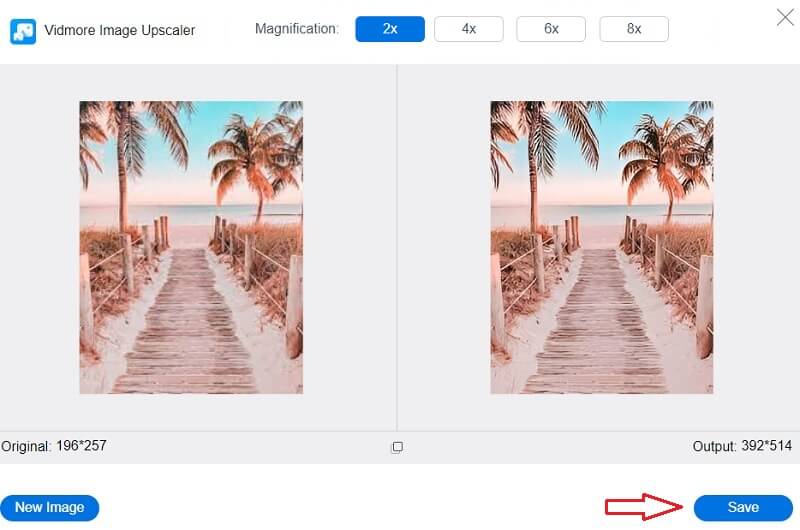
Step 3: Click the Save button at the bottom of the page after selecting the desired level of magnification, then wait while your image is downloaded.
Part 2. How to Improve Image Quality on Photoshop
Photoshop is often considered one of the most trained and expert applications when it comes to photo editing. This software is being put to use in editing various things, including premium images, logos, and flyers. It edits vector drawings in the same way that it edits pixel-based pictures. It includes a complete array of tools for editing pixel-based images.
Within this platform for professional development, other users will set challenges for you to complete. It is one of the most fantastic editing tools you can obtain. It is highly recommended for individuals thinking about entering the editing industry. It's possible that getting used to it will take some time, but the result will be well worth it. Take a look at the procedures listed below if you would like to learn how to enhance the quality of an image using Photoshop.
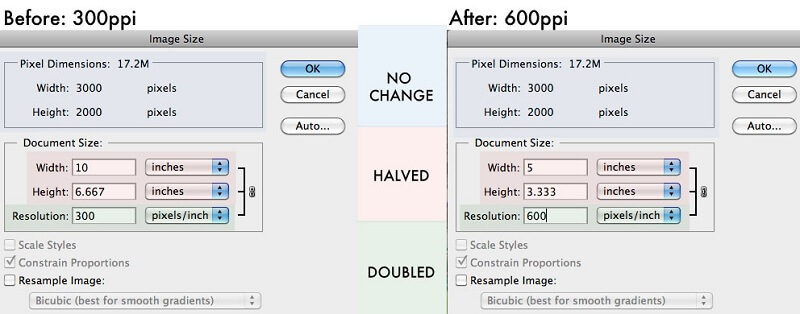
Step 1: Navigate to the File menu, choose Open from the drop-down menu, and select the image you want to use. After that, navigate to the image and choose the Image Size option from the drop-down menu. A window titled Image Dialog Box will materialize anywhere on the screen.
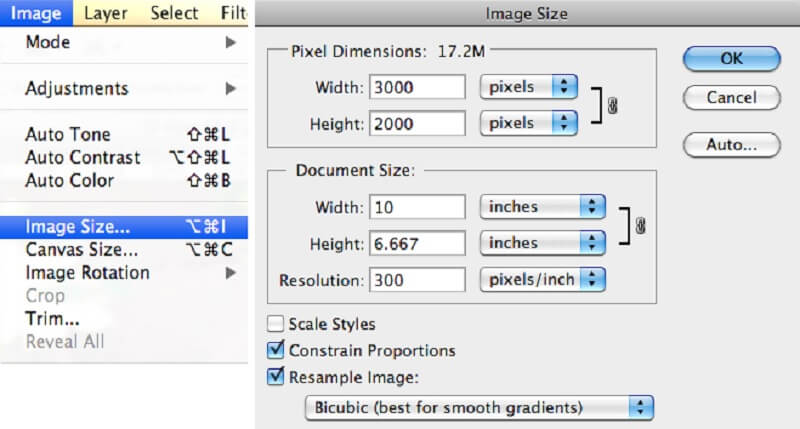
Step 2: Uncheck the Resample Image option to modify the resolution. It informs Photoshop that no pixels should be added or subtracted from the image.
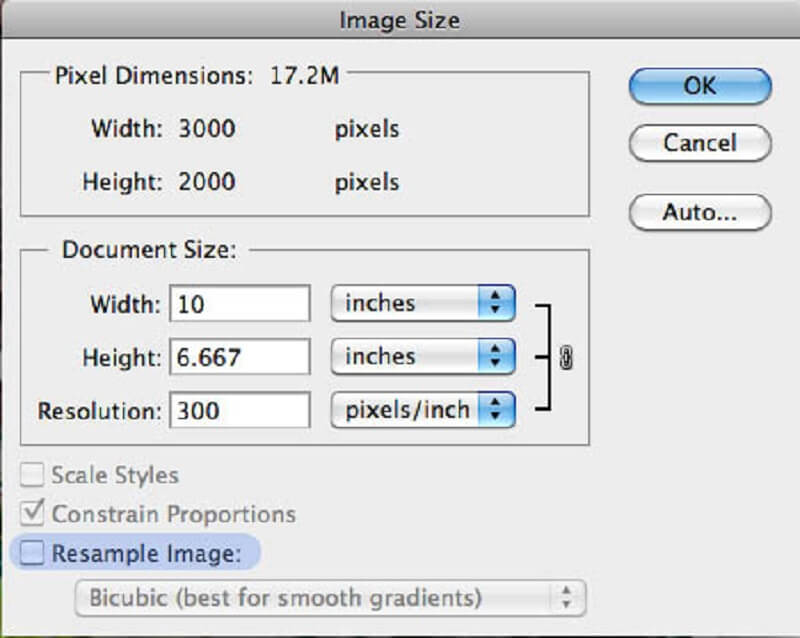
Step 3: Enter the resolution you want to use in the Resolution field. When you alter the value that you have entered into the Resolution field, you will see that the numbers that correspond to the width and height of the document also change. To accept the changes, click the OK button.
Part 3. How to Increase Image Quality on iPhone
To improve the quality of the photograph you took with your iPhone, all you have to do is modify the settings on the camera. Apple has recently released a brand new file format that uses an improved compression technique. The steps below will walk you through learning more about the most effective way to alter the resolution of images taken with an iPhone.
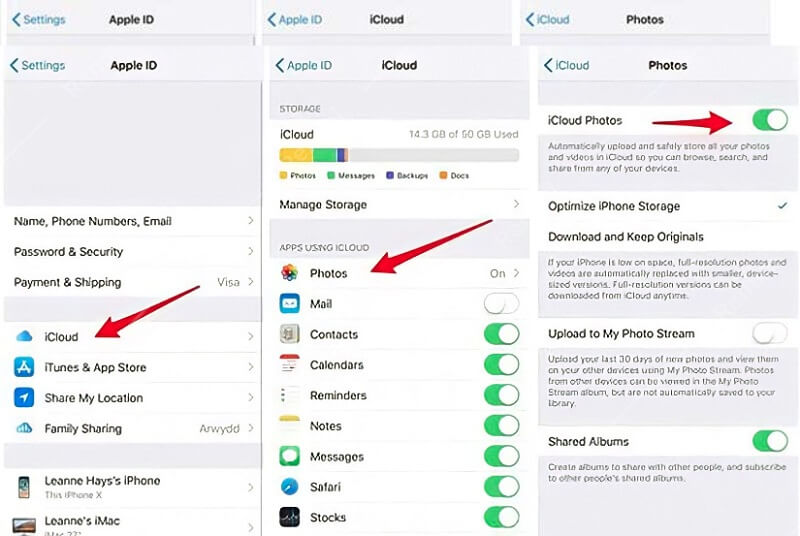
Step 1: Launch the app labeled Settings on your iPhone. Navigate to the iCloud menu using an iPhone and select the Photos option. Tap the iCloud icon on your iPhone and choose the Photos option from the menu.
Step 2: Make sure that the iCloud Photo Library option is turned on, and then select the Download and Keep Originals choice. You must save all of your photographs to the iPhone photo app and a local storage location. Failing to do so will reduce the resolution of the photographs that have been saved.
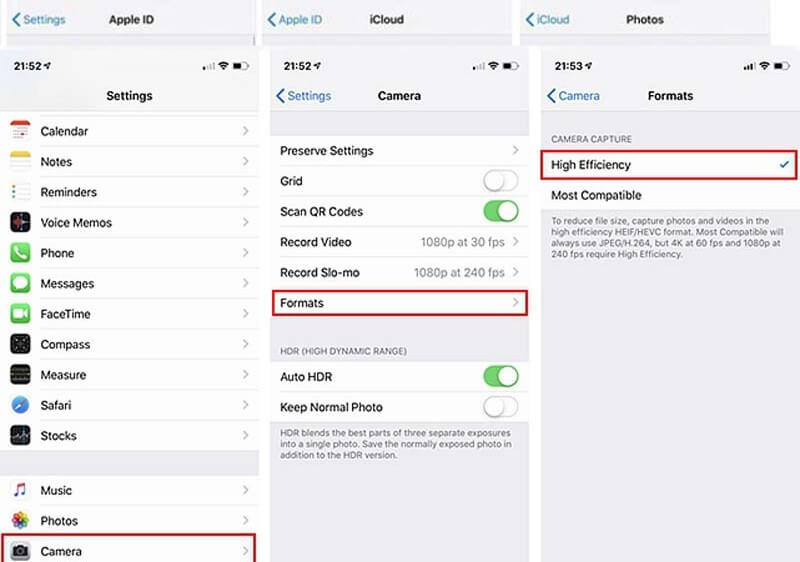
Step 3: Go back to the app that controls your settings and scroll down until you find the Camera option. You may alter the photo resolution on your iPhone by accessing the Settings app and tapping the Photos option. Once there, choose the Formats option, and then choose the High-Efficiency feature to store the photos in the HEIC file format.
Part 4. FAQs in Improving Image Quality
Why are iPhone photos low-resolution without any changes?
Unknowingly, you may upload your images to iCloud. In iPhone Settings, enable iCloud Photo Library. After selecting the iCloud Photo Library, you can store high-resolution iPhone photos.
Can WhatsApp modify iPhone photo resolution?
WhatsApp shrinks iPhone photographs. Apps compress the photographs they send. You may use these apps to send and download your images.
How can you alter Google image resolution?
Go to photos.google.com/settings on your computer. Then, click the Recover storage button. It will display the amount of storage space you will save by compressing photographs and videos from original quality to high quality. Finally, click the Compress button.
Conclusions
Now that different image editors are spreading in the digital market. You can quickly increase your image quality in just a few snaps! Good thing there are posts like this that will assist you in performing the tasks properly.


