How to Make a Photo Montage
Today, with all our technology, there are many fun ways to make your photos more interesting. One of the creative ways to combine multiple pictures in one frame is photo montage. It is like creating your own picture, where you can show off your favorite moments, travel, or anything you like in a fun and creative way. We will explore how to do this easily using the photo montage makers provided. These tools will help you transform and showcase your pictures in one frame. To get to know them, please read the following details.

PAGE CONTENT
Part 1. What is a Photo Montage
Let us first learn what a photo montage is. A photo montage is like creating a story by creatively combining different photos. Instead of one photo, you use several photos to show a series of events, memories, or ideas. People often use photo montages for special occasions like birthdays and weddings or to showcase their travels.
Part 2. How to Make a Photo Montage
1. Vidmore Video Converter
Are you looking for a simplified process of making photo montages with user-friendly tools and features? The excellent choice for turning your photos into captivating visual stories is the Vidmore Video Converter. This program allows you to create captivating photo montages with the convenience of the built-in collage feature.
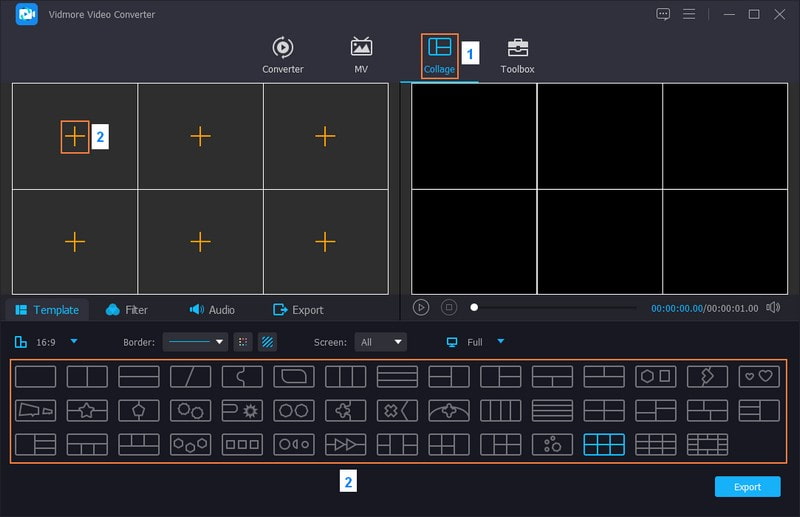
It is like having a digital canvas where you can blend pictures to tell a visual story. It offers thirty-nine templates with different designs and several photos you can add. You can arrange your pictures in various artistic layouts. Moreover, you can apply filters, add background music, and change output settings according to your liking. Impressive, right? Learn how to make a photo montage using Vidmore Video Converter:
Step 1. Visit Vidmore Video Converter's official website. Once there, download and install the program by following the on-screen instructions.
Step 2. Open the program. Navigate to the Collage tab from the top menu bar. Head to Template, and you will see various layout options. These layouts have different designs and numbers of pictures you can add. Pick one that can add all your pictures in one frame. Once picked, click the (+) buttons in each box in the frame to import your photos.
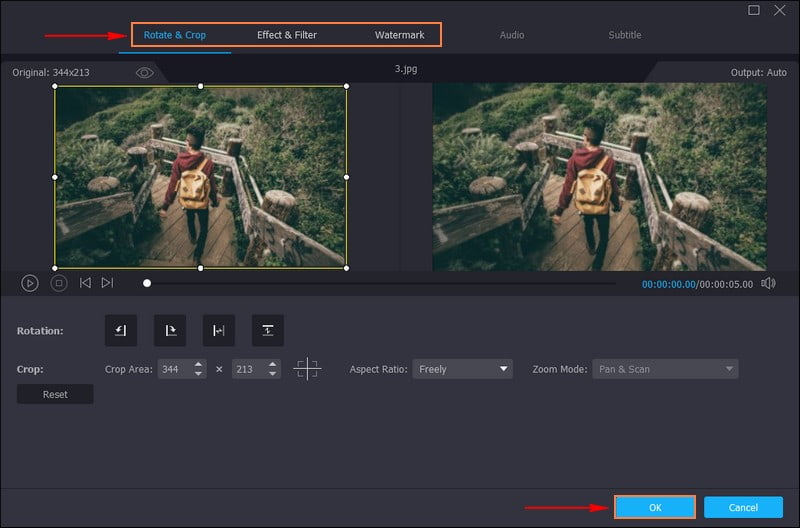
Step 3. Click the picture, drag to correct their position, and resize them, if needed, in each box. Click the Wand button to access the Rotate & Crop, Effect & Filters, and Watermark options.
Here, you can correct each picture's orientation and remove unwanted frames. In addition, you can embed ownership by adding a text or image watermark if you want to. Once done, press the OK button on the lower right of the interface.
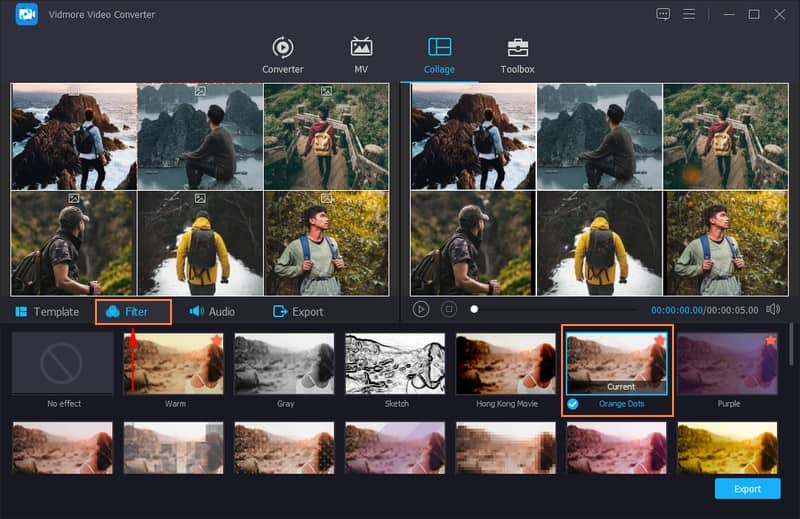
Step 4. Head to Filter, and you will see various presets you can choose from. These are Warm, Gray, Sketch, Hong Kong Movie, Purple, Plain, Coordinates, Starts, Modern, Pixelate, Pink 1, Dusk 2, Cool, and more. Please choose from the list suitable for your photo montage to make it more appealing on the screen.
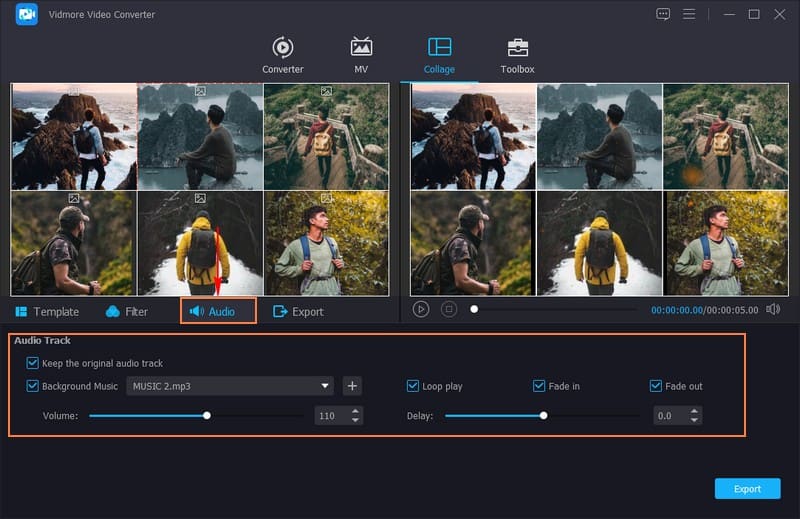
Step 5. Move to Audio. Put a checkmark beside Background Music to enable the option. Then, click the (+) button to add an audio file to your photo montage creation. It will immediately open your desktop folder and add the audio track you want to hear in your creation.
You can modify the Volume and Delay by dragging the pointers in the line bar. Drag the pointers to the left if you want to decrease. In contrast, drag the pointers to the right to increase. Moreover, you can apply audio effects, such as Loop play, Fade in, and Fade out, according to your preference.
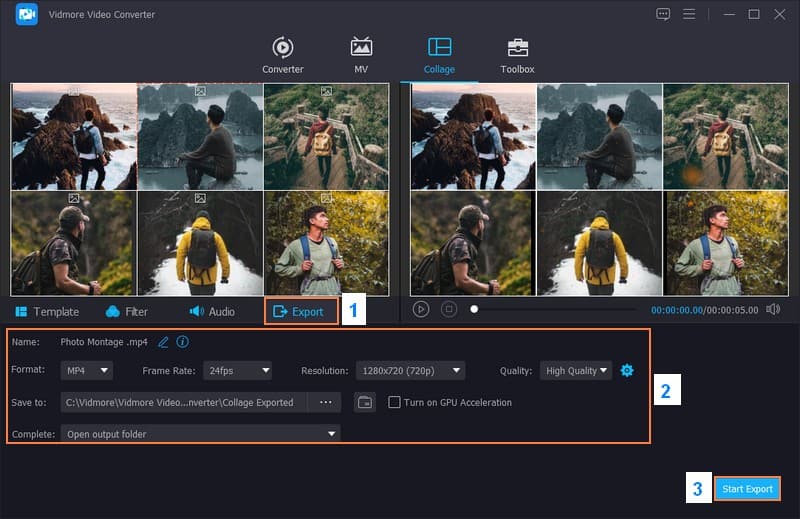
Step 6. Finally, go to the Export button. Enter a name for your photo montage. You can change the output settings, such as Format, Frame Rate, Resolution, and Quality. Once settled, hit the Start Export button to save your photo montage creation on your local drive.
2. Premiere Pro
Adobe Premiere Pro is a powerful tool for making photo montages. It is like a digital scrapbook where you can creatively arrange your photos and turn them into videos. You can add cool effects, transition between photos, and write text to tell a story with your pictures. You can save it as a video to quickly share it with your family and friends once you have finished. It is a fun and easy way to bring your photos to life. It is a fun and easy way to bring your photos to life. Discover how to create photo montage using Premiere Pro:
Step 1. Run the program on your computer. Click the File menu, New, then Project, and give your project a name.
Choose your settings, like Video Resolution, Frame Rate, and Duration. It determines the size and quality of your photo montage.
Step 2. Hit the File menu, then Import, and select the photos you desire to use in your collage. Hold down the CTRL key and add multiple photos at once. Right-click in the Project panel on the left corner and select New Item, then Sequence.
Step 3. In the Project panel, select your photos. Click and drop them into the timeline at the lower of the screen. Arrange them in the order you want. Click on a photo in the timeline to select it.
Hover your mouse over the edge of the photo in the timeline until a double-sided arrow appears. Click and drag to modify the duration of each photo.
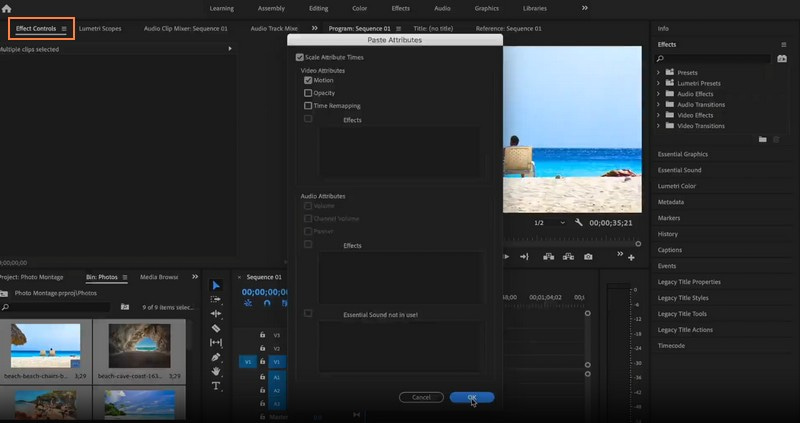
Step 4. Go to the Effects panel and look for Dissolve. Drag a transition effect like Cross Dissolve between the photos on the timeline. Upload an audio file and drag it to the audio track on the timeline below the photos to include music.
Go to the Type tool in the toolbar to add text to your creation. Click on the preview screen where you want to add text and start typing. You can customize the text using the Essential Graphics panel.
Step 5. Head to File, Export, then Media when satisfied with your collage. Choose your export settings, select a destination folder, and hit Export. Once the export is complete, you can open the exported video file to view your photo montage.
Part 3. FAQs about Making Photo Montage
How to make a photo montage on Instagram?
Launch the Instagram app. Click on Your Story at the top of the screen. Open the camera from the story. Pick the Layout button and choose your layout from the given options. Afterward, choose your photos for each section of your collage. Check if the pictures are in the correct order. When it is complete, click the Checkmark button.
What is a photo montage vs. collage?
Photo montage is putting different photos together to create a single image. In contrast, collage is about arranging multiple photos in a creative layout. Each photo stays separate, focusing on how they work together visually.
What is the difference between a montage and a slideshow?
A photo montage is a creative blend of images into one composition. In comparison, a slideshow is a sequential display of images or content, like a presentation.
What are some tips for creating an engaging photo montage?
Ensure that the pictures are in the proper order. Use photos that look similar or have a common theme. Add fancy stuff like transitions or effects between photos. Think about how your photos fit together on the screen.
Is there a standard number of pictures that can be added to a photo montage?
There is no standard number of pictures for a photo montage. It can vary depending on the montage's reason or purpose and design. Some photo montages include a few photos, while others might add several.
Conclusion
Making a photo montage is fun to show off your memories or ideas creatively and engagingly. You can turn your photos into something unique and share them with others. One of the reliable programs you can use to create photo montages is the Vidmore Video Converter. It allows you to add multiple pictures together and edit them. So, do not hesitate to try it and tell your story through pictures!


