3 Effective Ways to Enlarge an Image Without Losing Its Quality
When you enlarge your photographs beyond their original dimensions, the quality of the image will inevitably suffer as a result. When you first start learning how to edit photos, especially if you are a beginner, you will become frustrated since your images will wreck. However, It will enchant you to learn that many incredible internet and online applications are available. And they will assist you in enlarging your photographs while ensuring that the quality is preserved. This article is a tremendous help for you if you start and want to know how to enlarge a photo without losing its quality. If this describes you, then keep reading.


Part 1. Why Do You Enlarge Your Pictures
Image resizing is one of those complex problems that many people struggle with. When it comes to internet photographs, size is crucial, especially for those with slow Internet connections who cannot wait for an image-laden page to load. These individuals frequently feel frustrated and depart the site searching for an alternative. Ensure that you only upload photographs of the suitable size to the internet.
However, why is it necessary for you to resize your picture? It is necessary to have a consistent shape for the photos contained within a particular batch if we are going to make mini-batch learning more accessible. Because of this, an initial scaling of the image is necessary. We begin by scaling all of the photos to a form with dimensions of (300 × 300). Then we figure out how best to represent them using a resolution of (150 x 150).
Part 2. How to Enlarge a Picture Without Losing Its Quality
Fortunately, there are different ways to enlarge your images without losing their quality. Of course, you need to use tools to help you do so.
1. Vidmore Free Image Upscaler Online
One of the best ways to enlarge your image without losing its quality is through Vidmore Free Image Upscaler Online. This program works effectively on Mac and Windows operating devices. Aside from that, you can navigate this program without any subscription. This internet program is a great help in enlarging an image through AI or artificial intelligence. Unlike other editing tools, you won't have to make many adjustments or set different numbers because artificial intelligence will carry out those tasks.
Vidmore Free Image Upscaler Online is a massive help in maintaining a good image quality without losing its quality. By choosing the correct Magnification in the tool, you will achieve this without difficulty. Additionally, if you want to print your image and modify the DPI of an image, Vidmore will assist you!
And finally, it doesn't matter whatever file type you have. Vidmore Free Image Upscaler will still accept it. It can fix even animated pictures. That is why your image is guaranteed to help you if you want to enlarge your image using this online program.
Step 1: To locate the Vidmore Free Image Upscaler Online, you need to put its name on the search bar of your engine. Also, you can click the Upload Image button below to enlarge your photos directly.
Try Image Upscaler Now!
- Improve photo quality.
- Enlarge picture to 2X, 4X, 6X, 8X.
- Restore old image, unblur photo, etc.

Step 2: Once you have chosen an image, wait for a few moments while the artificial intelligence processes your image. And when the image is already processed, you will see the before and after results. Choose the Magnification that you want until you get the required zoom.

Step 3: Finally, press the Save button if you are okay with the result and enlargement of your image. And we're done!

2. Photoshop
When it comes to professional editing, Adobe Photoshop is a necessity that you cannot do without. It is a tool that can be used offline and assists users in improving their image quality without affecting the overall quality of the image. On the other hand, users may discover it is complicated since many procedures need to be performed before achieving the required adjustment. To further assist you, the following is a condensed explanation of how to increase the size of an image in Photoshop without degrading its quality.
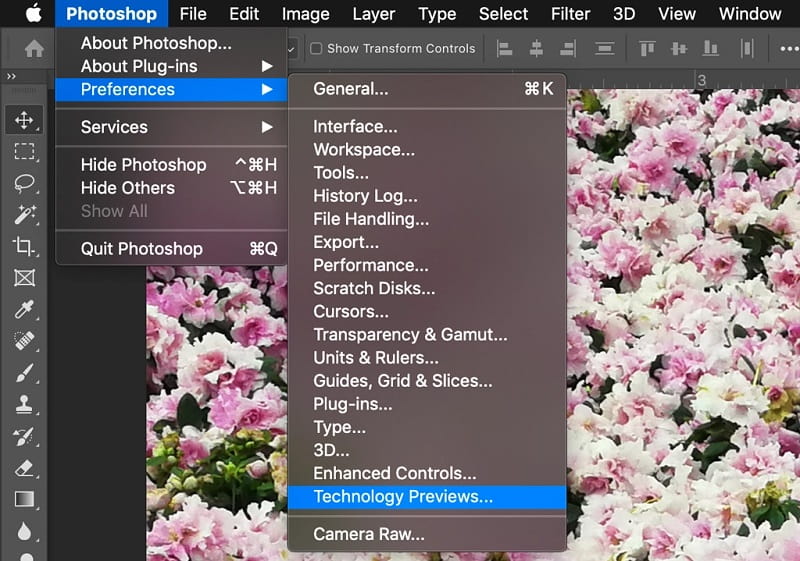
Step 1: To enable Preserve Details 2.0, press Command + K to enter the Preferences window and select Technology Previews in the list on the left side of the window.

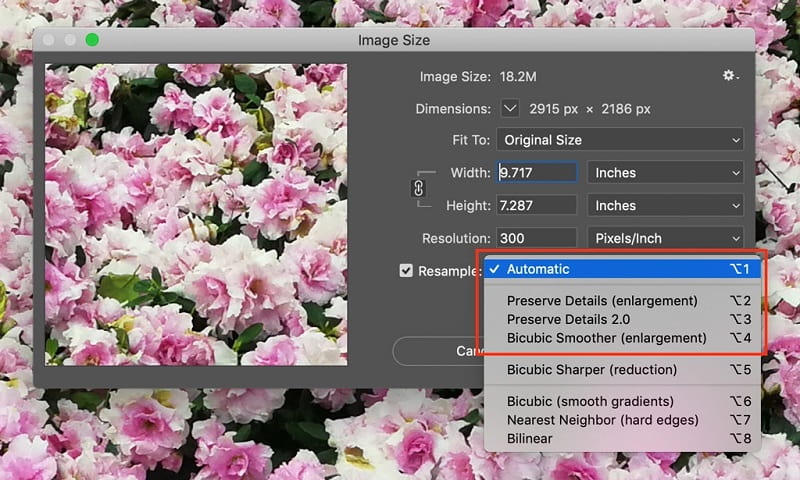
Step 2: After selecting Resample, options for the resampling method appear in the drop-down menu. These are the choices for adjusting resolution and dimensions independently, allowing Photoshop to blend pixels in various ways to maintain a smooth image while increasing or shrinking. The default option for enlargement is Automatic, although you can change it to the most recently employed approach. Photoshop will not use Preserve Details 2.0 if it is set to Automatic; therefore, you must select it manually to obtain high-quality results.

Step 3: A slider for Noise Reduction % will appear when selecting Preserve Details 2.0 from the drop-down menu, and a slider for Noise Reduction % will appear. Check the image preview one last time by zooming in and out and moving around the image. Modify Noise Reduction as necessary. Recheck the image in full-screen mode after clicking OK.
3. Adobe Lightroom
Adobe Lightroom is one of the most used software programs available. Numerous photographers regard it as the industry standard. However, this is also one of the most straightforward programs to learn and operate. Adobe Lightroom is where most artists begin their editing careers. This program is versatile and user-friendly, allowing you to accomplish anything. And if you want to know how to enlarge your images in Adobe Lightroom, take a look at this example.
Step 1: Continue to the Image Sizing section. To begin expanding your image, you will need to check the Resize to Fit box.
Step 2: Check the box if you do not require an enlarged version of the photo. If you want Lightroom to be able to enlarge it, you need to input it yourself.
Step 3: You have numerous alternatives for resizing to select from in the menu that drops down from the top. The first one is the relationship between Height and Weight.

Part 3. FAQs About Enlarging a Pictures Without Losing the Quality
What image formats does Adobe Lightroom support?
Lightroom is compatible with a wide variety of image file types. JPEG, TIFF, and DNG are just a few of the many formats available. In addition to that, it is suitable for use with CR2 and NE.
Which is superior: Lightroom or Photoshop?
Lightroom is the most excellent program for processing and managing the hundreds of photographs that are now stored on your various devices. Photoshop is known for providing a greater degree of control, which enables users to accomplish more extensive alterations and, as a result, create photographs that appear immaculate.
What's Photoshop's best image format?
The PSD file format offers the finest possible quality when printing images. If you want to edit photographs, you should use a Photoshop document (PSD). In PSD format, you can make color corrections and execute any other editing changes, such as adding text or layers.
Conclusions
With these most prominent tools, you can enlarge your image without losing its quality! Follow the instructions above to achieve the desired enlargement of your images.


