Article Title: Image Compressor for Website [Online & Offline Methods]
Images are essential for websites to add visual appeal and create appealing content. It is necessary to know that image size for a website does matter. If it is too big, your website will load slowly and provide a bad-viewing experience. In that case, you must compress your images for various reasons that benefit your website. This post will teach you how to compress image for web. Besides that, it will present image compressors you can rely on. Are you ready to learn these methods? If so, proceed to the following information.

PAGE CONTENT
Part 1. Introduce Best Image Size for Website
It is necessary to consider the image size for website for three reasons: page speed, ranking, and user experience. So poor choices in your image sizing can affect all three of these metrics, generally at the same time. With that, you must choose the best image size for a website, as it can help improve them all.
We will introduce to you the best image size for website to improve user experience and website page speed, and ranking:
| Website Image Type | Image Dimensions | Image Aspect Ratio |
| Background Image | 1920 × 1080 pixels | 16:9 |
| Website Banner | 250 × 250 pixels | 1:1 |
| Blog Image | 1200 × 630 pixels | 3:2 |
| Hero Image | 1280 × 720 pixels | 16:9 |
| Logo (Square) | 100 × 100 pixels | 1:1 |
| Logo (Rectangle) | 250 × 100 pixels | 2:3 |
| Social Media Icons | 32 × 32 pixels | 1:1 |
| Favicon | 16 × 16 pixels | 1:1 |
| Thumbnail Image | 150 × 150 pixels | 1:1 |
| Lightbox Images (Full Screen) | 1600 × 500 pixels | 16:9 |
Part 2. Why to Compress Image for Web
Why do you need to compress image for website? This part will answer this question for you. With that, you will have an extensive understanding of why it is necessary to compress images for websites. Without further ado, proceed with the following information.
- A compressed image can increase the website speed and help load the website faster.
- It provides the best experience to users visiting your website.
- A compressed image takes less time to upload.
- It takes up less storage space not only on your website but also on your hard drives or cloud storage.
- The compressed image looks as sharp on the screen as the original one.
- Compressed images can improve a website’s performance and search engine optimization rankings.
Part 3. How to Compress Image for Web
1. Online Way: Free Image Compressor Online
If you are the kind of user, who prefers to do your task online, count on Vidmore Free Image Compressor Online. It is a web-based image compressor that is free to access and use. It does require you to sign in to your account and does not require you to install a program on your desktop. This web-based image compressor has a straightforward interface, making it easier for first-time or professional users to navigate. The good thing about this platform is that it provides various points to compress images. One of the points mentioned is that compressed images load web pages faster. With that, consider compressing your images for the web to provide a great user experience in web browsers.
You do not need to worry if this platform can compress your image format because it supports various formats. These formats are JPG, JPEG, PNG, SVG, and GIF, which can be optimized and compressed up to 80% and maintain high-quality images. It supports batch compression, so if you want to save time, you can add multiple images simultaneously instead of compressing them individually. In addition, it can compress images up to 60% of their original size without sacrificing the features and quality of the image.
Here, we present a step-by-step process on how to compress image for web using Vidmore Free Image Compressor online:
Step 1. Visit Vidmore Free Image Compressor Online
To begin with, using your browser, look on Vidmore Free Image Compressor Online’s official website. Once directed to the main interface, compress your images using the web-based image compressor.
Step 2. Add Images to Vidmore Free Image Compressor Online
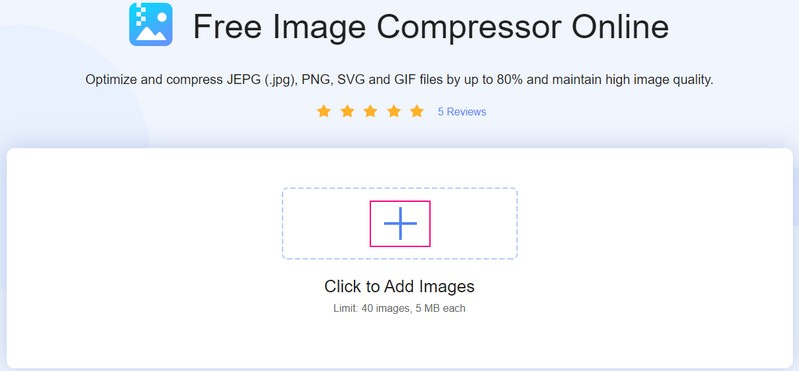
Head to the center part of the main interface. Here, you will see a button where you will add your images. Besides that, you will see information saying that you can add 40 images and 5 megabytes each at once. If you want to spend less time, you can upload them together instead of compressing them individually.
Click the (+) sign, and the web-based tool will automatically open your desktop folder. Then, select the images you want to undergo compression, and the image file size will be reduced afterward.
Step 3. Download Compressed Images
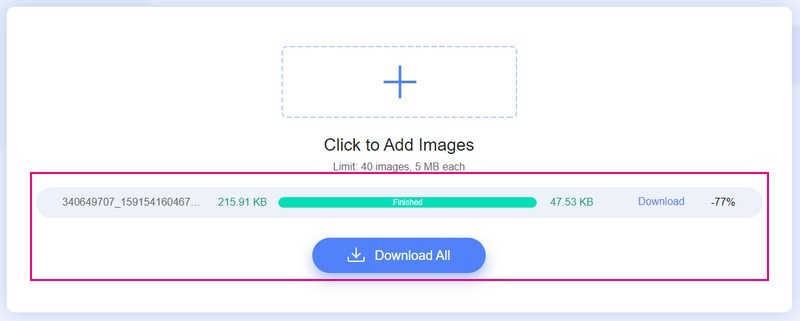
Once you select the images, you will see they go through the uploading and compressing process. As you can see, the size of your image file has been reduced from 215.91 KB to 47.53 KB. After that, you will see the word Finished covered in green beside your image file on your screen. It is a hint that the web-based image compressor successfully compressed your image.
Tap the Download All button to save your compressed image file to your desktop. After that, a folder will appear where your saved compressed image file is on your screen.
2. Offline Way: Photoshop
Photoshop is commonly used for graphic design, image creation, and photo editing. It offers several editing features for pixel-based images, vector graphics, and raster graphics. On top of that, it supports various image file formats that can be converted into another one. Photoshop is one of the best platforms with a unique algorithm to compress photos for websites. Besides that, it can compress a batch of images on your computer. It can help you optimize the loading speed of your web page and shrink the size of your images.
Here, we present a step-by-step process on how Photoshop compress image for web:
Step 1. Run the application on your desktop. Once the program is opened, head to the File tab and select the Open option. After that, it will open your desktop folder and select the image you want to undergo compression.
Step 2. Head to the File tab again and select the Save for Web & Devices option to compress the image for the web. With that, you will have a smaller image file size, which you can get using this program.
Step 3. Begin modifying the other parameters, such as the Image Size, Optimized, Preset, Percent, or Quality. Modifying these parameters helps you maintain the quality of your image.
Preview the image and the difference between the quality and file size comparison in the 4-Up button. Besides that, if you want to compress a specific size, you can estimate the percentage accordingly.
Step 4. Hit the Select download speed button to change the Size/Download Time. With that, you will get an estimate of how long it will take to download your image at the selected Size/Download Time.
Step 5. Once satisfied, press the Save button to compress the image for the web using the program.
Note: Save the compressed image file output to another folder to replace the original one.

Part 4. FAQs about Web Image Compression
What format types are supported by the web?
The typical image formats supported and used on the website are PNG, JPEG, GIF, SVG, and WebP.
What is the best compression format for web images?
PNG is the best compression format for web images because it supports lossless compression, maintaining details and contrast between colors. Besides that, it is commonly used for banners, graphics, infographics, and screenshots.
Is JPG or PNG better for websites?
Select JPG format if you prefer a fast-loading compressed image. However, select PNG if you want a clear, high-quality image on the websites.
Conclusion
Consider compressing your images to make the website run faster. This post presented online and offline image compressor for website. However, Photoshop requires you to subscribe to compress your images. So if you want to use a free image compressor, rely on Vidmore Free Image Compression Online. It can help you compress images and get the result straight on the website quickly and hassle-free.
