Create Your Own Music and Edit Your M4A Metadata with Ease
An M4A file is most commonly found as a song download format in Apple's iTunes Store. And it is one of the most popular file formats being used when it comes to making a song. And of course, if you were composing your own music, you need to know about the information that was attached to the soundtrack, which is also known as metadata. Or for instance that you want to correct some excess or false information about the audio tracks.
In this post, we will talk about the metadata in audio and why there is a need to edit it. As well as the best tool that you can count on for editing your audio's metadata. All you have to do is to refer to the information given in this post as we will also give you the M4A metadata editor.

- Part 1. All About Metadata and Why You Need to Edit It
- Part 2. Best M4A Metadata Editor Ever
- Part 3. FAQs About M4A Metadata Editor
Part 1. All About Metadata and Why You Need to Edit It
Maybe you are familiar with the information that you are seeing in every song that we play on our media player, however, we are not aware that these are the metadata. So, what is metadata? It is used to simplify basic data information and make it easier to track and interact with specific data. A metadata structure is a table that details how metadata will be gathered, how it will be created, how it will be compiled, and what objectives it will be used for.
You may be wondering what is the importance of editing metadata, well, there are a lot of reasons. For instance, you downloaded an M4A file and noticed that there was some incorrect information such as the name of the author, the title of the song, the name of the performer, the musical genre, the sound category, and so on and so forth. This information can be edited to highlight what's in each file. It also aids with sorting within a storage device. It also helps especially if you love composing songs. Through the help of editing metadata, you can take ownership of your song by putting your information into it.
Part 2. Best M4A Metadata Editor Ever
You may be scrolling through the internet and finding the best metadata editor for your file and somehow being confused about which tool to use or what tool suits your ability, well here is a solution for you. You can just fully depend on the Vidmore Video Converter. This professional software is both compatible with Mac and Windows therefore there will be no problem when it comes to compatibility. Aside from that, you don't have to worry about how to navigate the tool as it offers a user-friendly interface, which will help you to easily edit your audio's information. So even if you are a beginner, you can still easily understand it.
It is a one-stop shop actually because you can cut and trim your audio tracks and remove the unwanted parts through this tool. This can be done through the cutting session. Another thing is you can take control of the sound's quality by navigating the settings of the audio and arranging the bitrate, sample rate, and channel. What makes it more convenient to users is, you can choose the format that you require on your file.
Unlike other software which doesn't work without the help of an internet connection, Vidmore Video Converter still performs best even if it is now being supported by the internet. Aside from that, it is also a time saver as it allows faster conversion despite the file size. The only thing that it doesn't have is the mobile version.
And at this point, we will teach you to edit your M4A metadata through this professional program.
Step 1: Get the M4A Metadata Editor
Before you can get this tool, you need to acquire it by clicking the Download button given below. After that, install the program and let it run on your device. Once you successfully acquire the Vidmore Video Converter, you can now open it.
Step 2: Add M4A Files
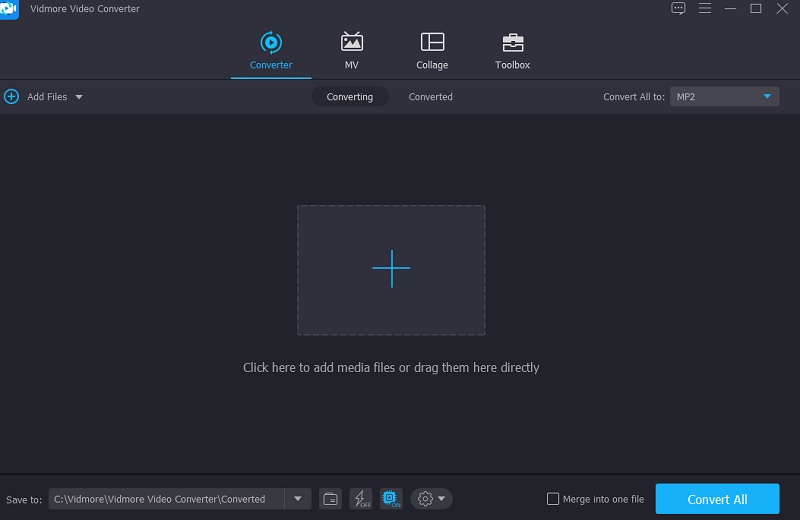
After you open the program, you will see the main interface. Just click the Add Files on the left upper part of the screen or you can also tick the Plus icon on the center part of the screen for you to add your M4A files.
Step 3: Edit the M4A Metadata
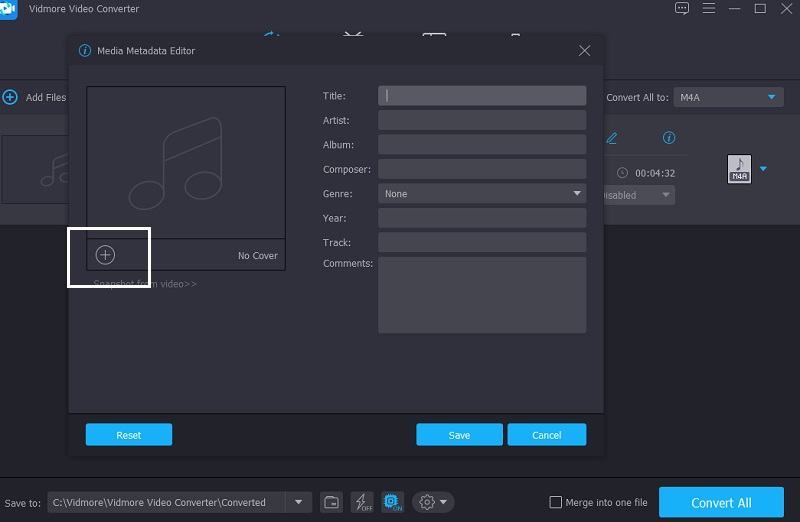
After adding the M4A file on the Timeline, you can now edit the metadata. Just go to the letter i icon with the blue color on the right side of the audio track. Then you will see the information that you will need to fill up such as the Title, Artist, Genre, and so on. Just put the data that you want to be seen on your soundtrack.
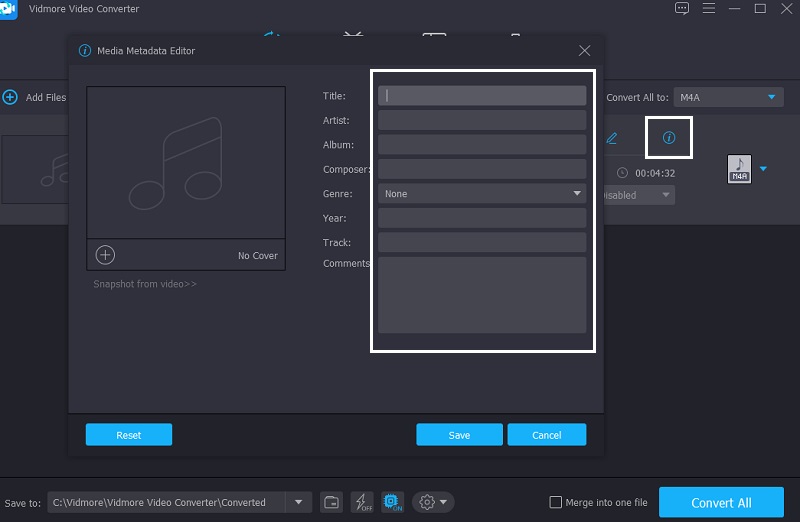
Aside from that, you can also customize the cover photo of the audio tracks. You just have to click the Plus sign that you will see below the frame and choose from the Library the photo that you want to see whenever you play your audio tracks on your media player. Then click the Save button.
Step 4: Convert the M4A File
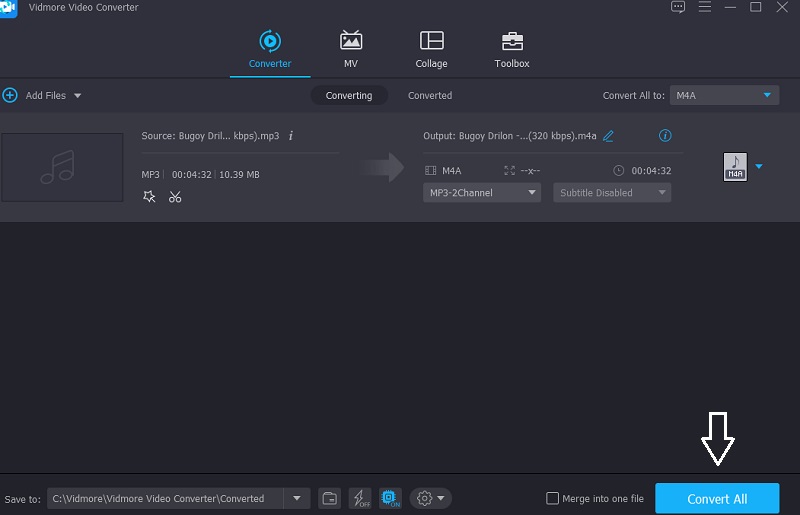
Lastly, after inputting the information on the audio tracks and inserting a cover photo, you can now proceed with the conversion process. To apply the changes, click the Convert All button and wait for the conversion process to finish.
Part 3. FAQs About M4A Metadata Editor
What kind of file formats have full information about metadata?
The FLAC, AIFF, and MP3 formats take full advantage of metadata, but WAV files only allow a little amount of metadata input.
What's the most important part of metadata that should be included in an M4A file?
Usually, the most needed information in an M4A's metadata is the show name and the episode title.
Can metadata be falsified?
Yes it is possible with just a few clicks, you can change the name or the information given on the audio tracks' metadata.
Conclusion
Through the given information above, we can say that it is very important to input metadata on our audio tracks especially if we want to take ownership of our audios. That is why there is also a need to have an M4A metadata editor for you to take control of the information on your soundtracks. Especially for an instance where we want to correct or change the information on our files. And with the help of Vidmore Video Converter, you can easily edit M4A metadata on Mac and Windows.
