Find Out How to Turn a Video into a Live Photo with Ease
A Live Photo is like a special picture that is not just still. It is a photo that also has movement and sound. When you look at it on your iPhone, it plays a tiny video clip, just a few seconds long, to make the moment come alive. Do you want to make your videos more than just moving images? If that is the case, we got your back, as this post will present methods to make video into a Live Photo. Let's explore how to turn a video into a Live Photo to give your videos this magical touch!

PAGE CONTENT
Part 1. How to Make a Video a Live Photo on iPhone
1. How to Make a Video a Live Photo on iPhone in a Default Way:
Did you know your iPhone has a hidden feature that allows you to transform videos into captivating Live Photos? This method uses a creative workaround to accomplish the Live Photo effect. It might not be the traditional default way, but it is a clever approach to give your videos a Live Photo-like experience. We will guide you through a simple way to achieve this using the built-in Photos application.
Below are the steps on how to turn a video into a Live Photo in a default way:
Step 1. Select a short video from your Photos application that you desire to use.
Step 2. If the video is too long, you can cut it to use only the part you like the most.
Step 3. Open the Settings on your smartphone, scroll down, click Wallpaper, and then select Choose a New Wallpaper.
Step 4. Browse and choose the video you want to convert into a Live Photo. Modify the start and end points to focus on the desired part. Then, choose Set for your lock screen.
Step 5. Lock your iPhone and press and hold the lock screen. Witness your chosen video come to life as a dynamic Live Photo.
2. How to Make a Video a Live Photo on iPhone Using intoLive:
Have you ever wished you could relive the special moments captured in your videos as dynamic Live Photos? Look no further; intoLive empowers you to seamlessly convert your favorite videos into stunning Live Photos that blend motion, emotion, and memories. This application allows you to customize your Live Photo further, enabling you to add effects, stickers, and text. You can select videos of any length. However, the free application version can only make Live Photos up to five seconds long. In contrast, the Pro version can only go up to 30 seconds.
Below are the steps on how to make a video into a Live Photo using intoLive:
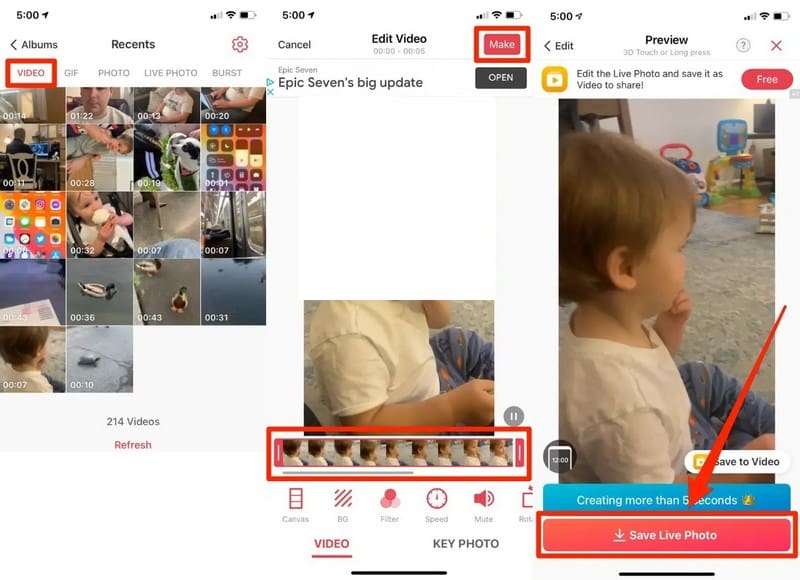
Step 1. To begin with, install intoLive on your mobile device and give it access to your photo library.
Step 2. You will be shown all the files in your camera roll, organized by type, such as video, burst, etc. Pick the video that you desire to turn into a Live Photo.
Step 3. The video editing page will open. Use the slider at the bottom of the screen to pick which part to turn into a Live Photo. In addition, you can use the buttons to incorporate filters, modify the video speed, and more. However, some options will be locked behind the intoLive Pro paywall.
Step 4. When you have the video looking how you want it, click Make in the upper right. Then, select how many times you would like the Live Photo to repeat; No repeat is the default and will usually work fine.
Step 5. The application will make your Live Photo. Once done, click Save Live Photo. Afterward, you can find your new Live Photo in the Photos application.
Bonus: How to Make a Video with Photos
Have you ever wanted to turn your favorite photos into amazing videos? Vidmore Video Converter is here to make it easy for you. This program is designed to be user-friendly, making it an excellent tool for beginners and those familiar with video editing. Imagine combining your treasured photos to make captivating videos that bring your memories to life. With Vidmore Video Converter's MV feature, you can create stunning videos using your photos without any hassle. Start creating your own photo videos today and relive your special moments in a new way!
Step 1. Download and Install Vidmore Video Converter from the official website. When installed, proceed to open the program to get started.
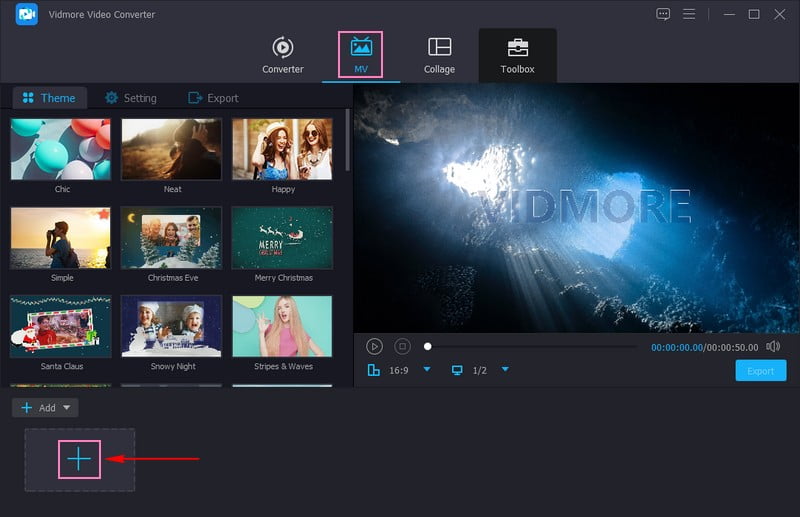
Step 2. Go to the MV tab, and click the (+) button on the bottom-left corner of your screen to import your image files. You can add as many images as you want into your video. In addition, you can place them in their correct order or position.
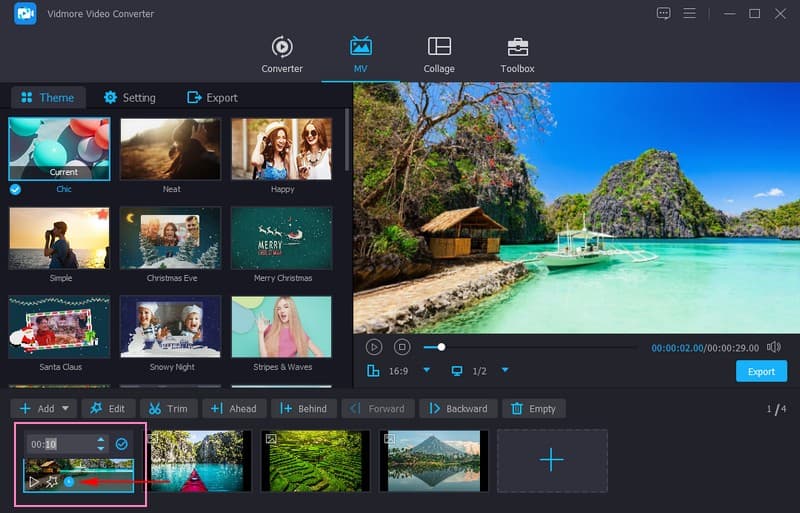
Step 3. If you want to modify the speed of each image, whether to appear shorter or longer, click the Clock button.
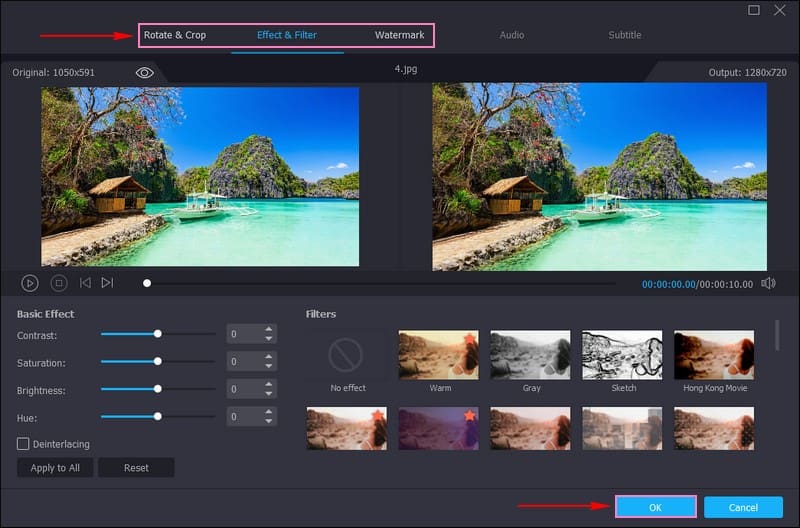
Step 4. Click the Wand button to edit your creation. Correct your video presentation and remove unwanted frames from Rotate & Crop. Modify the basic effects, such as brightness, hue, saturation, and contrast, and incorporate your desired filter from Effects & Filters. Embed a Watermark, whether text or image, to incorporate your ownership.
Note: Hit the OK button in each editing tool to apply the changes.
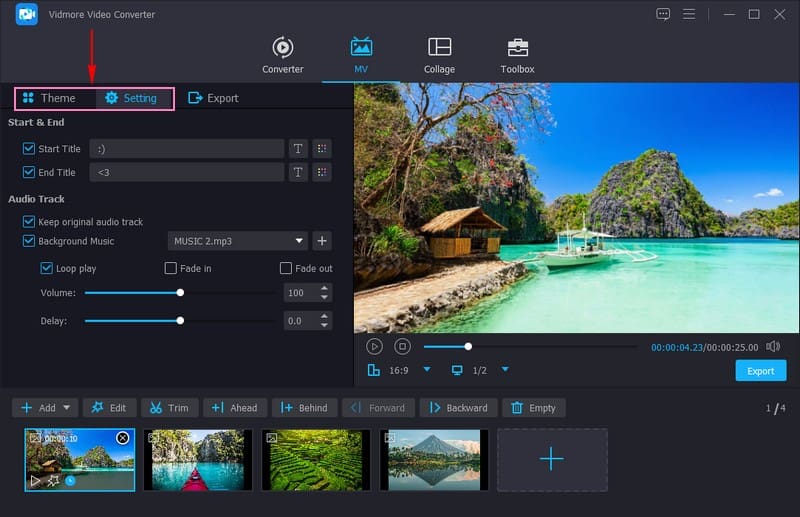
Step 5. On the Theme & Settings options, you can add your desired Theme, Start & End Titles, and Background Music. Put a checkmark beside each option for you to accomplish your thing.
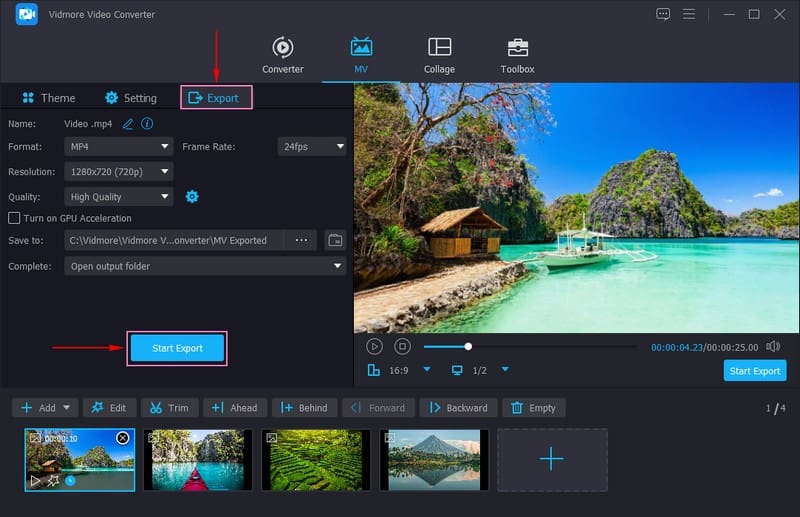
Step 6. Go to the Export option, and change your video format, resolution, frame rate, and quality based on your requirement. When settled, click the Start Export button to save your created video using photos.
Part 2. FAQs about Turning a Video into a Live Photo
How do I save a video as my live wallpaper on my iPhone?
Open Settings, scroll down and click Wallpaper, Choose New Wallpaper, and then pick the video from your album. Choose whether you want the video for the home screen, lock screen, or both.
How do I save a video as a picture?
For iPhone with Touch ID, play the videos and pause them at the frame you want to capture. Simultaneously press and hold the Home and Sleep or Awake buttons, and then release both buttons. After taking the screenshot, it will be saved to your device's Photos application as an image.
Why did Apple remove live wallpapers?
Apple decided it would prioritize a customizable lock screen instead of live wallpapers. It had to remove the latter so users could use the long-press gesture to customize the iOS lock screen.
Will Live photos work on all iPhone models?
Live Photos are supported on various iPhone models, but older or lower-end models might have limitations. Check your device's compatibility with Live Photos in the settings.
Can I convert Live Photos back to regular photos?
You can save a single frame from a Live Photo as a regular still image. Open the Live Photo in the Photos application, and then click Edit. Afterward, choose the frame you want to keep using the Make Key Photo option.
Conclusion
This post taught you how to turn a video into Live Photo on iPhone using the default method and third-party application. With intoLive, you can enhance your Live Photos by applying filters and changing the speed.
If you have a compilation of images you want to transform into a video, you can use Vidmore Video Converter. It allows you to import as many images as you want and offers several editing features to edit your output.

