How to Make a Live Photo a Video & Edit with Ease
Picture this: you have a Live Photo that is already awesome, but what if you could add a bit of movie-like magic to it? Well, guess what? You totally can! Turning your Live Photo into a video and editing it is possible. It is excellent for sharing on social media because people love watching short videos! So, turning your Live Photo into a video is like making your memories super exciting and enjoyably sharing them! Learn how to make a Live Photo a video from the following details without further ado.

PAGE CONTENT
Part 1. What is Live Photo
A Live Photo is a unique picture you can take with some devices, like iPhones. It is like a regular photo but records a brief movement and sound before and after the picture. So, when you look at the Live Photo, you can see a short, looping video along with the pictures, making the moment feel more alive.
Part 2. How to Make a Live Photo a Video
Have you ever taken a Live Photo and wanted to turn it into a video clip? Well, it is quite easy! And guess what? You can transform that magic moment into a video you can watch and share. Here is how to make a live photo a video:
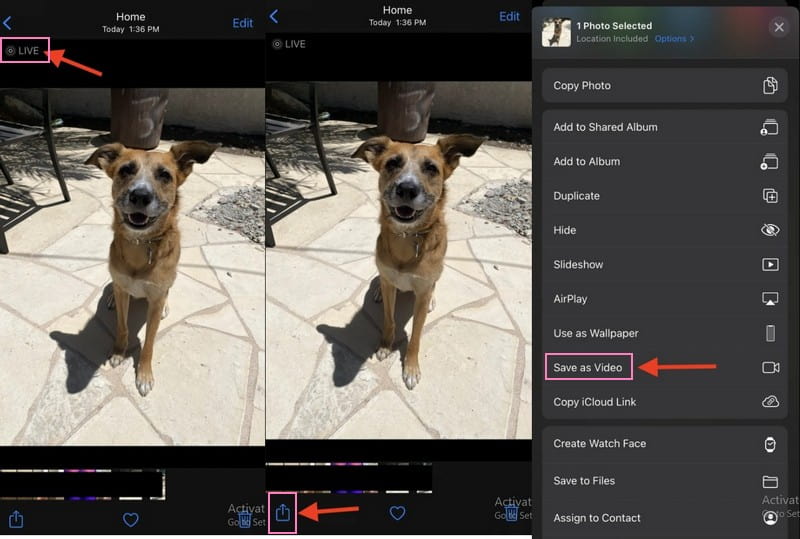
Step 1. Head to your Photos application and search the Live Photo you want to turn into a video.
Step 2. When looking at the Live Photo, swipe up on the screen. It will open a menu with some options.
Step 3. In the menu, you will see different options. Look for a Video or something similar, and click on it.
Step 4. After clicking on Video, the Live Photo will be transformed into a short video. You will see a preview. If you like how it looks, find the option to Save or Export the video.
This way, you will have the Live Photo as a moving video to share or watch. As simple as that, you have learned how to turn Live Photos into video.
Part 3. How to Convert Photo to Video
Are you looking to give your photos a new dimension by turning them into captivating videos? Enter Vidmore Video Converter, a powerful and user-friendly tool that effortlessly converts your favorite photos into videos. Beyond its primary function of converting videos, it can convert photos into engaging videos. It has a built-in feature to convert your photo to video by selecting a specific format. In addition, it offers various editing features to enhance the appearance of your video clips. If you want to create an engaging slideshow or improve your digital memories, Vidmore Video Converter has covered you. Here is how to convert photos to video using Vidmore Video Converter:
Step 1. To begin with, download the software from the official website. Once downloaded, please install the program. Afterward, proceed to open the program to get started.
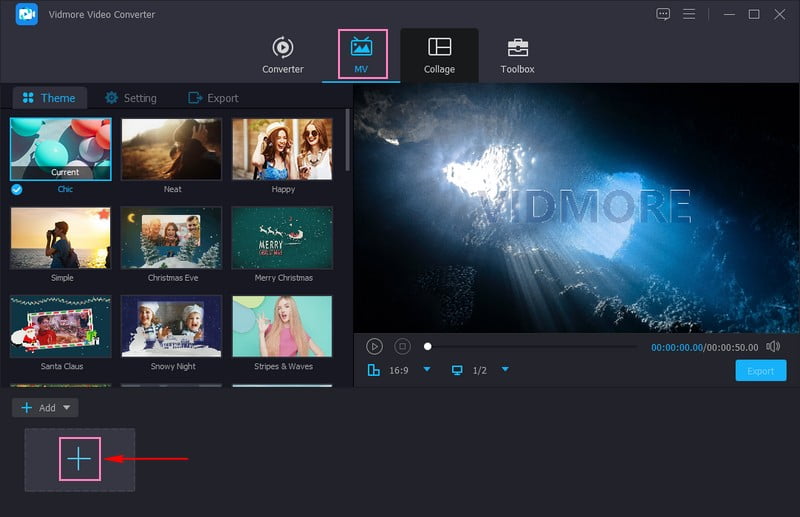
Step 2. Navigate to the MV tab, and on the center part of the interface, you will see an option to import image files. Click the (+) button, select the photos you want to turn into a video and import them.
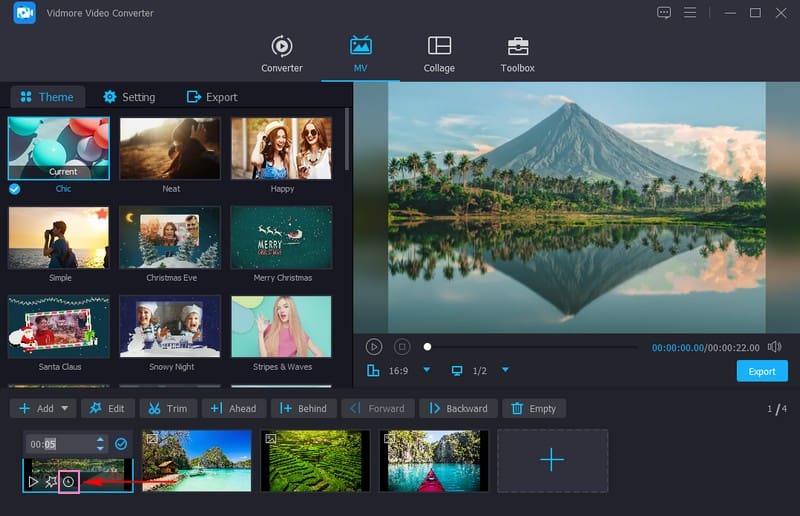
Step 3. To make your photos appear longer in the videos, click the Clock button inside your imported image file. You can input your preferred duration or use the arrow keys to increase or decrease the duration.
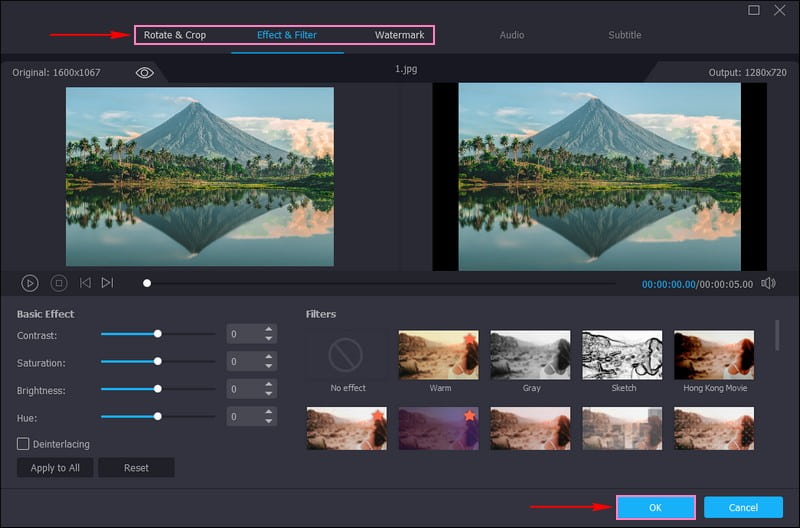
Step 4. Hit the Wand button to edit your output further. Correct your output's position and remove unwanted parts from the Rotate & Crop. Adjust the basic effects, such as saturation, hue, contrast, and brightness, and apply a filter from the Effects & Filters. If you wish to incorporate ownership into your output, go to Watermark, and do your thing. Once done, click the OK button on each feature to apply the changes.
Step 5. You can add a Theme, Start & End Titles, and Background Music on the Themes and Settings options.
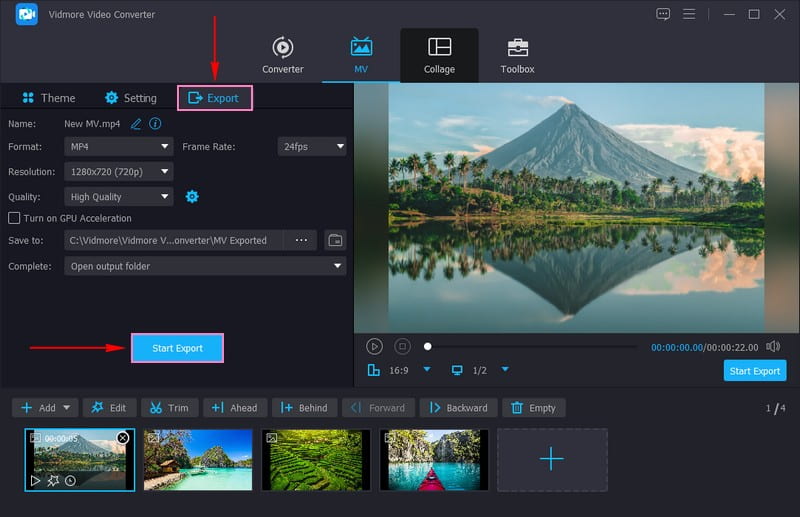
To set up how to convert your photo to a video, go to the Export button to see various options. On the Format, select a video format from the list, such as MP4, MOV, WMV, AVI, and more. Besides Format, you can modify the Resolution, Frame Rate, and Quality according to your requirement. Once settled, press the Start Export button to begin the conversion. Afterward, your converted photo to video will be saved on the local drive.
Bonus Tips: How to Edit Live Photo
So, if you have a Live Photo and you want to make it look even better? Editing it is like adding some special touches to your picture that can make it more awesome. Here is how to edit Live Photos:
Step 1. First, go to your Photos application and find the Live Photo you want to edit.
Step 2. When looking at the Live Photo, you will see an Edit button somewhere.
Step 3. Now you will see different tools to make your Live Photo cooler. You can see things like modifying the brightness, incorporating some color effects, or cropping the picture.
Step 4. While you are making changes, you will see a preview of how your Live Photo will look. If you like your work, click the Save button to keep your changes.
Step 5. Your Live Photo is now all spiffed up! You can enjoy looking at it with your edits. And if you want to show it off, you can share it with your family and friends.
Part 4. FAQs about Making a Live Photo a Video
Why can't I turn my Live Photo into a video?
The Save as Video option will not be available if one of the picked Live Photos has a Live effect applied. In that case, you must return the Live Photos to the original before saving and stitching them as a video.
How do I make a video of my wallpaper?
On newer Androids, launch the Gallery, select the video to use as wallpaper, and then Set as Live Wallpaper. Download the VideoWall or Video Live Wallpaper application for older Androids to make a video as your wallpaper.
How do I turn a live photo into a Tiktok video?
First, convert your Live Photo to a video from the Photos application on your iPhone. Once converted, go to the TikTok application, and press the (+) button to make a new video. On the recording screen, click the Upload button and select the converted Live Photo video from your camera roll. You can edit the video by incorporating effects, text, music, etc. Once done, click the Next button, and post it.
How to convert Live Photos to video on Android?
Install Live Photo to Video Converter and open it to get started. Choose the Live Photo you wish to convert and select the output video format. Once the conversion is done, the video will likely be saved in your device's gallery.
Can I edit the Live Photo video before sharing it?
Yes! You can use Vidmore Video Converter to edit your further output because it offers several editing features you might need.
Conclusion
This post taught you how to save Live Photo as a video, a fun way to bring your memories to life. Moreover, this post presented details on how to convert photos to video using Vidmore Video Converter. Besides the converting capabilities, it offers editing features to make your videos captivating.

