How to Screenshot on Any Area of Screen on Toshiba Laptops in High Quality Pictures
“My friend has a Toshiba laptop and he asked me how to screenshot on Toshiba laptop, how can I answer the question?”
Generally speaking, taking a screenshot on Toshiba laptop and other laptops are quite similar. You only need to find out some important shortcut key on your keyboard. The good news is that this guide will tell you more than one way to do the job on Toshiba laptop. So that you can capture the full screen or any part easily.


Part 1: How to Screenshot on Toshiba Laptop
Method 1: How to Screenshot on Toshiba Laptop with Windows 10
Game DVR is the screenshot tool in Xbox One by default. Then Microsoft introduced it into Windows 10. It means that you can get it if your Toshiba laptop have updated to Windows 10.
Step 1: Go to the Start menu at bottom left corner, select Settings and then Gaming. Next, toggle on Game Bar.
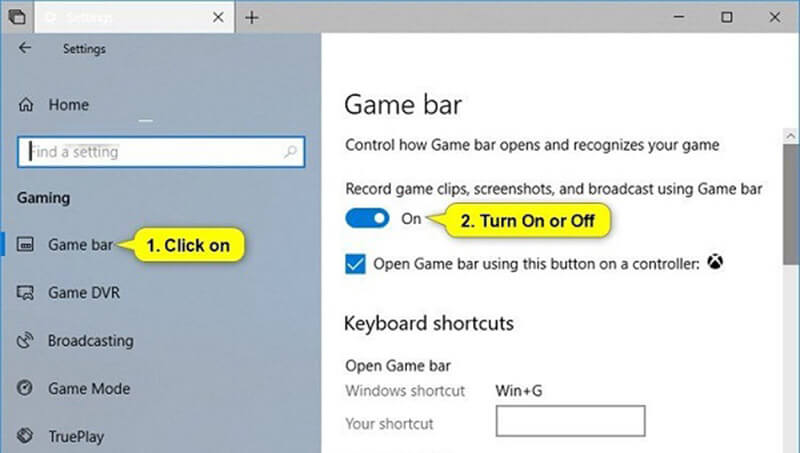
Step 2: Enter the window to screenshot on Toshiba laptop, and press Win + G keys. When prompted, check Yes, this is a game.

Step 3: Then click the Screenshot button with a camera icon to take a screenshot immediately.
Note: The screenshot will be saved in PNG format and stored in your video library. It can only screenshot full screen.
This way is also available for taking screenshots on Lenovo, Dell, etc.
Method 2: How to Screenshot on Toshiba Laptop Running Windows 8
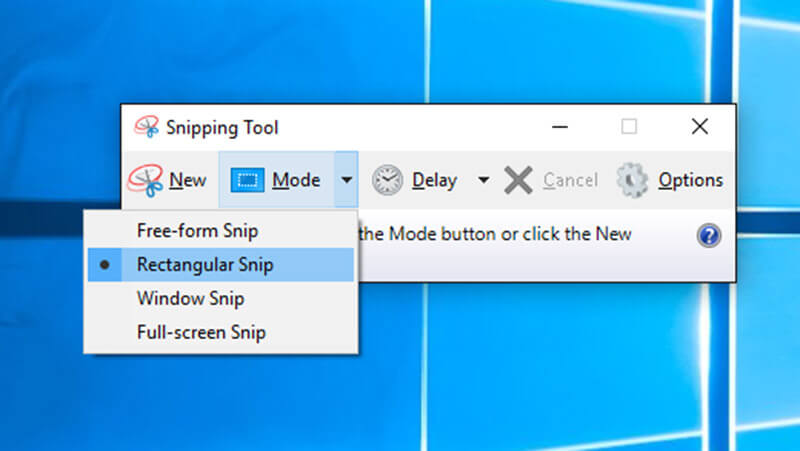
Snipping Tool is the built-in screenshot program on Windows Vista and later. So, you can use it to screenshot on Toshiba laptop.
Step 1: Swipe in from the right edge of your screen, click Search and type snipping tool in the search box. Then select Snipping Tool from the result.
Tip: For other Windows systems, find Snipping Tool in Start menu.
Step 2: Click the Mode menu and pick a proper mode, such as Rectangular. Then click New and take a screenshot on Toshiba with your mouse.
Step 3: Release mouse and the screenshot will appear in Snipping Tool. Now, you can edit it.
Step 4: Finally, click the Save button to save the screenshot or hit the Clipboard icon to send it to clipboard.
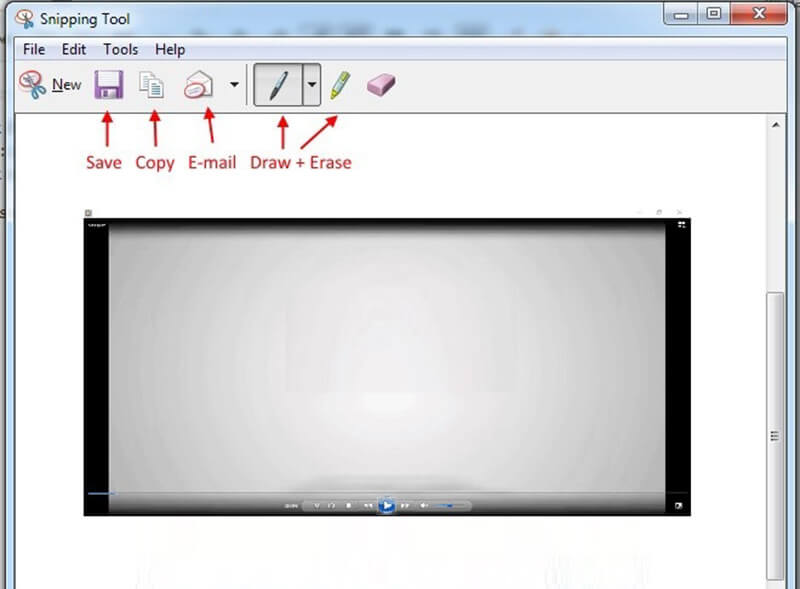
Note: If you wish to change the output format or destination, click Options.
Method 3: How to Screenshot on Toshiba with Windows 7
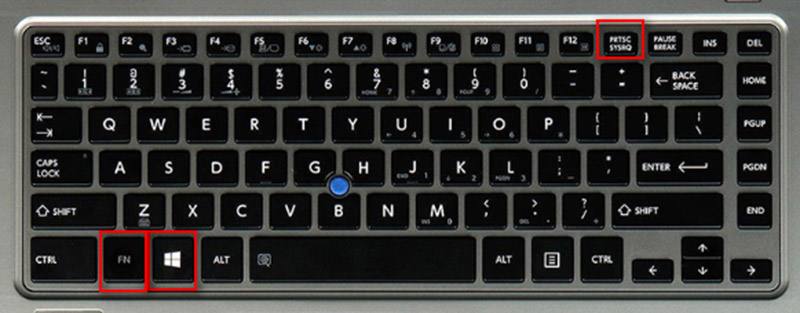
There is another way to screenshot on Toshiba laptop, the Print Screen key on your keyboard. On Toshiba laptops, the key may be labeled Print Scr, PrtScr, Prt Sc, or PrtScn. For compact keyboards, the print screen key may be integrated into other function keys and you can find it on Toshiba website.
Step 1: Once press the Print Screen key, the screenshot for full screen will be sent to clipboard.
Step 2: Open Microsoft Paint and paste the screenshot by hitting Ctrl + V.
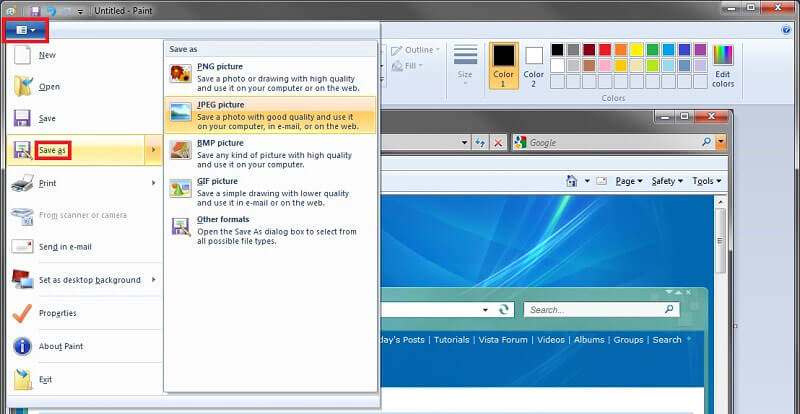
Step 3: Go to File menu, select Save as and choose a proper format, like JPEG. Then locate the desired folder, enter a filename, and click Save button.
For the details about taking screenshots on Windows computer, you can check it here.
Part 2: Best Free Way to Screenshot on Toshiba Laptop
In addition to the built-in screenshot functions, you can also try some third-party software, such as Vidmore Screen Recorder. It is a full-featured screenshot utility for Toshiba laptops and other machines. Everyone can use it without paying a penny.
Main Features of the Best Screenshot Tool for Toshiba
- Take screenshot for full screen, custom region, or a window.
- Screenshot on Toshiba laptops with customize hotkey.
- Edit screenshots in real time.
How to Take a Screenshot on Toshiba Laptop
Step 1: Install Screen Recorder
Launch the best screenshot tool after you installed it on your Toshiba laptop. There is another version for Mac. Then click the Menu icon and choose Preferences to open the popup dialog. Go to the Output tab, and set Location of screenshot files and Screenshot format according to your preference. If you prefer to hotkey, go to Hotkeys tab and set Screen Capture.

Step 2: Screenshot on Toshiba
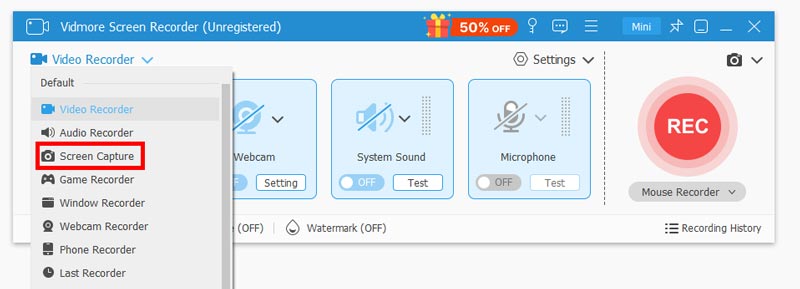
Open the window or screen that you wish to screenshot, and click Screen Capture in the main interface. Then your cursor will turn to a cross. Here you have two options:
To screenshot a window on Toshiba laptop, click on it.
If you wish to screenshot a custom region or full screen, just click and drag your left mouse to cover the desired area.
Step 3: Edit and save screenshot
Once you release your mouse, the menu bar will show up. Now, you can edit the screenshot:
Add shape: Select the desired shape and choose your favorite color, place it to the right position on screenshot.
Add text: Select T icon, set the font, size and color, click on the screenshot and enter the texts.
Add painting: Choose the Pen tool, pick the right color, and then draw on the screenshot easily.
After editing, click the Save button to export the screenshot to your hard drive or choose Clipboard to send it to your clipboard.

Part 3: FAQs of Screenshot on Toshiba Laptop
How do I do a screenshot on Toshiba with Windows XP?
First, the Print Screen key is the easiest way to take a screenshot for full screen on Windows XP. Plus, the Snipping Tool is available on Windows XP as well.
How do I enable the Fn key on my Toshiba laptop?
On some Toshiba laptops, you have to use Fn and another key to take a screenshot. To enable it, go to Start menu, select All programs or Programs and then Toshiba. Head to Utilities and then Accessibility, and check the box next to Fn key.
How do I use screenshot hotkeys on Toshiba laptop?
The screenshot hotkeys on Toshiba laptop include:Win + Print Screen: Screenshot entire screen and save it as an image.Alt + Print Screen: Take a screenshot of the active window and save it to clipboard.Win + Shift + S: Screenshot custom region.
Conclusion
This guide has told you how to take a screenshot on Toshiba laptops running Windows 10/8/7 and earlier. As an important function, screenshot is useful to save a window, full screen or a custom region. In addition to default methods, you can also try Vidmore Screen Recorder, which is total free to use. More troubles? Please leave a message below.
