Practical Tutorial: How to Compress the Audio File in iTunes and Use an Optimal Alternative
For music lovers, enjoying high-quality music listening is their ultimate pursuit. Music producers aim to enhance audio quality as audio technology evolves to improve our listening experience all the time. However, the listening experience upgrades with the expansion of the audio file size. So, when we emphasize the listening quality, we need to consider the storage capacity of our devices. Nonetheless, this article will show you how to compress the audio files in iTunes without downgrading its original fidelity.

PAGE CONTENT
Part 1. Can I Compress Audio Files in iTunes?
Yes, it can. When it comes to compressing the audio file, you can choose the exceptional built-in application on your Mac: iTunes. You can also download it from the Microsoft Store if you use a PC. Developed by Apple Inc., iTunes is a software program that performs as a media player, media library, mobile device management utility, as well as the client app for the iTunes Store. It allows the users to manage their audio files to download, play, and convert with audiobooks, ringtones, and podcasts.
With this software, you can easily change the audio’s bitrate to compress the file size.
Part 2. How to Compress Audio Files in iTunes?
In Part 1, we have mentioned that you need to download this software to your desktop. Then, follow the steps below to compress your audio files.
Step 1. Find Preferences Settings
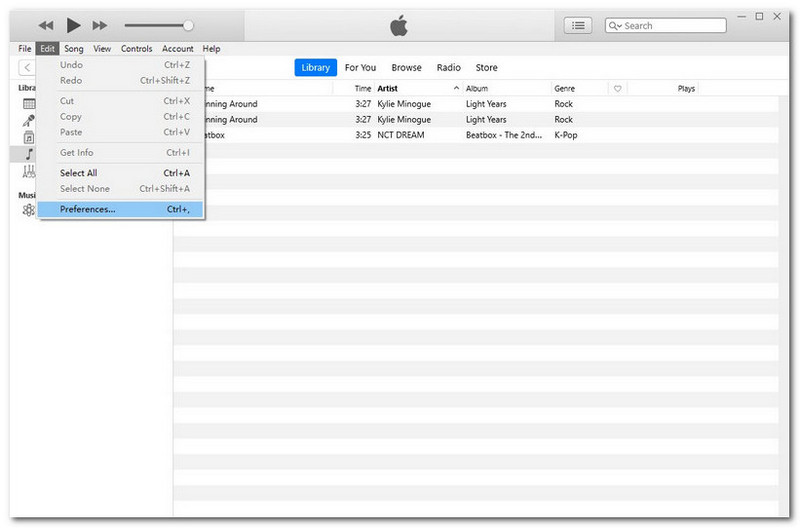
After you launch the iTunes, You will see the beginning interface as shown below.
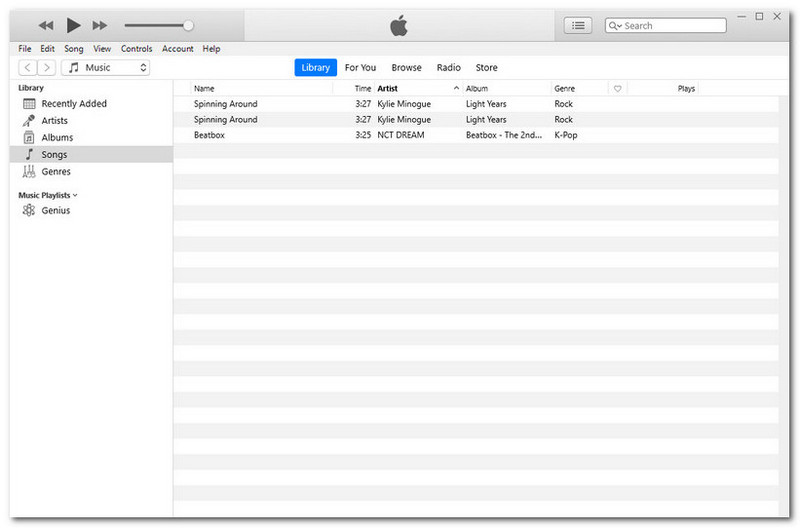
Choose Edit on the top-left menu bar. Then, click the Preferences at the bottom end.
Step 2. Find Import Settings
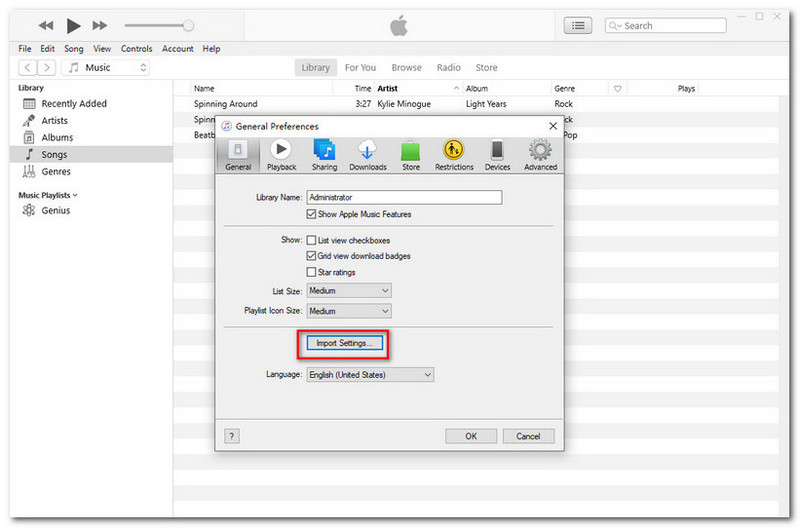
After the last step, there will be a pop-up window: General Preferences. Click the Import Settings.
Step 3. Import Settings
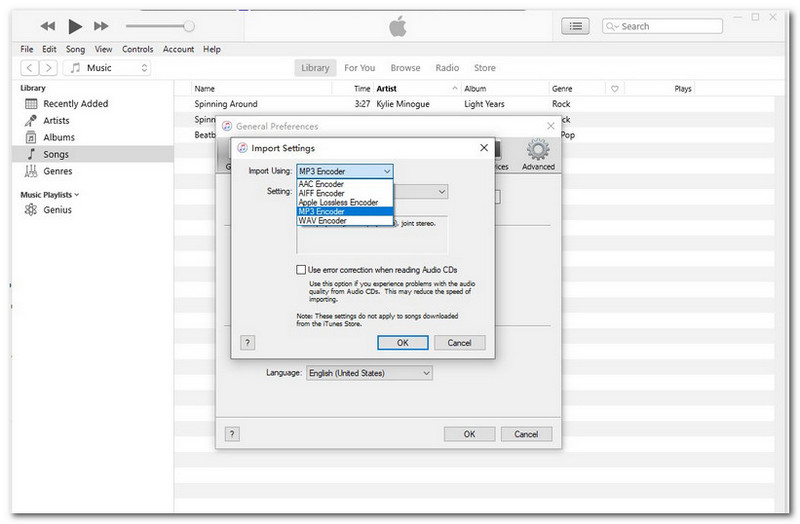
From the interface of Import Settings, click Import Using. Select MP3 Encoder from the drop-down menu.
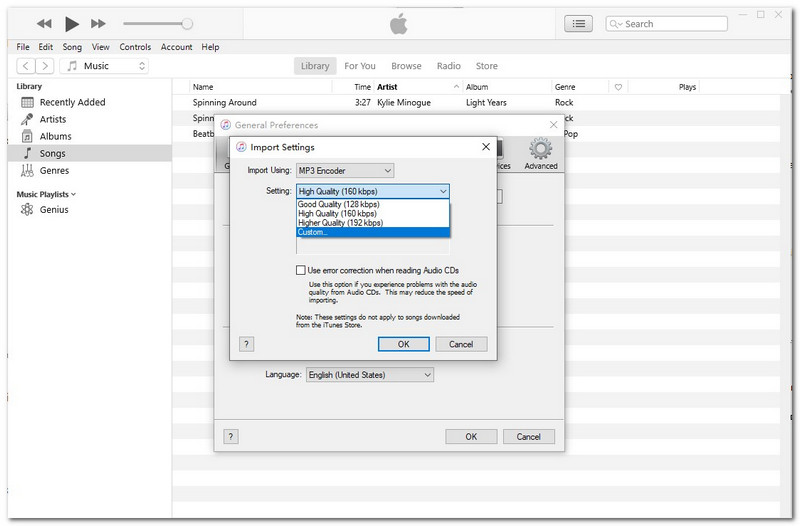
Under here, click the drop-down button of Settings to fine-tune the bitrate from good to higher. Or you can select Custom to set your own. Then, click OK to confirm your settings.
Step 4. Start Compressing
When all the above steps are done, right-click the audio file in your Library. Then, select Create MP3 Version. You will wait for a while for the converting process. And finally, you can see the file size has been reduced.
Part 3. How to Compress Audio Files in iTunes Alternative?
Even though compressing the audio files in iTunes is fast and convenient, there still are limitations. For example, the audio compressor does not work sometimes. Besides, you will lose the original quality of your file by lowering its bitrate. Because the level of bitrate is also one of the factors affecting file quality. It’s hard to make a balance between file size and output quality.
But if you use Vidmore Video Converter, we confidently guarantee that this one will keep your audio quality during its compression. Various audio formats are supported by it. More importantly, it will compress your audio file with high-quality output. If you are a beginner in the audio editing area, this one can help you get it on easily. More features are shown below.
- Almost all audio file formats are supported, including MP3, WAV, WMA, M4A, AAC, AC3, etc.
- Compatible with different kinds of devices, including Apple and Android.
- Preserve the original quality of your audio file.
- Overall operation is user-friendly, especially beginner-friendly.
- High-speed processing algorithms to accelerate the compression 50x faster.

Try the following instructions to compress audio files on Windows.
Step 1. Launch the Software
As for preparation, click the official links above to download the current version of Vidmore Video Converter. Then, launch it.
Step 2. Select Your Target Audio File
Click Add Files at the top-left corner under the four major functions. You can choose the target audio file that needs to be compressed.
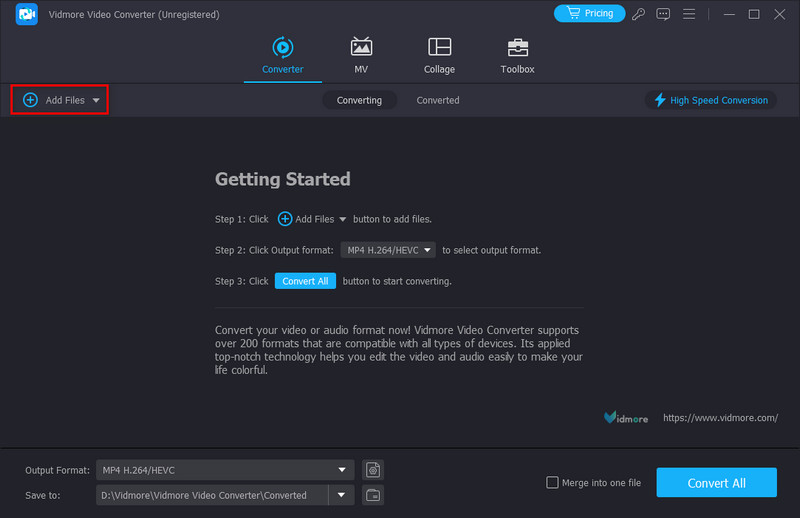
Step 3. Customize Your Output Formats
When your file is added, click the icon named MP4 at the top-right corner. Choose the Audio section to adjust the bitrate for the resulting quality.
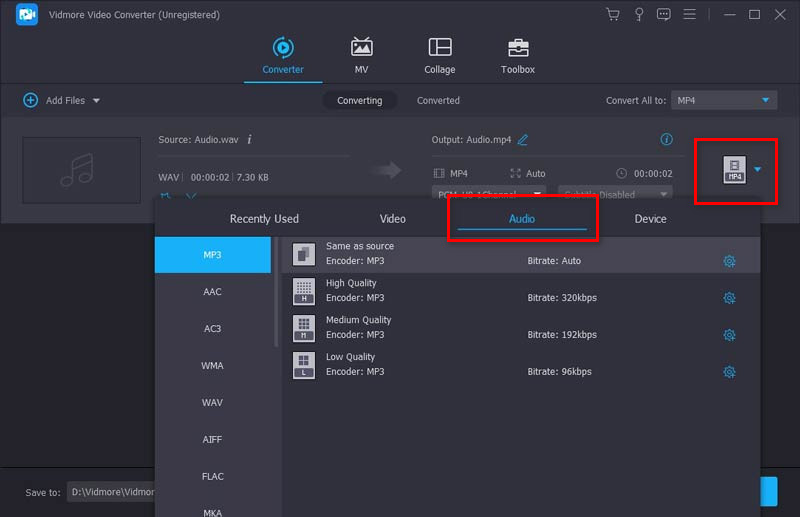
Step 4. Select Your Storage Destination
Click Save to at the bottom left to select a storage destination for your resulting file. At last, you can click Convert All at the bottom-right corner to start your compression.
Tip:
When compression audio in Vidmore Video Converter, the built-in Noise Remover can help remove your audio background noise. In this case, your output audio file might sound clear and better even after compression.
Part 4. FAQs about Compressing Audio Files in iTunes
What format is iTunes lossless?
A compression format that Apple developed on its own, converts your audio into AAC format by default. Or you can choose different encoding options, like AIFF, Apple Lossless, MP3, and WAV. This is Apple’s own audio compression technology, Apple Lossless Audio Codec (ALAC), ranging from 16-bit/44.1 kHz (CD Quality) up to 24-bit/192 kHz. It preserves all the original data.
Does compression reduce audio quality?
Compression means you will get a smaller file size by losing a good chunk of the audio file data. As a result, you’ll also lose some of the sound quality.
Does Apple Music compress audio?
No, it does not. According to Apple Support, they will deliver music using lossless audio compression to platforms like iPhone, iPad, Mac, and Apple TV.
Conclusion
Now, you have already learned how to compress the audio files in iTunes. This is a really precise and accessible program. However, the compression function it offers isn't that stable and high-quality. Most applications in the market also find it hard to balance the file size and audio quality. So, if you want to reduce the audio file size to a better result, the Vidmore Video Converter can be an ideal choice. It will make you never worry about the limited internal storage of your device. Still hesitate to try it? You must click the download links above to prove it is the best.
