Edit Background Image in PowerPoint in 3 Easy Steps
One of the well-known tools for presenting a visual aid is PowerPoint. PowerPoint provides a wide array of tools and choices to assist most people in creating visually appealing presentations. Using background pictures and graphics is one of the alternatives available if presenters want to get the attention of their audiences. Why settle for a standard and straightforward slide design when you can create something unique? This post will learn how to edit background graphics in PowerPoint by seeing the simple steps below.

- Part 1. Guide on Editing the Background Image Online
- Part 2. How to Edit the Background Picture in Powerpoint
- Part 3. FAQs on Editing a Background Graphic in PowerPoint
Part 1. Guide on Editing the Background Image Online
Suppose you want an easy-to-navigate photo editor in editing the background of your picture. In that situation, you can use an online tool. And one of the most trusted programs is the Vidmore Background Remover Online. It is a background remover containing artificial intelligence, which helps to make the editing a convenient one. With the help of AI or artificial intelligence, you won't have to shade the parts that you want to keep or erase in the picture. Because it automatically eliminates the background once you upload it.
Vidmore Background Remover Online is a very friendly photo editor wherein even beginners are fond of it. Without prior knowledge in editing, users can edit the background of their image according to their preference. It possesses essential editing tools such as cropping, rotating, and flipping. Aside from that, Vidmore wins when it comes to versatility because users can access it on Android, iPhone, Windows, and Mac devices. Lastly, it supports different image formats such as JPG and PNG. If you prefer this easy solution in editing the background image of your powerpoint, you may use the steps below.
Step 1: On your device, navigate the browser and search for the Vidmore Background Remover Online. Once you reach the main page, press the Upload Portrait icon, or you can drop your file on the interface automatically.

Step 2: After dropping the image on the main page, the artificial intelligence will assess it and immediately remove the background. After that, you can now start editing your pictures. Begin by tapping the Edit icon on top of the image.
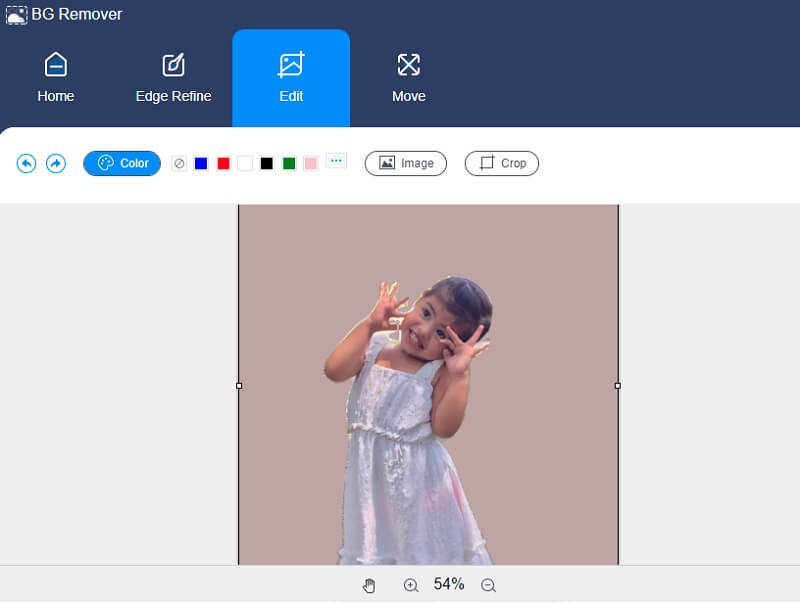
Step 3: Once the Edit tab shows you the other editing tools such as Image, Color and Crop. To start editing the graphics, proceed by editing the background by choosing the color from the Color button.
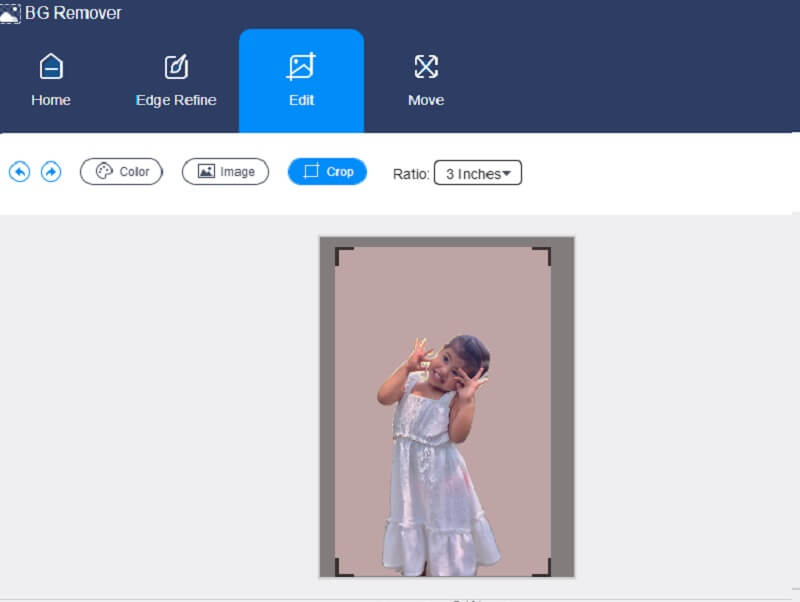
If you see that your image has a lot of space, you can modify the size by clicking the Crop button on the right part of the image. The Ratio will show you the different sizes, choose the one you prefer. But if you are still left displeased, you can move the cropping tools manually.
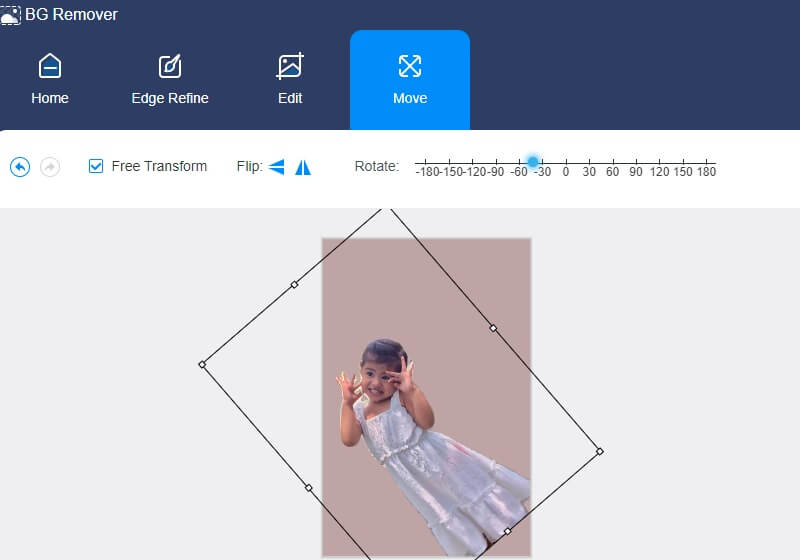
Another editing tool that Vidmore offers is the flipping and rotating option. Tap the Move tab, and it will show you the Slider and the Triangle icon on the upper part. If you want to rotate your image, move the Slider from left or right until you reach the proportion you want. And if you want to twist your image, click the Triangle symbols.
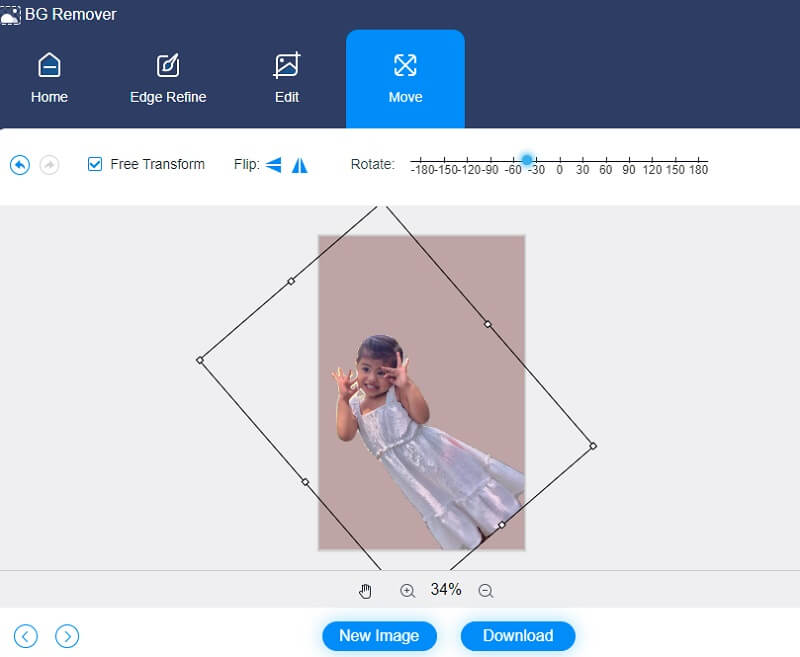
Step 4: Are you satisfied with the result? You can now apply the changes you have made. Press the Download button below and look for your edited image in your Folder.
Part 2. How to Edit the Background Picture in Powerpoint
Presentation software, such as PowerPoint, was created by Microsoft to allow users to build a slideshow of essential data such as charts and photos for use in a presentation. The ability to modify photographs in PowerPoint is another tool at your disposal. PowerPoint is an excellent alternative if you don't have Photoshop or are intimidated by its depth. It is possible to conduct a great deal of basic picture editing to improve the photographs that you have included in your presentation.
Other individuals may be interested in having visually appealing visual aids, so they are devoting their time to editing the photographs included in the slideshow. As a result, you will learn how to edit the background image in PowerPoint in this section.
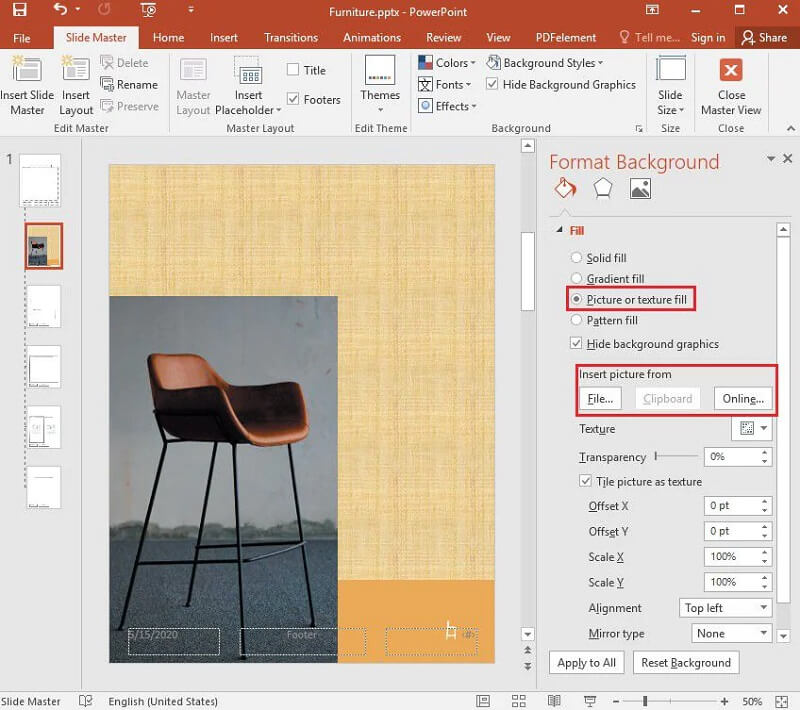
Step 1: Access the PowerPoint presentation, choose View and tap the Slide Master from the drop-down menu. Then, at the top of the thumbnail panel on the left, you may choose Slide Master from the drop-down menu. Following that, a ribbon will open, and you will need to pick Background Styles and then the Format Background item from the drop-down menu.
Step 2: Next, in the Format Background tab, choose Picture or Texture Fill if you wish to use images or graphics from your computer to decorate the background. Then go to the image and press the Insert button. You can use the picture to fill the backdrop of the slide master and all of the layout experts below it.
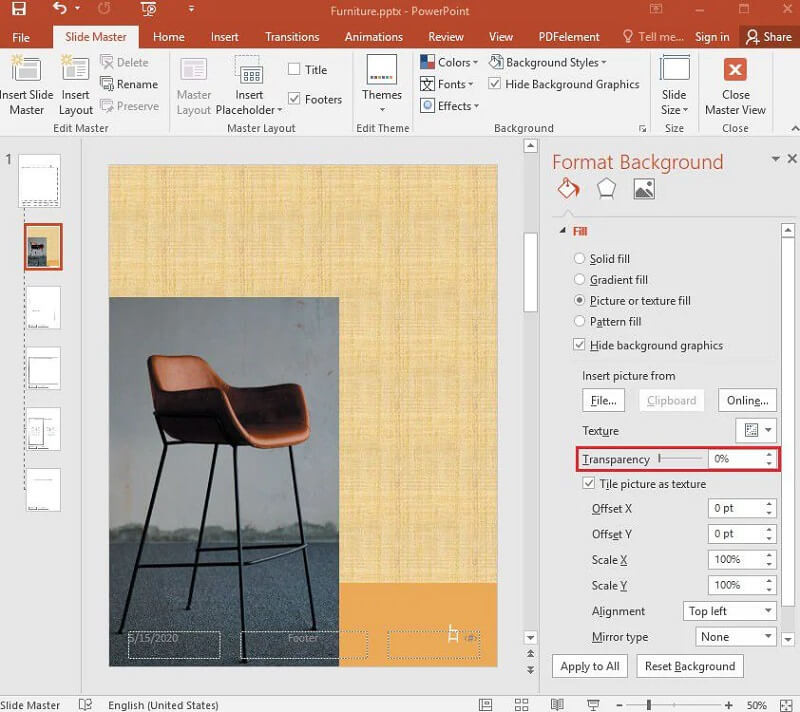
Step 3: Final step is to create a watermark effect by going to the Format Background tab and dragging the Transparency bar to the right to modify the opacity percentage of the image.
Part 3. FAQs on Editing a Background Graphic in PowerPoint
What are the drawbacks of using graphics in a presentation?
When incorporating images in a presentation, it is possible to encounter technical difficulties. A PowerPoint projector or an overhead projector may fail to function correctly during a presentation. Failures in the technical department will divert the audience's attention and diminish the impact of your presentation.
How do you make a PowerPoint slide appear suitable?
To present a professional image, Create a copy of your picture by pressing Ctrl+D on your keyboard and selecting Artistic Effects from the Picture Tools tab at the top of your screen. Choose Blur and then add a Fade motion after the previous to your blurred image to make it more interesting.
What role do photos have in PowerPoint?
The objective of visuals on each slide is to assist the audience in putting their thoughts into perspective with their own experiences. Suppose you use too many words or visuals in your presentation. In that case, people will spend more time looking at your slides than listening to your vocal presentation.
Conclusions
Having an attractive image in a presentation is guaranteed to get your audience's attention. And for that to be possible, you should learn how to edit the background image in PowerPoint. And by reading the post above, you can do it without difficulty. But since the editing tools of Powerpoint are pretty limited, you can switch to the best background editor online, which is the Vidmore Background Remover Online. All the basic editing tools you need are in that online program!
